Showing posts with label Mini Book. Show all posts

Thursday, January 30, 2025

Paint Sampler Notebook

Hi friends! I hope you are well! Today I have a notebook tutorial to share using mainly patterned papers. You can easily turn it into a sketchbook instead, by just using different papers for the inside.

Please note: this post has affiliate links, for which I receive a small percentage of sales generated by the link, at no extra cost to you.
Layers of ink - Paint Sampler Notebook Tutorial by Anna-Karin Evaldsson.

I really like the papers in Tim Holtz various Backdrops paper packs and they are great when it comes to making your own notebook or sketchbook. Here I mainly used papers from the Christmas Backdrops pack. The cover was embellished with stamping, sentiments and sequins.

Prepare patterned papers for the journal.

Start by deciding which papers that you want to use. I cut out some of the paint samplers. 

Stamp with Simon Says Stamp Create.


Stamp with Tim Holtz School Desk.

Stamp the cover here and there with the alphabet stamp from Tim Holtz School Desk set and a coffee stain stamp. I stamped both the back and the front cover.

Bind the notebook.

Cut pages for the inserts. One of my favorite things with making my own notebooks is that I can use my favorite papers. Here I used fairly thin notebook paper, but I often use watercolor paper instead. Make a template and attach it to the cover and the inserts as show. Pierce holes.


Stitch the spine with embroidery floss. 

Use your favorite paper for the inserts of the journal.

Tie the floss on the inside and trim the cover with a craft knife.


I distressed and tore some of the edges. 


These paint samples are great. You can also use them to cover the entire notebook. The smaller sentiments come from Simon Says Stamp Create and were stamped with brown ink and die cut with the coordinating dies.

Stamp a sentiment for the notebook.

I like how the patterned paper shows through the stamped title. I also glued a bunch of sequins to the background.


Stamp a ticket from Simon Says Stamp Mixed Labels and die cut with the coordinating die. Fold the ticket over the edge of the cover and add a stamped and die cut sentiment. 


The Backdrops papers are double-sided, so inside covers are patterned too.

Layers of ink - Paint Sampler Notebook Tutorial by Anna-Karin Evaldsson.

Handmade notebooks are great gifts and I like having one in my bag at all times.

Layers of ink - Patterned Paper Notebook Tutorial by Anna-Karin Evaldsson.

I hope this inspired you to make your own notebook. It is a great way to use your favorite patterned papers. 


Thank you for visiting!

Happy crafting!

Anna-Karin

Supplies:

* Please note: the links are affiliate links, for which I receive a small percentage of sales generated by the link, at no extra cost to you.


Wednesday, November 20, 2024

Frostie December Journal

Hi crafters! One of my favorite projects of the year is my December Daily journal, inspired by Ali Edwards concept of documenting the month of December. I have been doing this since 2012, making this my thirteenth December daily journal.

We are getting our first snow of the year as I type this, so it might soon be time for a snowman.

Please note: this post has affiliate links, for which I receive a small percentage of sales generated by the link, at no extra cost to you.

Layers of ink - December Daily watercolor journal tutorial by Anna-Karin Evaldsson.

When I saw Tim Holtz Mr. Frostie, I knew I wanted him on the cover of my journal. My journals have looked different through the years, but the focus is on words rather than on adding photos, to make it easier to document each day. This year I made a journal with a stamped and watercolored cover. The book is 5.5x6.3 in and my December countdown tags will go into it. Although they might not be tags this year. I will share that post in a couple of days.

Stamp Tim Holtz Mr Frostie on watercolor paper.

Start by stamping Mr. Frostie and the tree on watercolor paper with Archival Jet Black ink.

Extend the stamped image with pens.

I used pens to extend the tree and create more snowy ground.

Paint the snowman and tree with watercolors.

Paint the snowman, tree and snow with watercolors. Drop in darker shades to create shadows. 

Paint the sky with Ultramarine.

Paint a light layer of blue for the sky.

Add details and highlights with a black pen and a white gel pen.

Add details and highlights with a black pen and a white gel pen. The white gel pen can also be used to create snow. 

Die cut the sentiment with Tim Holtz Vault Seasonal Sketch.


Round the corners.

I used Sizzix Little Sizzles Mat Board for the covers. Glue the watercolor paper to the mat board and place under a heavy book. Round the corners and punch two holes along the other edge. Cut pages from your favorite paper. I used a paper good for writing, but often also use sketch paper or watercolor paper.


The back cover was covered with one of Tim Holtz Christmas Backdrops papers. I love the backdrops papers.

Add Simon Says Stamp Pawsitively Dazzling Gems.

For sparkle and more snow, I added Simon Says Stamp Pawsitively Dazzling Clear Gems

Stamp sentiments.

I stamped this sentiment from Tim's Tiny Text Christmas on the background first, but it ended up difficult to read because of a couple of those splattered dots. Instead, I stamped it on white paper, cut into a strip and covered up the bad stamping.

Tim Holtz Stamper's Anonymous Mr. Frostie.

This is such a great stamp! I really like snowmen. There is something so joyful about them. 

Tim Holtz Stamper's Anonymous Mr. Frostie.

There is also a gem on mr. Frostie's hat. 

Stamp the sentiment with Simon Says Stamp Season's Greetings.

Don't forget to add some shadows. No need for perfection! This sentiment comes from Simon Says Stamp Season's Greetings. 

The letters were die cut from Simon Says Stamp white glitter paper.

I glued the letters unevenly on purpose, for a playful look. 

Add Tim Holtz idea-ology Christmas layers.

I also added a few Tim Holtz Christmas Emporium Layers to the inside. 


These vintage artificial snow adds are so pretty.

Layers of ink - December Daily journal tutorial by Anna-Karin Evaldsson.

You can also turn this design into a Christmas card. 

I am looking forward to filling my journal with memories.

You can find my previous Christmas Daily journals here:


Thank you for stopping by!


Happy Christmas crafting!

Anna-Karin

Supplies:

* Please note: the links are affiliate links, for which I receive a small percentage of sales generated by the link, at no extra cost to you.


Sunday, August 18, 2024

Postage Stamp Notebook

Hello crafters! Today I am happy to have a tutorial on the Simon Says Stamp store blog.

Layers of ink - Postage Stamp Notebook Tutorial by Anna-Karin Evaldsson.


Ever since I was a small child, I liked notebooks, sketchbooks and journals. Big ones, small ones, pretty ones, interesting ones and almost any type of notebook. I still like notebooks just as much and often make my own. Today, I am going to share an easy notebook/sketchbook with a stitched spine.

When I saw Tim Holtz Postmarked Sticker Book, I thought it would look great to cover an entire notebook front cover with the colorful stamps. The stamps are so pretty that all you need to add is a title and some sentiments. If you don’t want to make a notebook, you can use the cover design on a card instead.

To see the tutorial and all the details, head over to the Simon Says Stamp Store blog

Thank you so much for stopping by here today! 


Anna-Karin


Monday, April 8, 2024

Vintage Floral Notebook

Hi stampers! It is a new week and I hope you had a good weekend. The Easter holiday is over here and gave a mix of sunny and freezing cold weather.

Please note: this post has affiliate links, for which I receive a small percentage of sales generated by the link, at no extra cost to you.


This week we have a Spring Flowers theme at the Simon Says Stamp Monday Challenge Blog. I love seeing how one spring flower after another appear at this time of the year, sometimes seemingly overnight. 

Don't miss the lovely project by our April guest Estelle Palumbo aka Atouscrap.

Layers of ink - Vintage Floral Notebook Tutorial by Anna-Karin Evaldsson.

I made a notebook/journal this week using a mix of idea-ology papers and ephemera and some stamping. The book is stitched along the spine and I used fairly thin notebook paper for the insert. You can of course use any paper that you want. In most of my handmade books, I used either sketch paper or watercolor paper. The book is about 4x5.8 in.

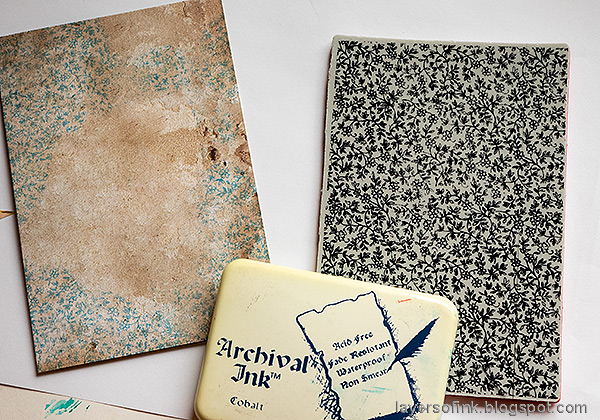
Layers of ink - Vintage Floral Notebook Tutorial by Anna-Karin Evaldsson. Stamp with Tim Holtz Tiny Prints

I used a piece of Tim Holtz Backdrops Vol. 4 paper for my cover and stamped it here and there with a Tim Holtz Tiny Prints floral stamp and Cobalt Archival Ink. That is one of my oldest ink pads, and it is still going strong.

Layers of ink - Vintage Floral Notebook Tutorial by Anna-Karin Evaldsson.

Pick out some ephemera, old book paper, and more Backdrops paper. Ink and distress the edges. I also used a piece of Tim Holtz fabric. Fray the edges of the fabric. Stamp sentiments on the cover and the focal image. The focal image comes from Tim's Palette Ephemera pack.

Layers of ink - Vintage Floral Notebook Tutorial by Anna-Karin Evaldsson. Pierce holes through the spine.

Fold papers for the insert and score with a bone folder. Make a template and pierce holes along the spine.

Layers of ink - Vintage Floral Notebook Tutorial by Anna-Karin Evaldsson. Stitch along the spine.

Stitch along the spine with a saddle stitch. I used three strands of DMC floss.

Layers of ink - Vintage Floral Notebook Tutorial by Anna-Karin Evaldsson.

Tie on the inside.

Layers of ink - Vintage Floral Notebook Tutorial by Anna-Karin Evaldsson.

I trimmed the notebook around the edges before gluing everything in place.

Layers of ink - Vintage Floral Notebook Tutorial by Anna-Karin Evaldsson. Add ephemera.

The gold circle was die cut with Simon Says Stamp Thin Frames. I found it on my desk and added it to the notebook.

Layers of ink - Vintage Floral Notebook Tutorial by Anna-Karin Evaldsson.

The floral card was inked with Antique Linen and Frayed Burlap. The top sentiment comes from Simon Says Stamp Laugh in Flowers. I stamped 'remember' and cut into a strip. It was used to cover up the message that was printed on the little notecard. 

Layers of ink - Vintage Floral Notebook Tutorial by Anna-Karin Evaldsson.

The main sentiment also comes from Laugh in Flowers. The butterflies are from Tim's Field Notes Snippets.

Layers of ink - Vintage Floral Notebook Tutorial by Anna-Karin Evaldsson.

The back cover was left with only the stamping. I also inked the edges around the notebook with Uncharted Mariner and Scorched Timber. I am very fond or how those two inks blend into a gorgeous shade of brownish grey.

Layers of ink - Vintage Floral Notebook Tutorial by Anna-Karin Evaldsson.

You can also stitch with a sewing machine, or use staples.

Layers of ink - Vintage Floral Notebook Tutorial by Anna-Karin Evaldsson.


I hope you will join us this week in our Spring Flowers challenge. You have a chance to win a $25 gift voucher to do some fun shopping at Simon Says Stamp. You have until Monday 8am Ohio time. 1pm UK time, 2 pm CET to join in.


Do you use Instagram? If so please add #sssmchallenge so we can see your entries there too.


Thank you so much for stopping by here today! 

Happy crafting!

Anna-Karin

Supplies:

* Please note: the links are affiliate links, for which I receive a small percentage of sales generated by the link, at no extra cost to you.