Hello friends! I hope you had a wonderful Christmas! Today I am sharing a winter decoration. We have had very little snow so far this season, but hopefully it will come.
Please note: this post has affiliate links, for which I receive a small percentage of sales generated by the link, at no extra cost to you.

I like having winter decorations which aren't Christmas themed. When Christmas is over, I keep the winter themed decor items out until spring time. Here is a little family of deer in a snowy forest. The base is a wood slice and I used idea-ology items to create the scene, in addition to my favorite way to make snow.

The deer from Tim Holtz Salvaged Reindeer were colored with alcohol ink. I like how the alcohol ink brought out the great texture of the deer. They also stay shiny. You can use Distress Paint instead of alcohol ink.

The three Tim Holtz Woodland Tree Lot were colored in an ombre fashion using Distress Paint. Mist the tree with water. Place the paint in a plastic bag and place the tree in the bag. Press to make sure you get paint everywhere. Let dry.

When the paint and the deer were dry, I applied texture paste mixed with a tiny bit of white paint to the trees and to the deer. Sprinkle with Mica Flakes and then with Rock Candy Glitter.

Apply a thick layer of texture paste to the wood slice and press the deer and the trees into the paste. The paste will act as a glue. Sprinkle with Mica Flakes first and then with Rock Candy Glitter.
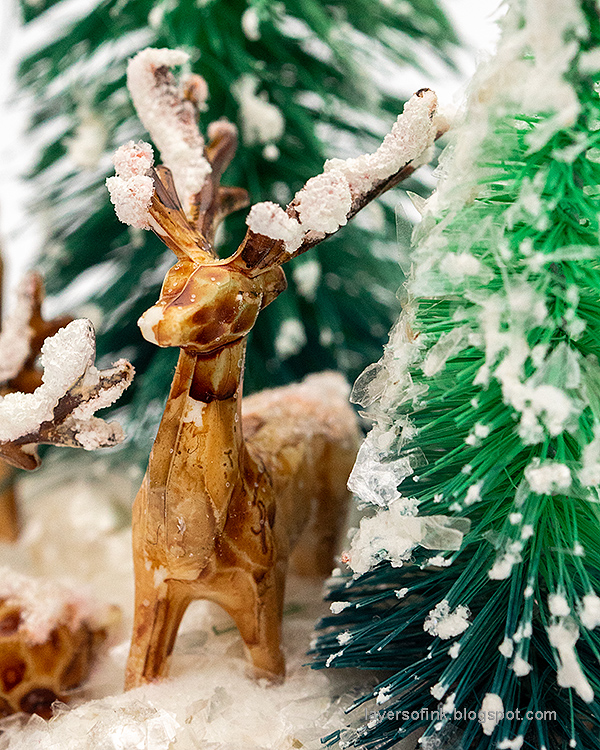
The snow looks thick since the deer sink into it.

I also added Tim Holtz Baubles here and there. Apply a little Distress Matte Medium on top and sprinkle with glitter.

You can add even more snow to the trees, but I wanted the ombre colors to still be visible.

I really like the shapes of these Salvaged Reindeer.

When I took these photos, we did have some snow, but it is all gone again now.

You can of course use a different base and make your forest even bigger.

Thank you for visiting!
Happy crafting!
Anna-Karin
Supplies:
* Please note: the links are affiliate links, for which I receive a small percentage of sales generated by the link, at no extra cost to you.
* Please note: the links are affiliate links, for which I receive a small percentage of sales generated by the link, at no extra cost to you.


%20(1).jpg)