Showing posts with label Eileen Hull. Show all posts

Saturday, January 28, 2023

Vintage Journal Tutorial

Hi friends! I hope you are well and that your are enjoying your weekend. Today I have a journal / notebook tutorial to share with fun mixed media techniques, and using a couple of second hand finds.

Please note: this post has affiliate links, for which I receive a small percentage of sales generated by the link, at no extra cost to you.

Layers of ink - Vintage Journal Tutorial by Anna-Karin Evaldsson.

I found a couple of these old photo frames in a second hand store recently and thought it was time to use one of them. I removed the image that was in the frame and used a childhood photo of myself instead, after going through a pile of photos to see what might fit the size. The journal was made with Eileen Hull's Sizzix Frame Pocket Journal Scoreboards Plus die. You can also use the techniques for other journal dies.

Layers of ink - Vintage Journal Tutorial by Anna-Karin Evaldsson. Die cut Sizzix Eileen Hull Pocket Journal from mat board.

Start by die cutting the covers and the pocket from Sizzix Little Sizzles Mat Board. This is a Big Shot Plus die and it won't fit in the ordinary Big Shot or Vagabond. I didn't have big enough mat board, but that didn't matter since I wasn't planning to use the closure part. 

Layers of ink - Vintage Journal Tutorial by Anna-Karin Evaldsson. Cover with old dictionary paper.

Cover with old dictionary paper, using matte medium. Add a layer of medium on top of the paper too.

Layers of ink - Vintage Journal Tutorial by Anna-Karin Evaldsson.

I cut off one of the flaps from the covers, since I didn't want to use the closure mechanism, as it would have covered up the frame design that I was planning for the front.

Layers of ink - Vintage Journal Tutorial by Anna-Karin Evaldsson. Paint with Distress Paint.

Paint with Distress Paints.

Layers of ink - Vintage Journal Tutorial by Anna-Karin Evaldsson.

Add white paint through Tim's Latticework stencil

Layers of ink - Vintage Journal Tutorial by Anna-Karin Evaldsson. Stencil through Tim Holtz Linen.

Sponge Speckled Egg through Tim's Linen Stencil, for a touch of blue.

Layers of ink - Vintage Journal Tutorial by Anna-Karin Evaldsson. Stamp with Simon Says Stamp Old Letter.

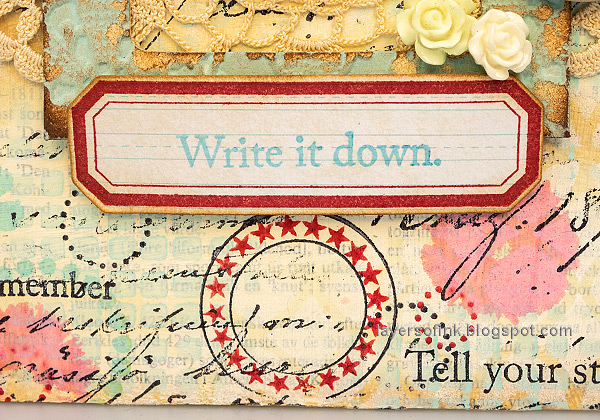
Stamp here and there with Simon Says Stamp Old Letter Background

Layers of ink - Vintage Journal Tutorial by Anna-Karin Evaldsson.

Initially I was planning to only use the script stamp above, but I was in the mood for stamping and started stamping a whole bunch of sentiments and circles on the background. The circles come from Simon Says Stamp Mix and Match Circles

Layers of ink - Vintage Journal Tutorial by Anna-Karin Evaldsson.

Die cut the frame with the frame pocket part of the Frame Pocket Journal Scoreboards Plus die. Cut off the flaps and emboss in Eileen Hull's Tablecloth folder.

Layers of ink - Vintage Journal Tutorial by Anna-Karin Evaldsson.

Paint with Speckled Egg.

Layers of ink - Vintage Journal Tutorial by Anna-Karin Evaldsson.

When dry, sand and ink with Vintage Photo.

Layers of ink - Vintage Journal Tutorial by Anna-Karin Evaldsson.

The labels were stamped on Tim Holtz Journal Cards with Simon Says Stamp Mixed Labels and die cut with the coordinating dies.

Layers of ink - Vintage Journal Tutorial by Anna-Karin Evaldsson.

Paint and stamp the pocket in the same way as the cover, but without the dictionary paper. 

Layers of ink - Vintage Journal Tutorial by Anna-Karin Evaldsson.

I glued a little crocheted piece to the front. It was found in the same second hand store as the frame. 

Layers of ink - Vintage Journal Tutorial by Anna-Karin Evaldsson.

Adhere the frame with a Tim Holtz brad so that it is stuck down well. 

Layers of ink - Vintage Journal Tutorial by Anna-Karin Evaldsson.


Layers of ink - Vintage Journal Tutorial by Anna-Karin Evaldsson.

The old text paper, paint, stenciling and stamping adds interesting layers to the background without being overwhelming.

Layers of ink - Vintage Journal Tutorial by Anna-Karin Evaldsson.

You can of course use any sentiment as the title of the book. 

Layers of ink - Vintage Journal Tutorial by Anna-Karin Evaldsson.

I used cream paper for the inside and stitched down the center of each of the two signatures with my sewing machine. The pages are slightly too small, but I wanted to get as many pages as possible out of my A4 sheets since I was using one of my favorite sketching papers and didn't want to waste paper, so I was okay with that. Round the edges with a Corner Chomper. I used an elastic string to bind the book, making it easy to remove the signatures.

Layers of ink - Vintage Journal Tutorial by Anna-Karin Evaldsson.

The string was tied through a button at the spine. The fabric A was cut from a piece of Tim Holtz Holiday Eclectic Elements fabric

Layers of ink - Vintage Journal Tutorial by Anna-Karin Evaldsson.

I tied some beads at the end of the strings.

Layers of ink - Vintage Journal Tutorial by Anna-Karin Evaldsson.

The spine also got a stamped title.

Layers of ink - Vintage Journal Tutorial by Anna-Karin Evaldsson.

I covered the inside covers with Tim Holtz Backdrops papers. I really like the backdrops papers. The pocket was adhered to the inside of the front cover.

Layers of ink - Vintage Journal Tutorial by Anna-Karin Evaldsson.

The back of the journal looks like this.

Layers of ink - Vintage Journal Tutorial by Anna-Karin Evaldsson.

This sentiment comes from Simon Says Stamp Beautiful Butterflies and I reach for it quite often.

Layers of ink - Vintage Journal Tutorial by Anna-Karin Evaldsson.

With the Mix and Match Circles set you can combine the circle stamps to create many different designs.

Layers of ink - Vintage Journal Tutorial by Anna-Karin Evaldsson.

I filled the pocket with Tim Holtz Journal Cards and Pocket Cards, which can be used on the pages in the journal. You can add mementos, photos, postcards or anything else to that pocket. I will probably add something else once I start using the journal.

Layers of ink - Vintage Journal Tutorial by Anna-Karin Evaldsson.

The book is nice and chunky.

Layers of ink - Vintage Journal Tutorial by Anna-Karin Evaldsson.

You can make this book for any theme and it would also make a great gift. 


Thank you so much for visiting my blog today and I hope you enjoyed the tutorial!

Happy stamping!

Anna-Karin


Supplies:

* Please note: the links are affiliate links, for which I receive a small percentage of sales generated by the link, at no extra cost to you.

Sunday, November 27, 2022

Christmas Sweater Tag and Card Tutorial

Hi friends! Today I have a tag and a card to share with a warm and textured sweater background, looking almost like a real knitted sweater. 

Please note: this post has affiliate links, for which I receive a small percentage of sales generated by the link, at no extra cost to you.


Layers of ink - Christmas Sweater Tag and Card Tutorial by Anna-Karin Evaldsson.

I wanted to make winter/Christmas cards with different color combos and using the lovely Sizzix Sweater 3-D Embossing Folder designed by Eileen Hull. Lately, I have used embossing folders a lot and there are more tutorials coming with fun dry embossing techniques. The stamping was done with the cute Simon Says Stamp Let It Snow set and I used Clearly For Art Modeling Film for the dimensional snowglobe.

Layers of ink - Christmas Sweater Tag and Card Tutorial by Anna-Karin Evaldsson.

Start by stamping Simon Says Stamp Falling Snow on a watercolor card and a tag cut from watercolor paper. Use permanent inks for this step.

Layers of ink - Christmas Sweater Tag and Card Tutorial by Anna-Karin Evaldsson. Emboss in Sizzix Eileen Hull Sweater Texture.

Ink the inside of the Sweater 3-D embossing folder with two shades of Distress Ink. Mist with water and emboss the paper. Look at that amazing sweater texture.

Layers of ink - Christmas Sweater Tag and Card Tutorial by Anna-Karin Evaldsson.

When dry, I inked the tag and the paper with more Distress Ink to bring out the texture. If you want a lighter look, leave as they were after the previous step.

Layers of ink - Christmas Sweater Tag and Card Tutorial by Anna-Karin Evaldsson.

The cute snowman was stamped with Simon Says Stamp Let It Snow from the Cozy Hugs release. Start by stamping on white paper with Rose Madder Archival Ink and Simon Says Stamp Pawsitively Saturated Surf ink.

Layers of ink - Christmas Sweater Tag and Card Tutorial by Anna-Karin Evaldsson. Stamp with Simon Says Stamp Let It Snow.

Continue by stamping the scarf, facial features and snowglobe.

Layers of ink - Christmas Sweater Tag and Card Tutorial by Anna-Karin Evaldsson.

Die cut with the coordinating die.

Layers of ink - Christmas Sweater Tag and Card Tutorial by Anna-Karin Evaldsson.

Die cut the snowglobe from Wendy Vecchi's Clearly For Art Modeling Film

Layers of ink - Christmas Sweater Tag and Card Tutorial by Anna-Karin Evaldsson.

Heat the modeling film with a heat tool and shape it into half-globes. Be careful not to burn yourself. Add Moon Dust Stickles at the base.

Layers of ink - Christmas Sweater Tag and Card Tutorial by Anna-Karin Evaldsson.

Stamp snowflakes and sentiments with Simon Says Stamp Let It Snow and die cut with the coordinating dies.

Layers of ink - Christmas Sweater Tag Tutorial by Anna-Karin Evaldsson.

The pink tag uses coral combined with stronger shades of pink and just a bit of turquoise. You can of course turn this into a card too instead. I stitched around the edges of both the tag and the card with my sewing machine, to add to the fabric theme.

Layers of ink - Christmas Sweater Tag Tutorial by Anna-Karin Evaldsson.

Most of the snowflakes were adhered with foam tape. Add a sprinkle of Simon Says Stamp Beachy sequins to the background.

Layers of ink - Christmas Sweater Tag Tutorial by Anna-Karin Evaldsson.

I die cut lace from Simon Says Stamp White Diamond Glimmer Cardstock using Tim Holtz Crochet set and also used cheese cloth and a real piece of lace trim. 

Layers of ink - Christmas Sweater Tag Tutorial by Anna-Karin Evaldsson.

Attach the modeling film snowglobe to the paper one with staples and adhere to the background.

Layers of ink - Christmas Sweater Tag Tutorial by Anna-Karin Evaldsson.

Here you can see the dimensional globe better. Clearly for Art Modeling Film will keep its shape perfectly.

Layers of ink - Christmas Sweater Card Tutorial by Anna-Karin Evaldsson.

The card turns the color combo around, with turquoise and teal being the main colors, and peach being the accent color. 

Layers of ink - Christmas Sweater Card Tutorial by Anna-Karin Evaldsson.

Adhere some of the snowflakes with glue and some with foam tape.

Layers of ink - Christmas Sweater Card Tutorial by Anna-Karin Evaldsson.

Since the dots were stamped before the dry embossing, they look like they are a part of the pattern of the sweater.

Layers of ink - Christmas Sweater Card Tutorial by Anna-Karin Evaldsson.

The hat and the base of the snowglobe were colored with Tombow pens. 

Layers of ink - Christmas Sweater Card Tutorial by Anna-Karin Evaldsson.

Again, I added a die cut lace trim and a real one, combined with cheese cloth.

Layers of ink - Christmas Sweater Card Tutorial by Anna-Karin Evaldsson.

I hope you enjoyed this project and that it inspired you to do some textured cards or tags.


Thank you so much for stopping by here today!

Happy stamping!

Anna-Karin


Supplies:

* Please note: the links are affiliate links, for which I receive a small percentage of sales generated by the link, at no extra cost to you.