Showing posts with label Sizzix. Show all posts

Monday, July 14, 2025

File Folder Ephemera Card

Hi crafters! It is a new week and we have a new Simon Says Stamp Monday Challenge for you you.

Please note: this post has affiliate links, for which I receive a small percentage of sales generated by the link, at no extra cost to you.


This week our theme at the Simon Says Stamp Monday Challenge Blog is Stitch It. Fun! Stitching adds such a nice tactile feel to projects and can be used instead of adhesive too. Don't miss the gorgeous project by our July guest designer Thom Santilla.

Layers of ink - File Folder Ephemera Card Tutorial by Anna-Karin Evaldsson.

I made a card this week with three file folders and four double-sided tags. The folders were handstitched. I used lots of words, ephemera, fibers, stamping and stencilling. 

Die cut with Tim Holtz Vault Noteworthy.

Start by die cutting the file folders from Ranger Heavystock cardstock using Tim Holtz Sizzix Vault Noteworthy set. 

Stamp and stencil the file folders.

Ink them with Distress Ink and then use stencils to add a pattern to the front of each folder. I also stamped them partially with stamps from Tim Holtz School Desk and Ultimate Grunge, using black and Red Geranium Archival Ink.

Stamp the background paper.

For the background I used a piece of Tim Holtz Backdrops paper and stamped it with the same stamps as the folders, as well as Simon Says Stamp Crackle Background. 

Stitch the edges of the folders.

Pierce holes down the sides of the folders and stitch with DMC floss. 

Cut and embellish the tags.

Cut labels from various Backdrops papers. Add a tag circle and punch a whole. Stamp sentiments, sand and ink the edges. Then add ephemera and stickers. 


Embellish the back of the tags too.

Stamp a sentiment.

I stamped a sentiment from Tim Holtz Warehouse District on the most visible folder.


Round the corners with a We R Memory Keepers Corner Chomper. Mount the background on cardstock and then again on folded brown cardstock. Adhere the three folders. As you can see, I also stamped sentiments on the label part of the folders. Most of them come from Simon Says Stamp Mixed Labels.


I added words from AALL & Create Mindful Moments to the folders and to the tags.

Add Simon Says Stamp Pawsitively Dazzling Gunmetal Gems.


Tags made from ephemera and stamping.

I tied a fibers and twine to the tags. These are the fronts of the four tags (except for the first one).

Add Tim Holtz idea-ology ephemera.

I had fun picking out ephemera pieces that fit together. 


All the tags have postage stamps on them from Tim Holtz Postmarked. The stamped sentiment comes from Simon Says Stamp Mixed Labels.

Stamp with Stamper's Anonymous Classics 1.

This sentiment comes from Stamper's Anonymous Classics #5.


More details.


The backs of the four tags look like this, more words, ephemera and stamps.


I sanded the edges of all the tags and left some almost without ink, so that the white paper shows.


This tag was cut so that the word 'colour' would be visible.


I found a couple of Swedish stamps on Tim's Postmarked set and used them.


An interesting background paper.


I hope you enjoyed this tutorial! 

Join us this week in our Stitch It challenge! You have a chance to win a $25 gift voucher to do some fun shopping at Simon Says Stamp. You have until Monday 8am Ohio time. 1pm UK time, 2 pm CET to join in.


Do you use Instagram? If so please add #sssmchallenge so we can see your entries there too.


Thank you so much for visiting today! 

Happy crafting!

Anna-Karin

Supplies:

* Please note: the links are affiliate links, for which I receive a small percentage of sales generated by the link, at no extra cost to you.


Saturday, June 21, 2025

Alphabet Altered Notebook

Hello crafters! Today I have an altered notebook tutorial to share, made with one of the new large embossing folders by Tim Holtz / Sizzix. 

Please note: this post has affiliate links, for which I receive a small percentage of sales generated by the link, at no extra cost to you.

Layers of ink - Alphabet Altered Notebook Tutorial by Anna-Karin Evaldsson.

The new large texture fades from Tim Holtz make it possible to emboss a much larger surface in just one go. I have many times wished for larger embossing folders and it is fun to just see such a large dry embossed paper. The design was just large enough for the A5 notebook I altered (5.8x8.3in). I used the Large Typewriter 3-D Texture Fade.


Start by embossing a piece of watercolor paper in the Large Typewriter folder. I misted the paper with water before embossing, since that gives a better result. 

Coat with gesso.

Next, I painted the paper with white gesso.

Paint with Distress Paints.

Paint with watered-down Distress Paint and mist with more water to blend.

Splatter with white paint.

When the paint is dry (it will take a while), apply white paint to the letters to make them stand out better. Don't aim for a perfect result.


Splatter the background with some more white paint.

Stamp with Tim Holtz School Desk.

Stamp the background here and there with the alphabet stamp from Tim's School Desk set. 

Stamp with Tim Holtz Sign Painter.

Stamp the Tim Holtz Sign Painter letters with Simon Says Stamp Tidepool Pawsitively Saturated ink and then die cut with the coordinating Simon Says Stamp Sign Painter Letters set. I also die cut the letters from black cardstock.


I stamped sentiments from Tim's Tiny Text and also added strips of Design Tape Trims.


The larger butterflies were die cut with Simon Says Stamp Stitching Butterflies and the smaller with Tim Holtz Vault Boutique set. The were die cut from left over inky and watercolored papers. The bodies were die cut from Simon Says Stamp Black Glitter cardstock.


Glue the title as shown, off-setting the black die cuts to create a shadow. 

Mixed media background.

The background is very textured and I like how the paints blend.


If you make a card or tag, you can add more shape to the butterflies, but since journals are meant to be used, carried in bags and so on, I left them fairly flat.

Die cut butterflies with Tim Holtz Vault Boutique.

I really like the Thoughts & Theories sentiment from Tim's Noble Gents set.


For the background, I used Distress Ink in the same shades, applied them to a non-stick craft sheet, misted with water and pressed watercolor paper into the ink. You can use watercolor paper, gesso and Distress Paint instead. I just wanted a quicker background.


I glued Design Tape to the spine of the book, to cover up the black cover.


Add some glue under the tape to make sure it sticks well.

Layers of ink - Alphabet Altered Notebook Tutorial by Anna-Karin Evaldsson.

 I glued everything down with Simon Says Stamp craft glue. If you don't want to alter a notebook, you can also used the embossed panel to make your own notebook, or to create an A5 card.

Layers of ink - Alphabet Altered Notebook Tutorial by Anna-Karin Evaldsson.

The notebook happened to match in color to one of my favorite pens. 


Thank you for visiting! See you again tomorrow!

Happy crafting!

Anna-Karin

Supplies:

* Please note: the links are affiliate links, for which I receive a small percentage of sales generated by the link, at no extra cost to you.


Monday, June 9, 2025

Yellow Floral Tag

Hi friends! I hope you are well and had a good weekend! Today I have a tag to share with lots and lots of sunny yellow. 

Please note: this post has affiliate links, for which I receive a small percentage of sales generated by the link, at no extra cost to you.


This week we have a Monochrome theme at the Simon Says Stamp Monday Challenge Blog. I hope you will join us! Monochrome is a lot of fun! Don't miss the lovely project by our June guest designer Wanda Hentges.

Layers of ink - Yellow Floral Tag Tutorial by Anna-Karin Evaldsson.

I was inspired by the sun and used shades of yellow as my color, with just a little bit of brown. An almost entirely yellow project is always joyful. The background is both dry and heat embossed and I created dimensional flowers from different papers and shades of yellow. 

Emboss with Tim Holtz Sizzix Vault Flourish.

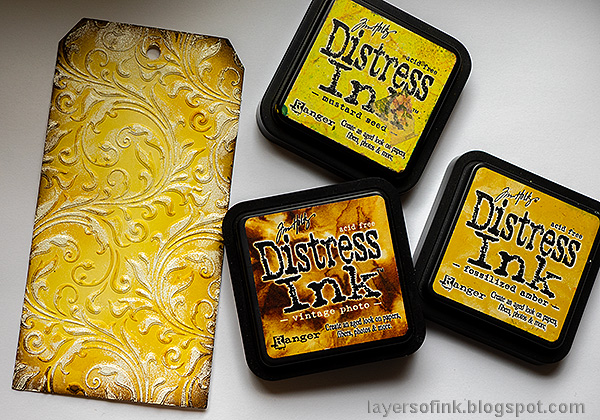
Start by dry embossing a tag in Tim Holtz new Vault Flourish ML folder. ML stands for multi-level. I applied embossing ink to some of the embossed parts and sprinkled with white embossing powder. The goal is not a perfect look, but a messy, shabby chic look. 

Ink with distress ink.

Ink the tag with Distress Ink. The white embossing will resist the ink.

Ink with Mustard Seed Distress Oxide ink.

Smear Mustard Seed Distress Oxide on a non-stick craft sheet and mist with water. Press the tag lightly into the ink.

Die cut Tim Holtz Rustic Layering Flower.

Die cut flowers using Simon Says Stamp Rustic Layering Flower and Morning Blossom. I used inky or watercolored paper in various shades of yellow, as well as Simon Says Stamp Ice Vellum.

Die cut Simon Says Stamp Poised Primula.

I also die cut some Simon Says Stamp Poised Primula flowers, from left-over inky paper and from Simon Says Stamp Color-Blend paper. The Color-Blend paper is glossy.

Shape the flowers.

Shape the flowers with Tim Holtz Shaping Kit.

Assemble the flowers.

Assemble the flowers and shape the small flowers too.


I wasn't careful at all when applying the embossing ink, since this is the look I was aiming for. 


The sentiments were stamped with Simon Says Stamp Create set and die cut with the coordinating dies.


I added Simon Says Stamp Pawsitively Dazzling Sunbeam Gems to the small flower centers and Prism Gems to the larger flowers.

Dimensional paper flowers.

The Ice Vellum has a really cool sparkly look. 

Double embossed background.

I glued cheese cloth under the flowers.


The Poised Primula flowers are so cute and such a great size. 


Here, you can better see that the yellow small flowers are glossy. Mixing different surfaces adds interest.


Join us this week in our Monochrome challenge! You have a chance to win a $25 gift voucher to do some fun shopping at Simon Says Stamp. You have until Monday 8am Ohio time. 1pm UK time, 2 pm CET to join in.


Do you use Instagram? If so please add #sssmchallenge so we can see your entries there too.


Thank you so much for visiting today! 

Happy crafting!

Anna-Karin

Supplies:

* Please note: the links are affiliate links, for which I receive a small percentage of sales generated by the link, at no extra cost to you.