Showing posts with label Modeling film. Show all posts

Monday, July 22, 2024

Matchbox filled with words

Hello crafters! It is Monday and I hope you had a good weekend with some crafty time!

Please note: this post has affiliate links, for which I receive a small percentage of sales generated by the link, at no extra cost to you.


This week our challenge theme at the Simon Says Stamp Monday Challenge Blog is Add a Sentiment. I hope you will join us and don't miss the project by our July guest designer Laura Cassina

Layers of ink - Matchbox filled with words tutorial by Anna-Karin Evaldsson.

I made a matchbox and couldn't use just one sentiment, but instead filled the box with sentiments. Almost as if it is a little box holding a lot of secrets. The box was made with Tim Holtz Vault Matchbox set and I used a bunch of different butterfly stamps to embellish it and the cards.

Layers of ink - Matchbox filled with words tutorial by Anna-Karin Evaldsson.

There are seven sentiment cards in the box.

Layers of ink - Matchbox filled with words tutorial by Anna-Karin Evaldsson. Die cut with Tim Holtz Matchbox.

Start by die cutting the box with the Vault Matchbox die from heavystock paper. Fold along the scorelines.

Layers of ink - Matchbox filled with words tutorial by Anna-Karin Evaldsson. Ink with Distress Ink.

Ink the box with Distress Ink. I also die cut a card for the top of the box.

Layers of ink - Matchbox filled with words tutorial by Anna-Karin Evaldsson.

Stamp one of the butterflies from Tim Holtz Flutter on acetate. 

Layers of ink - Matchbox filled with words tutorial by Anna-Karin Evaldsson. Color with alcohol ink.

Cut out and color on the back with alcohol ink.

Layers of ink - Matchbox filled with words tutorial by Anna-Karin Evaldsson.

Gently heat with a heat tool and shape the acetate. Be careful as this might not work with all types of acetate. I used Wendy Vecchi Clearly for Art Modeling Film.

Layers of ink - Matchbox filled with words tutorial by Anna-Karin Evaldsson.

Die cut seven cards from inky paper. Stamp sentiments and small images on the cards. Mist the images with water after inking. Also stamp a sentiment inside the box.

Layers of ink - Matchbox filled with words tutorial by Anna-Karin Evaldsson. Stamp with Simon Says Stamp Stained Glass.

Stamp here and there with Simon Says Stamp Stained Glass, for texture.

Layers of ink - Matchbox filled with words tutorial by Anna-Karin Evaldsson.

Ink the edges and assemble the box.

Layers of ink - Matchbox filled with words tutorial by Anna-Karin Evaldsson.

I added Moon Dust Stickles Glitter Gel to the back of the butterfly, but forgot to take a photo of that step.

Layers of ink - Matchbox filled with words tutorial by Anna-Karin Evaldsson.

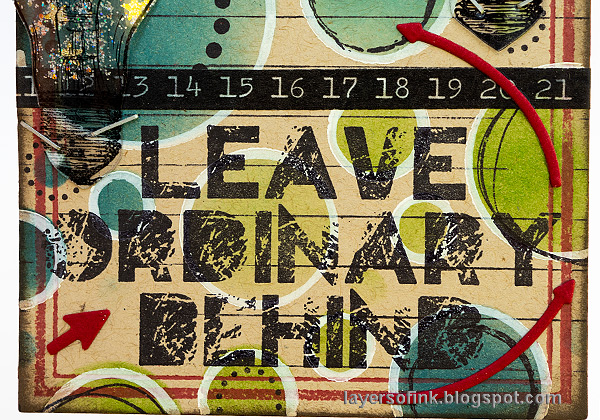
A part of a Tim Holtz Tiny Text sentiment was stamped on the front.

Layers of ink - Matchbox filled with words tutorial by Anna-Karin Evaldsson.

I stamped words from Simon Says Stamp Forest Scenery on both sides of the box. I messed up the stamping of 'peaceful' and restamped and cut into a strip. 

Layers of ink - Matchbox filled with words tutorial by Anna-Karin Evaldsson.

When you open the box you will find a little treasure of words.

Layers of ink - Matchbox filled with words tutorial by Anna-Karin Evaldsson.

I used a mix of stamps by Simon Says Stamp and Tim Holtz for the sentiments and images.

Layers of ink - Matchbox filled with words tutorial by Anna-Karin Evaldsson.

Mist the stamp with water after inking for a watercolor effect.

Layers of ink - Matchbox filled with words tutorial by Anna-Karin Evaldsson.

The remaining four cards. The long sentiment comes from Tim's Urban Chic, the sentiment to the bottom left is from Simon Says Stamp Extra Proud and the remaining two sentiments are from Tim's Tiny Text.

Layers of ink - Matchbox filled with words tutorial by Anna-Karin Evaldsson.

The birds come from Tim Holtz Mini Ornates.

Layers of ink - Matchbox filled with words tutorial by Anna-Karin Evaldsson.

The stamp at the top is one of my youngest son's favorite sayings.

Layers of ink - Matchbox filled with words tutorial by Anna-Karin Evaldsson.

All the little cards and the box itself.

Layers of ink - Matchbox filled with words tutorial by Anna-Karin Evaldsson.

Die cut the side pieces from kraft cardstock and sand to reveal the texture.

Join us this week in our Add a Sentiment! You have a chance to win a $25 gift voucher to do some fun shopping at Simon Says Stamp. You have until Monday 8am Ohio time. 1pm UK time, 2 pm CET to join in.


Do you use Instagram? If so please add #sssmchallenge so we can see your entries there too.


Thank you so much for stopping by here today! 

Happy crafting!

Anna-Karin

Supplies:

* Please note: the links are affiliate links, for which I receive a small percentage of sales generated by the link, at no extra cost to you.


Wednesday, May 22, 2024

Earth Tag Tutorial

Hi stampers! Today I have a tag to share with various fun techniques. It is one of those projects that proceeded without much of a plan. 

Please note: this post has affiliate links, for which I receive a small percentage of sales generated by the link, at no extra cost to you.

Layers of ink - Earth Tag Tutorial by Anna-Karin Evaldsson.

The tag has an earth theme with lightbulbs turned into hot air balloons exploring the world. The background is made with a combination of stenciling and stamping. The globe is heat embossed and shiny and the lightbulbs are glittery and dimensional. Arrows are a great way to create movement. 


Start by die cutting the globe from Tim Holtz Vault World Travel set from heavystock paper and from Simon Says Stamp Acetate.

Layers of ink - Earth Tag Tutorial by Anna-Karin Evaldsson. Ink and emboss with various powders.

Ink the base globe with Simon Says Stamp Embossing ink and sprinkle Wow embossing powders on top. I used Tarnished Teal, Sea of Tranquility and Crusty Copper. Repeat until you are happy with the look. Ink the land masses with Distress Ink and emboss with several layers of clear powder. Sprinkle some of the colored powders into the last layer. Always be very careful with heat embossing and do not touch the melted powder until it has cooled down completely.

Layers of ink - Earth Tag Tutorial by Anna-Karin Evaldsson. Color with alcohol ink.

Ink the acetate with Patina Alcohol ink, to make it look like the ocean.

Layers of ink - Earth Tag Tutorial by Anna-Karin Evaldsson.

Die cut another circle from old dictionary paper and place under the acetate. Then glue all the pieces and place under a book until the glue is dry.

Layers of ink - Earth Tag Tutorial by Anna-Karin Evaldsson.

The tag was die cut with Tim's Framed Tags. Ink the die with Archival Ink Red Geranium before die cutting. It was stamped with Simon Says Stamp Ledger Paper Background stamp.

Layers of ink - Earth Tag Tutorial by Anna-Karin Evaldsson. Ink through Simon Says Stamp Mix and Match Circles.

Ink with Distress Ink through Simon Says Stamp Mix and Match Circles stencil.

Layers of ink - Earth Tag Tutorial by Anna-Karin Evaldsson. Add white circles.

Clean the stencil and place it back on the tag. Trace around the circles with a white paint pen.

Layers of ink - Earth tag tutorial by Anna-Karin Evaldsson. Stamp with Simon Says Stamp Mix and Match Circles.

Stamp the sentiment with black ink and stamp circles from Simon Says Stamp Mix and Match Circles stamp set on some of the circles.

Layers of ink - Earth Tag Tutorial by Anna-Karin Evaldsson. Stamp lightbulbs.

Stamp the lightbulbs from Tim's Curiosity Shop on Wendy Vecchi Clearly for Art Modeling Film. Cut out, heat with a heat tool and shape the bulbs. Add Nebula Stickles Glitter Gel to the back.

Layers of ink - Earth Tag Tutorial by Anna-Karin Evaldsson.

Glue the globe to the background and draw a circle around it with a black marker. Staple the lightbulbs to the background.

Layers of ink - Earth Tag Tutorial by Anna-Karin Evaldsson.

The stamp in the circle in the upper right-hand corner is meant to be the sun.

Layers of ink - Earth Tag Tutorial by Anna-Karin Evaldsson.

The globe is very shiny, as you can see here, with the acetate in the background and the layers of embossing powders.

Layers of ink - Earth Tag Tutorial by Anna-Karin Evaldsson.

I placed some of the arrows so the pointed to specific places. The arrows are die cut with Vault World Travel.

Layers of ink - Earth Tag Tutorial by Anna-Karin Evaldsson.

The main sentiment comes from Tim Holtz Random Quotes. I also added some design tape Trims to the tag.

Layers of ink - Earth Tag Tutorial by Anna-Karin Evaldsson.

The tag is quite dimensional because of the lightbulbs / hot-air balloons.

Layers of ink - Earth Tag Tutorial by Anna-Karin Evaldsson.

The techniques can be used for other dies and stamps too and for other types of projects and themes.


Thank you so much for stopping by here today! 


Anna-Karin

Supplies:

* Please note: the links are affiliate links, for which I receive a small percentage of sales generated by the link, at no extra cost to you.


Wednesday, April 10, 2024

Paper Mosaic with Dimensional Butterflies

Hi friends! I am happy to have a tutorial on the Simon Says Stamp Store Blog. I made a paper mosaic piece with dimensional butterflies. Here is a sneak peek: 

Layers of ink - Paper Mosaic Tutorial by Anna-Karin Evaldsson.

Paper mosaic is perfect for small pieces or scraps of papers. I used mainly ephemera by Tim Holtz. The butterflies are made from Wendy Vecchis Clearly For Art Modeling film, which keeps its shape perfectly.

To see the step-by-step tutorial and all the details, head over to the Simon Says Stamp Store Blog


Thank you so much for stopping by here today! 

Happy crafting!

Anna-Karin

Supplies:

* Please note: the links are affiliate links, for which I receive a small percentage of sales generated by the link, at no extra cost to you.


Wednesday, March 27, 2024

Stitched Notebook

Hello friends! Today I have a notebook/journal tutorial to share, for a notebook with a stitched binding. If you don't want to make a notebook, the cover can easily be turned into a card instead.

Please note: this post has affiliate links, for which I receive a small percentage of sales generated by the link, at no extra cost to you.

Layers of ink - Stitched Dragonfly Notebook Tutorial by Anna-Karin Evaldsson.

I love to make my own notebooks and sketchbooks. They are also great gifts. This notebook is 5x6 in, a folded Tim Holtz Backdrops paper. The Backdrops papers are so gorgeous and make for great notebook or journal covers. I stamped a dragonfly image on the cover and colored it with pencils. The dragonfly was also stamped on Clearly For Art Modeling Film. Later, I might have removed the modeling film dragon fly, but only because it was a little too dimensional for my liking. 

Layers of ink - Stitched Dragonfly Notebook Tutorial by Anna-Karin Evaldsson. Stamp dragonfly on the notebook cover.

Fold a piece of Backdrops Vol 4 paper in half and stamp the dragonfly image from Stamper's Anonymous Classics #1 on the cover.

Layers of ink - Stitched Dragonfly Notebook Tutorial by Anna-Karin Evaldsson. Color with colored pencils.

Color the dragonfly with colored pencils. I used Prismacolors. Use a white pencil to blend the colors.

Layers of ink - Stitched Dragonfly Notebook Tutorial by Anna-Karin Evaldsson.

Add details to the dragonfly with a black pen and a white gel pen. Don't worry about getting it perfect, since that is not the point.

Layers of ink - Stitched Dragonfly Notebook Tutorial by Anna-Karin Evaldsson. Stamp sentiments and circles.

Stamp circles from Simon Says Stamp Mix and Match Circles and various sentiments on the background.

Layers of ink - Stitched Dragonfly Notebook Tutorial by Anna-Karin Evaldsson. Color patterned paper with pencils.

I wanted the title to have the exact same colors as the dragonfly and used the pencils to color another piece of Backdrops paper. I created an ombre effect.

Layers of ink - Stitched Dragonfly Notebook Tutorial by Anna-Karin Evaldsson. Die cut the title with Tim Holtz Alphanumeric Emporium dies.

Use Tim Holtz Alphanumeric Emporium dies to die cut the letter.

Layers of ink - Stitched Dragonfly Notebook Tutorial by Anna-Karin Evaldsson.

Stamp the dragonfly with Stazon Jet Black on Wendy Vecchi Clearly For Art Modeling Film

Layers of ink - Stitched Dragonfly Notebook Tutorial by Anna-Karin Evaldsson. Color with alcohol ink.

Cut the dragonfly out and color the body with alcohol ink.

Layers of ink - Stitched Dragonfly Notebook Tutorial by Anna-Karin Evaldsson. Shape the modeling film.

Gently heat with a heat tool and shape the wings. Be careful not to burn yourself. The film keeps its shape perfectly.

Layers of ink - Stitched Dragonfly Notebook Tutorial by Anna-Karin Evaldsson. Add Ranger Stickles.

Add Distress Stickles Moon Dust to the back of the wings and let dry.

Layers of ink - Stitched Dragonfly Notebook Tutorial by Anna-Karin Evaldsson.

Cut inserts from your paper of choice. In this case, I used fairly light-weight notebook paper, which can take fountain pens without problems. Make a template first by piercing holes through a folded piece of paper. As you can see the inserts are larger than the cover.

Layers of ink - Stitched Dragonfly Notebook Tutorial by Anna-Karin Evaldsson. Pierce holes along the spine.

After you pierced through all the layers, it looks like this.

Layers of ink - Stitched Dragonfly Notebook Tutorial by Anna-Karin Evaldsson. Stitch the notebook along the spine.

I stitched the book using three strands of DMC embroidery thread using a saddle stitch. Tie it on the inside.

Layers of ink - Stitched Dragonfly Notebook Tutorial by Anna-Karin Evaldsson.

I trimmed the inserts and a tiny bit of the covers to get a notebook where the pages went right up to the edges of the cover. Normally, I make the pages slightly smaller than the cover, but since I used thinner paper than what I usually use, it was possible to trim through them all at once. 

Layers of ink - Stitched Dragonfly Notebook Tutorial by Anna-Karin Evaldsson.

Using colored pencils to color the paper before die cutting creates a nice effect and the paper is satin smooth.

Layers of ink - Stitched Dragonfly Notebook Tutorial by Anna-Karin Evaldsson.

Stamp some of the circles off the edge for a finished look.

Layers of ink - Stitched Dragonfly Notebook Tutorial by Anna-Karin Evaldsson. Dimensional dragonfly.

The Moon Dust Stickles gives a great shimmer to the wings of the dragonfly. 

Layers of ink - Stitched Dragonfly Notebook Tutorial by Anna-Karin Evaldsson.

The Clearly For Art Modeling Film is one of my favorite surfaces and you dan do many techniques with it. 

Layers of ink - Stitched Dragonfly Notebook Tutorial by Anna-Karin Evaldsson.

Even though I loved the dimensional dragonfly, I decided to remove it. Since the cover and the inside pages are pretty thin, it bothered me when I was writing in the book. I might put it back again, or I will use it on another project instead.

Layers of ink - Stitched Dragonfly Notebook Tutorial by Anna-Karin Evaldsson.

The white and black pen details add movement and life to the wings.

Layers of ink - Stitched Dragonfly Notebook Tutorial by Anna-Karin Evaldsson.

Here's another look at the stitch. If you want to, use a contrasting or bright colored thread instead.

Layers of ink - Stitched Dragonfly Notebook Tutorial by Anna-Karin Evaldsson.

Since the Backdrops papers are double-sided, the inside covers are patterned too.

Layers of ink - Stitched Dragonfly Notebook Tutorial by Anna-Karin Evaldsson.

Here's another look at the notebook without the Modeling Film dragonfly.


Thank you so much for stopping by here today! 


Anna-Karin

Supplies:

* Please note: the links are affiliate links, for which I receive a small percentage of sales generated by the link, at no extra cost to you.