Wednesday, December 30, 2020

2020 Review Art Journal Page

Hi everyone! I can't believe the year is almost over. I have one last tutorial for this unusual and difficult year. It's an art journal page using stencils, acrylic paint, markers, glitter gel and stamps. You can of course use the techniques for other types of projects too. 

Layers of ink - 2020 art journal page tutorial by Anna-Karin Evaldsson.

At the end of every year I do either a scrapbooking page or an art journal page summarising the year. This year it is an art journal page, a double page in my Large Dylusions Journal. When thinking back on this year, my first thought was that I wanted to paint the entire page black, but there have also been many moments of joy and light, which is why the colorful circles are shining in the darkness. I hardly ever use black backgrounds.

Layers of ink - 2020 art journal page tutorial by Anna-Karin Evaldsson. Paint background with acrylic paint.

This page started out like this. It has been a page on which I have smeared left-over paint during the year, which makes it even more suitable for this topic. If you want to make your own background, start with a layer of gesso and then just add acrylic paint with a palette knife. It's a mix of Dina Wakley and Distress Paint.

Layers of ink - 2020 art journal page tutorial by Anna-Karin Evaldsson. Draw circles with stencil.

I wanted to use the SSS I Like Big Dots stencil since I just got it. I drew circles with a black pen. You can skip this step if you want to, but I hadn't yet decided what to do and I wanted the dots to line up as they did on the stencil.

Layers of ink - 2020 art journal page tutorial by Anna-Karin Evaldsson. Mask the circles.

Draw circles through the stencil on SSS Masking Paper. Cut out and place over the dots on the page.

Layers of ink - 2020 art journal page tutorial by Anna-Karin Evaldsson.

Paint with black paint. 

Layers of ink - 2020 art journal page tutorial by Anna-Karin Evaldsson. Remove masks.

Remove the masking paper and the colored circles appear. There might be some paint that has seeped under the edge here and there, but that doesn't matter.

Layers of ink - 2020 art journal page tutorial by Anna-Karin Evaldsson.  Stamp with SSS Mix and Match Circles set.

Stamp the circles with circles from the SSS Mix and Match Circles set. Designing stamps for Simon Says Stamp has been one of the main highlights of my year, so some of the stamps had to make their way onto this page.

Layers of ink - 2020 art journal page tutorial by Anna-Karin Evaldsson.

For the title, I printed the numbers and cut them out. Draw the outlines with a white gel pen.

Layers of ink - 2020 art journal page tutorial by Anna-Karin Evaldsson. Paint numbers with acrylic paint.

Paint with acrylic paint. I wanted a rough look and visible paint brush marks. 

Layers of ink - 2020 art journal page tutorial by Anna-Karin Evaldsson. Stamp with Simon Says Stamp Circle Pattern Background.

Stamp sentiments and images into most of the circles. Stamp the page here and there with the Circle Pattern Background stamp and white paint. Always clean the stamp immediately after using it with paint.

Layers of ink - 2020 art journal page tutorial by Anna-Karin Evaldsson.

I added a border, journaling and some dots with a Sharpie paint pen.

Layers of ink - 2020 art journal page tutorial by Anna-Karin Evaldsson.

Apply Stickles Moon Dust on some of the dots, through the stencil with a palette knife.

Layers of ink - 2020 art journal page tutorial by Anna-Karin Evaldsson.

Since the background was a random mix of color, all the circles look different.

Layers of ink - 2020 art journal page tutorial by Anna-Karin Evaldsson.

The paint circles add texture to the black background while also toning down the black a little.

Layers of ink - 2020 art journal page tutorial by Anna-Karin Evaldsson.

The glitter gel looks real nice on some of the dots and is perfect for New Year.

Layers of ink - 2020 art journal page tutorial by Anna-Karin Evaldsson.

I really like small sentiment stamps, since they can fit in many places. 

Layers of ink - 2020 art journal page tutorial by Anna-Karin Evaldsson.

I used the stamps with the people hanging from strings on my Honeycomb Patchwork Journaling page too. They were meant to hang from balloons, as you can see here on the Just Miss You set.

Layers of ink - 2020 art journal page tutorial by Anna-Karin Evaldsson.

I am trying to hand-letter a little more on my projects and here I wanted big bold numbers with a rough look, which weren't so hard to do.

Layers of ink - 2020 art journal page tutorial by Anna-Karin Evaldsson.

The Make Most Of stamp is by Darkroom Door and was white embossed on vellum. You could also white emboss it directly on page.

Layers of ink - 2020 art journal page tutorial by Anna-Karin Evaldsson.

Part of writing more by hand was also the hand-written sentiments on this page, written with a Sharpie Paint Pen.

Layers of ink - 2020 art journal page tutorial by Anna-Karin Evaldsson.

I had a penguin left over from another project on my desk and decided to place it into one of the numbers. It was die cut with the Memory Box Snowglobe Backer set from Frosted Glitter Paper.

Layers of ink - 2020 art journal page tutorial by Anna-Karin Evaldsson.

The Moon Dust Stickels has a mix of small and larger pieces of glitter. It looks particularly cool overlapping the painted number. 

Layers of ink - 2020 art journal page tutorial by Anna-Karin Evaldsson.

I always enjoy nature, but during this year, it has been even more important than before.

Layers of ink - 2020 art journal page tutorial by Anna-Karin Evaldsson.

I liked the look of this half circle, which happened since there was already some black paint on the background when I placed out the circles.


Thank you so much for stopping by here today! I will be back tomorrow with a year-in-review post about some of my favorite projects. 

Happy crafting!

Anna-Karin

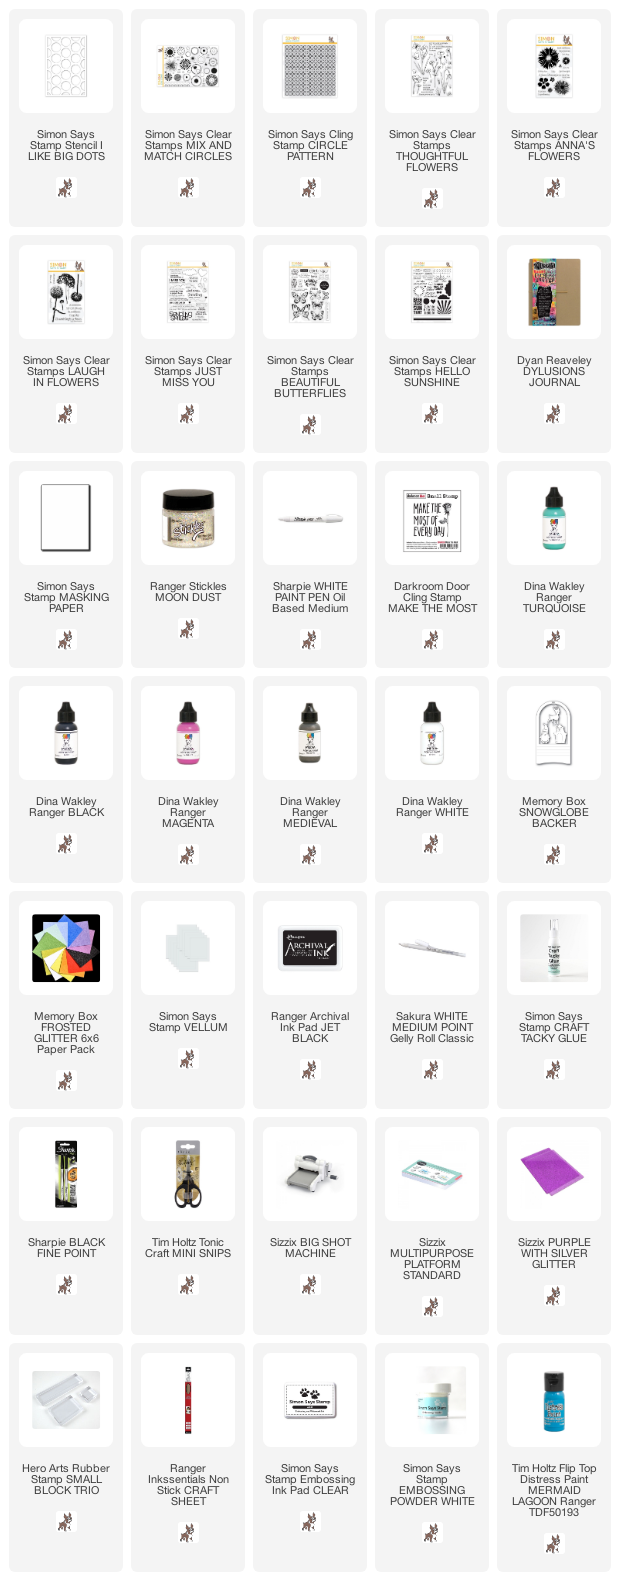
Supplies:

* Please note: the links are affiliate links, for which I receive a small percentage of sales generated by the link, at no extra cost to you.

Saturday, December 26, 2020

Scenic Winter Ornaments

Hello friends and Merry Christmas! I hope you have had a beautiful Christmas. Our Christmas lasts three days from Christmas Eve until Boxing Day. Santa comes to deliver gifts personally on Christmas Eve, but this year, he couldn't come into the house, but had to leave the gifts outside the door. The boys had a wonderful time, even though we missed being with family.

We got our first snow of the year on Christmas Day. Perfect timing!! It makes everything look so much brighter.

I have a winter tutorial for you, in the shape of dimensional shiny and glittery ornaments.

Layers of ink - Scenic Winter Ornaments Tutorial by Anna-Karin Evaldsson.

These ornaments can hang in a tree, in a window or on the wall. Since they are winter-themed, rather than Christmas-themed they can be given as gift or displayed the whole winter. I had such fun using metallic, glitter and holographic papers to make these. Mixing papers with different surfaces also adds interest. The ornaments were made with dies by Memory Box and you can also use the techniques to make flat cards.

The step photos are mainly for the aqua ornament to the left.

Layers of ink - Scenic Winter Ornaments Tutorial by Anna-Karin Evaldsson. Memory Box Snowglobe Backer

Start by die cutting the Snowglobe Backer from light blue Memory Box Frosted Glitter paper and from blue Simon Says Stamp Shimmery Cardstock. I also die cut it from one of the SSS Aqua Holographic papers, to use the back piece.

Layers of ink - Scenic Winter Ornaments Tutorial by Anna-Karin Evaldsson.


Layers of ink - Scenic Winter Ornaments Tutorial by Anna-Karin Evaldsson.

There are additional Memory Box snowglobe dies that you can use to build up a scene, but since I only had these two, I decided to cut off a piece from the aqua and glitter paper, so that they would not all be the same.

Layers of ink - Scenic Winter Ornaments Tutorial by Anna-Karin Evaldsson.  Die cut from glitter paper.

Die cut the deer and penguin from various glitter papers. I used glitter papers from both Memory Box and SSS.

Layers of ink - Scenic Winter Ornaments Tutorial by Anna-Karin Evaldsson. Poppy stamps Evergreen Trio

Die cut trees with the Poppy Stamps Evergreen Trio set from aqua and white glitter paper.

Layers of ink - Scenic Winter Ornaments Tutorial by Anna-Karin Evaldsson.

I glued the shimmery frame to the inside of the glitter frame, to cover up the white paper.

Layers of ink - Scenic Winter Ornaments Tutorial by Anna-Karin Evaldsson.

Fold along the score lines on the die cuts and start with the foil background, as seen here.

Layers of ink - Scenic Winter Ornaments Tutorial by Anna-Karin Evaldsson.

Continue with the aqua and white landscape pieces. This will cover the floor of the Snowglobe Backer piece.

Layers of ink - Scenic Winter Ornaments Tutorial by Anna-Karin Evaldsson.

Here's a photo of what the ornament looks like from the side. It's a really simple way of creating dimension.

Layers of ink - Scenic Winter Ornaments Tutorial by Anna-Karin Evaldsson.

These are the pieces I die cut for the white and silver ornament. I used SSS Aqua Holographic paper, Memory Box Frosted Glitter, SSS Silver Glitter and white Memory Box Foil paper. I also added a second holographic piece for the back (not included in this photo).

Layers of ink - Scenic Winter Ornaments Tutorial by Anna-Karin Evaldsson.

I added the cut-off trees here and there on the different frame pieces, since I wanted more trees.

Layers of ink - Scenic Winter Ornaments Tutorial by Anna-Karin Evaldsson. Glitter penguin.

The penguin was adhered with foam dots. You can add a staple to the front fold-up to make sure it is stuck well.

Layers of ink - Scenic Winter Ornaments Tutorial by Anna-Karin Evaldsson.

Here you can perhaps better see the dimension. The trees reflect nicely in the holographic paper.

Layers of ink - Scenic Winter Ornaments Tutorial by Anna-Karin Evaldsson. SSS Holographic paper.

The SSS holographic paper is so cool. I just love how this paper looks like a winter sky with a magical aurora borealis. The colors change as you change the angle of the light. There are also a few sequins.

Layers of ink - Scenic Winter Ornaments Tutorial by Anna-Karin Evaldsson.

Angle the ornament differently and the same paper looks like this. Isn't it cool?

Layers of ink - Scenic Winter Ornaments Tutorial by Anna-Karin Evaldsson.

And from this angle, the sky has a third look, with more light aqua colors.

Layers of ink - Scenic Winter Ornaments Tutorial by Anna-Karin Evaldsson. Glittery forest.

The trees look nice in the different glitter and foil papers.

Layers of ink - Scenic Winter Ornaments Tutorial by Anna-Karin Evaldsson.

And I love this cute little deer from the Snowglobe Backer set.

Layers of ink - Scenic Winter Ornaments Tutorial by Anna-Karin Evaldsson.

You can of course use any sentiment. I find a snowy landscape to be very peaceful, which is why I picked this one. The sentiment I used come from Memory Box Berry Wreath set and was stamped with SSS Spring Rain ink.

Layers of ink - Scenic Winter Ornaments Tutorial by Anna-Karin Evaldsson.

I am not sure which one is my favorite. I like the different shades of white and silver on this one. If you look closely, you'll see that the white glitter papers that I used aren't exactly the same, adding variation. I also used up small pieces of left-over glitter paper for the trees and snowmen.

Layers of ink - Scenic Winter Ornaments Tutorial by Anna-Karin Evaldsson.

From the side it looks like this. The white foil frame is closest to the back, then the silver glitter fram ant at the front, the white glitter frame.

Layers of ink - Scenic Winter Ornaments Tutorial by Anna-Karin Evaldsson. Paper snowmen.

These snowmen from the Snowmen Snowglobe set are so cheerful. I also used them on my Winter House Easel Card project.

Layers of ink - Scenic Winter Ornaments Tutorial by Anna-Karin Evaldsson.

Our trees actually have some of the glitter now, since the snow has arrived. Hopefully it will stay for a while.

Layers of ink - Scenic Winter Ornaments Tutorial by Anna-Karin Evaldsson.

I added extra trees here too. Just glue them to the back of the frames.

Layers of ink - Scenic Winter Ornaments Tutorial by Anna-Karin Evaldsson. SSS Holographic paper.

The holographic paper in the back looks almost like snowfall.

Layers of ink - Scenic Winter Ornaments Tutorial by Anna-Karin Evaldsson.

The sentiment was silver embossed to fit with the colors of the ornament.

Layers of ink - Scenic Winter Ornaments Tutorial by Anna-Karin Evaldsson.

Our ornaments are hanging in the tree now, but when we remove the tree I will hang them in a window so that we can keep them out all winter.

Layers of ink - Scenic Winter Ornaments Tutorial by Anna-Karin Evaldsson.

The lights from the tree reflects nicely in all that glitter and shine.

I hope you enjoyed this tutorial and that it inspired you to do some winter crafting and to have fun mixing glitter, holographic and foil papers.


Thank you so much for stopping by here today! 

Happy crafting!

Anna-Karin

Supplies:

* Please note: the links are affiliate links, for which I receive a small percentage of sales generated by the link, at no extra cost to you.