Showing posts with label Derwent. Show all posts

Monday, February 5, 2018

Shimmery Watercolor Art Journal Tutorial

Hello everyone! I hope you had a good weekend! We had lovely cold and sunny weather and Leo and I took one of our walks that go past a horse center. He loves to look at the horses. Leo was also very lucky to get a bag of old cars from one of Anton's friends, so he had a really great weekend.


This week at the Simon Says Stamp Monday Challenge Blog we have a Love is in the air theme, and since it is the first Monday of a new month, the team is showcasing products by a specific company / designer. This week the turn has come to Carabelle Studio, you can see all their pretty stamps and stencils here

Our February guest designer is Stacy Hutchinson, don't miss her gorgeous project. 

Layers of ink - Shimmery Watercolor Art Journal Tutorial by Anna-Karin Evaldsson with Carabelle Studios stamps

I did a Valentine's card last week and already made Valentine's day cards for the boys (you can find them in this post), so I felt like something different this week. This quote about loving many things jumped into my head and I decided to do an art journal page. I don't use my own handwriting enough in my art journals, and if I do, it is often hidden in some way, so for today, I challenged myself to write the quote by hand on the page, and not worry too much about how it looked. It also helped that I had a lovely new pen by Jane Davenport that I wanted to try it. It is a beautiful turquoise color and was the first thing Anton spotted on my desk yesterday when he was doing one of his rounds to see what he might find.

Layers of ink - Shimmery Watercolor Art Journal Tutorial by Anna-Karin Evaldsson with Carabelle Studios stamps

I used two stamp sets by Carabelle Studio, Herbier 2 and Dans Les Champs and white embossed them. I worked in my brand new Jane Davenport Mixed Media Canvas Cover Journal, which has watercolor paper inside. As you might know, I have a thing for watercolor paper and I was really happy to find this journal.

Layers of ink - Shimmery Watercolor Art Journal Tutorial by Anna-Karin Evaldsson in Jane Davenport journal

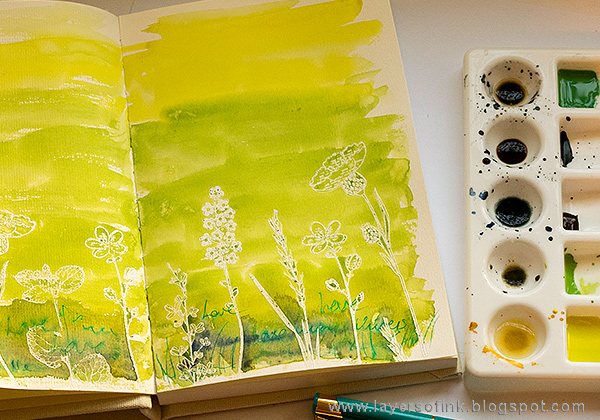
Paint the page with a mix of yellow and green watercolor paint. Before it was completely dry, I scribbled and wrote some words with the Inkredible Pen Set pen by Jane Davenport, using a turquoise green ink cartridge. Because the ink is water soluble, it dissolved a little since the paper was still wet. This was the effect I wanted and it is my favourite part of this page. Some of the words are still legible, others are not.

Layers of ink - Shimmery Watercolor Art Journal Tutorial by Anna-Karin Evaldsson with Derwent Inktense

To color the flowers I used a mix of Scribble Sticks and Derwent Inktense pencils, both of which are water soluble.

Layers of ink - Shimmery Watercolor Art Journal Tutorial by Anna-Karin Evaldsson with Carabelle Studios stamps

A couple of additional strands of grass were stamped with Peeled Paint Distress Ink, misting with water before stamping for a watercolor look. I also misted the entire page with Wendy Vecchi's Butterscotch Mica Spray, which gave it a lovely warm shine.

Layers of ink - Shimmery Watercolor Art Journal Tutorial by Anna-Karin Evaldsson with Carabelle Studios stamps

Before the mica spray was completely dry, I dipped a green and a brown Scribble Stick in water and flicked a paint brush against them to create splatters. In the areas were the mist was dry, the splatters are well defined, in the areas where the mist was still wet, they dissolved slightly, creating almost a bokeh effect.

Layers of ink - Shimmery Watercolor Art Journal Tutorial by Anna-Karin Evaldsson with Jane Davenport Inkredible pen

When the page was dry, I wrote the quote with the Inkredible pen, and also stamped the background some more with Tammy Tutterow's Dear Ruby stamp.

Layers of ink - Shimmery Watercolor Art Journal Tutorial by Anna-Karin Evaldsson with Ranger Letter It Medium Pens

I also wanted to try out Ranger's new Clear Medium Pens and embossing powders, from their Letter It range. I wrote the title with a bullet shaped pen. The pens contain Perfect Medium, which means that you can both use them with Perfect Pearls and with embossing powders. It was embossed with the Marigold powder.
 Layers of ink - Shimmery Watercolor Art Journal Tutorial by Anna-Karin Evaldsson

I also doodled some hearts and embossed them. The embossing powder gives a lovely raised effect.

Layers of ink - Shimmery Watercolor Art Journal Tutorial by Anna-Karin Evaldsson

You could easily stamp even more flowers to create a kind of meadow effect. I used the Ranger pens to add more white grass at the bottom of the page, embossing with white powder. I also used some Small Talk stickers.

Layers of ink - Shimmery Watercolor Art Journal Tutorial by Anna-Karin Evaldsson

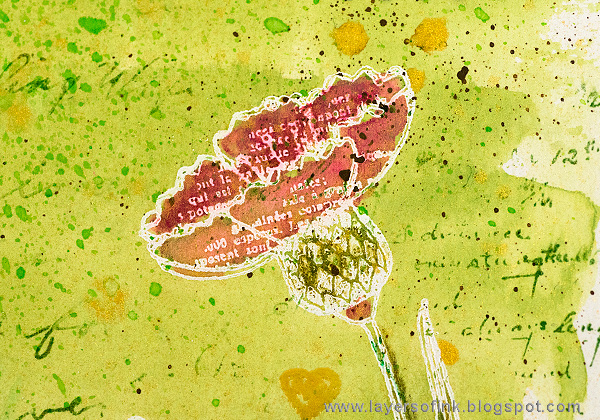
Here's a close up of one of the flowers. Since I had washed the page with green first, the colors are a little muted.

Layers of ink - Shimmery Watercolor Art Journal Tutorial by Anna-Karin Evaldsson

Here you can see the texture and the writing better.

Layers of ink - Shimmery Watercolor Art Journal Tutorial by Anna-Karin Evaldsson

Don't worry about coloring the flowers perfectly, a bit of messiness adds to the watercolor look.

Layers of ink - Shimmery Watercolor Art Journal Tutorial by Anna-Karin Evaldsson

Here you might see the lovely raised effect of the embossing powder a little better. The gold trim is Dresden German Scraps by Prima.

Layers of ink - Shimmery Watercolor Art Journal Tutorial by Anna-Karin Evaldsson

The effect of the mica spray is always a little hard to catch, but you can see it here.

I hope you will join us this week in our Love is in the air challenge. As always, you have a chance to win a $50 gift voucher to do some fun shopping at Simon Says Stamp. You have until next Monday 8am Ohio time. 1pm UK time, 2 pm CET to join in.


Don't forget to follow Simon Says Stamp on Instagram, they post great stuff daily. 


Do you use Instagram? If so please add #sssmchallenge so we can see your entries there too.


Thank you for taking the time to stop by my blog today!  

Happy crafting!

Anna-Karin

Supplies

* Please note: the links are affiliate links, for which I receive a small percentage of sales generated by the link, at no extra cost to you.


Carabelle Studio DANS LES CHAMPS BY ZORROTTE
[ SSS ]
Carabelle Studio HERBIER 2
[ SSS ]
Jane Davenport PLAIN 9x6 Inch Mixed Media Canvas Cover Journal 376704
[ SSS ]
Jane Davenport TEAL INKredible Pen Set Mixed Media 2
[ SSS ]
Tammy Tutterow Designs DEAR RUBY
[ SSS ]
Winsor Newton COTMAN WATERCOLORS PLUS 12
[ SSS ]
Derwent 24 INKTENSE COLORED PENCILS
[ SSS ]
Dina Wakley Ranger SCRIBBLE STICKS
[ SSS ]
Ranger WENDY VECCHI Designer Mica Sprays
[ SSS ]
Ranger METALLICS EMBOSSING POWDER SET Letter It
[ SSS ]
Ranger CLEAR MEDIUM PENS SET 2 Letter It lei59608
[ SSS ]
Ranger CLEAR MEDIUM PENS SET 1 Letter It lei58793
[ SSS ]
Prima Marketing WROUGHT IRON GOLD Dresden
[ SSS ]
Tim Holtz Idea-ology SMALL TALK
[ SSS ]
Tim Holtz Idea-ology CHITCHAT STICKERS
[ SSS ]
Simon Says Stamp EMBOSSING POWDER WHITE
[ SSS ]
Tsukineko Versamark EMBOSS INK PAD
[ SSS ]
Ranger Archival Ink EMERALD GREEN
[ SSS ]
Tim Holtz Distress Ink PEELED PAINT
[ SSS ]
Tim Holtz Distress Collage Medium MATTE
[ SSS ]
Hero Arts Rubber Stamp CLEAR ACRYLIC BLOCK 4 x 4.5
[ SSS ]
Winsor Newton COTMAN SYNTHETIC SABLE 111 ROUND 1 Brush
[ SSS ]
Prima Marketing ROUND #14 Watercolor Artist Brush
[ SSS ]
Prima Marketing ROUND #4 Watercolor Artist Brush
[ SSS ]

Friday, March 20, 2015

Stampendous/Eileen Hull ATB Tutorial

Hello everyone! I missed the blog hop that the Eileen Hull Inspiration Team had together with Stampendous. I was working on my project the evening that Leo was born, so I will always remember this Artist Trading Block. I was planning to photograph it the next morning, but that of course didn't happen.

I made a watercolour Artist Trading Block with very pretty flower and sentiment stamps from Stampendous: Frantage Flowers, Queen Bee, Say It Today. I thought this would be a nice spring-time gift for someone special (although I am not planning to give it away anymore). The flowers were coloured with Derwent Inktense pencils, which worked great for these detailed images. The Inktense pencils are great, and if you add water on top, they turn into watercolours, but once dry, the colour is permanent. This is a tutorial.

Start by die cutting the pieces of a block using the 3-D Blocks/Cubes die. Die cut the largest of the three blocks on the die. It is an XL die, so you need the Extended Cutting Pads together with your Big Shot or Vagabond. You can also use one of the other block dies, such as the 3-D Block/Cube/Bank die, which is just slightly larger than the block here. I used white mat board as my base since it takes ink and paint beautifully. If you use chipboard, you might want to cover it with paper first, to give you a white surface to work on.

Stamp flower images from Frantage Flowers and Queen Bee with Jet Black ink. The ink needs to be waterproof.

Stamp sentiments with the same ink. Colour the flowers with Inktense pencils, leaving some areas white for highlights.

Use water and a paintbrush to turn the pencils into watercolours. When dry, the paint is permanent, which is a great characteristic of Intense pencils.

Smear Antique Linen and Frayed Burlap Distress Ink on your craft sheet, mist with water and pick up with a paint brush. Paint around the flowers, starting with Antique Linen and dropping in the darker Frayed Burlap.

Apply a strong adhesive along the edges. I used Ranger's Wonder Tape.

Don't assemble the block yet (like I did), instead stamp swirl stamps from Frantage Flowers here and there with Frayed Burlap, using both first and second generation stamping. It is easier to stamp before you assemble the block. Dry with a heat tool.

Smear Ranger's Emboss It dabber around the edges of the block, one side at a time. Sprinkle with Stampendous Aged Ivory Embossing Enamel and melt with a heat gun. Be careful so you don't burn yourself. I love the vintage look of this embossing powder.

This block comes together real fast and the recipient will be happy for a different type of thank you gift.

The sentiments work so well together, and would be great for cardmaking too.

The Inktense pencils work very well when it comes to colouring such detailed images, since you can easily get the colour exactly where you want it to be. Just don't use too much water when you turn them into watercolour.

The neutral background lets the bright flowers stand out nicely.

I love these honey bee stamps and the way in which the embossing powder frames the panels.

You can see the round up with links to all the posts in the blog hop here on Eileen Hull's blog and here on Stampendous blog.

Thank you so much for stopping by today! Have a great weekend!

Happy Crafting!

Anna-Karin


Supplies:


And:
Stampendous: Frantage Flowers, Say It Today