Showing posts with label Sutter. Show all posts

Sunday, July 6, 2014

Fairy Tale Castle

Hello stampers! A new month and of course a new Craft a Scene challenge theme - Fairy Tales. I am looking forward to seeing what you will create.
 
Many fairy tales need a castle, and I made mine pink. The scene is done on glossy cardstock and coloured the with dye inks, using a Colorbox Stylus tool. Most of the stamping was done with black ink and I tried out quite a few compositions before deciding on this one. The castle is from Sutter and the rest of the stamps from Stampscapes. Highlights were added with a white gel pen and mist with white pigment ink.
 
If you read the Craft Stamper magazine, don't miss my series on scenic stamping, with tutorial articles. The first article is in the July issue and the second one is in the August issue, which is out now. And there is more to come! If you don't read the Craft Stamper, it is a wonderful stamping magazine, full of techniques.
 
Thank you for stopping by!
 
Happy stamping!
 
Anna-Karin
 
Supplies:
Stamps: Sutter: Castle #2; Stampscapes: Ledge 954F, Side Falls Lg. 075G, Tree Duo 085A, Tree Duo Lg.086B, Migrating Birds 152D, Oak Branch 203G, Scenic Sentiment Sheet 7
Ink: Ranger Adirondack: Salmon, Aqua, Willow, Oregano, Pesto, Stonewashed; Distress Ink: Peeled Paint, Black Soot, Pumice Stone, Iced Spruce; Colorbox Frost White; Ranger Archival Ink Jet Black
Surface: Kromecote glossy cardstock

Sunday, June 16, 2013

Elk at Waterfall

Hello and welcome to my blog! Today I am sharing my second scene of the month for Craft a Scene's June challenge, 'Forest Animals'.

Elk at waterfall - Layers of ink
I have run into elks quite a few times in the forest and when we children they were relatively frequent visitors to our residential area, eating apples in the garden among other things. This one is in its natural environment, taking a stroll beneath a little waterfall. All the stamping was done with Archival Jet Black ink on glossy cardstock. The scene was coloured with dye inks, using a Colorbox Stylus Tool, as usual starting with the lightest shades and gradually building up darker colours (see this tutorial). Highlights were added with a white gel pen and mist with white pigment ink.

Thank you for looking! I hope you will play along with us this week!

Happy Stamping!

Anna-Karin

Supplies:
Stamps: Stampscapes: Ducks in Formation 027A, Brook Falls 184G, Prickley Branches 272G, Mossy Rocks Sm. 322C, Sentiment Sheet 7; Sutter: Left Moose Large
Ink: Adirondack: Aqua, Stonewashed, Denim, Pesto; Distress Ink: Antique Linen, Frayed Burlap, Gathered Twigs; Jenni Bowlin: Weather Vane; Memento: Gray Flannel; Colorbox Frost White
Surface: Kromecote glossy cardstock

Sunday, June 2, 2013

Deer in Birch Forest

Hello and welcome! A new month and a new challenge theme at Craft a Scene, 'Forest Animals'. So do a scene which includes any kind of forest animal, from your own area or elsewhere.

I use my small animal stamps a lot, but sometimes forget about the larges ones, so I challenged myself to use some of them this month.

For this week, I did a watercolour card featuring a cute Sutter deer stamp. I love seeing deer in the forest and I am also particularly fond of Birch trees. The trees and deer were stamped on watercolour paper with Archival Jet Black Ink. To make it easy to stamp the grass and paint the sky and grass, I painted the trees and deer with masking fluid. When it was dry, the grass texture was stamped. To paint the sky, I first painted it with clean water and then dropped blue watercolour paint into the sky. The grass was painted in a similar way, but I added some dry-brushing and painted extra grass and also shadows (once the first layer of paint was dry). By making the grass darker and warmer in the front of the scene you add a feeling of perspective.

Finally, I painted some highlights and flowers with white acrylic paint and stamped the leaves in the left hand corner.

Thank you for looking! I hope you will join us this month!

Anna-Karin

Supplies:
Stamps: Stampscapes: Ducks in Formation 027A, Sedge Filler 251C, Twisting Leaves Sm., Birch Tress 312I, Birch Trees Sm. 313G; Sutter: Fawn
Ink: Ranger Archival Jet Black
Paint: Daler & Rowney watercolours; Adirondack Snow Cap
Surface: Daler & Rowney watercolour paper
Medium: Daler & Rowney masking fluid
Embellishments: twine

Sunday, April 14, 2013

Running Wild

Hello everyone! We are continuing this month's theme of  'Down on the Farm/Western' at Craft a Scene. We love seeing all the different farm scenes that are submitted to the challenge.

Here is my second card for the month:

I was happy to ink up a Sutter horse stamp that I hadn't used yet. When test stamping the scene on a piece of scrap paper, I wasn't sure of which of the two Stampscapes houses to use and stamped both to see which one looked the best. It turned out that they looked really great together, and it also looked more like a little forest farm, than if I had just used the one house.

I masked the horses so that they wouldn't be covered in grass texture and stamped the Meadow to the top right, to create the tree line and grassy area. To the left, I stamped stones, grass texture with the Sedge Filler stamp, and some small pine trees, to tie it to the meadow stamp part of the scene. I also added trees behind the houses. All the stamping was done with Archival Jet Black.

The scene is done on glossy cardstock and coloured with dye inks using a Colorbox Stylus tool (see this tutorial). For the grass I used Willow, Lettuce, Meadow, Oregano, Pesto and Forest Moss, in that order. It is often a good idea to add some browner tones to grass too (Pesto and Forest Moss), and not only use green. The horses and houses were coloured with Pebble, Mushroom, Ginger, Espresso and Walnut Stain. I used Aqua and Stonewashed for the sky. Highlights were added with a white gel pen and just a little bit of mist by drybrushing white pigment ink.

Thank you for looking!

Happy Stamping!

Anna-Karin

Supplies:
Stamps: Sutter: Horses in Sand; Stampscapes: Meadow Lg. 057G, Tree Duo 085A, Tree Duo Lg. 086B, Shack 246B, Cabin Sm. 248A, Sedge Filler 251C, Prickly Branches 272G, 3 Rocks and Grass 299B, Rocks and Grass 301A
Ink: Adirondack: Aqua, Stonewashed, Willow, Lettuce, Meadow, Oregano, Pesto, Pebble, Mushroom, Espresso; Distress Ink: Forest Moss, Walnut Stain; Ranger Archival Jet Black; Colorbox Frost White
Surface: Kromekote glossy cardstock

Sunday, March 31, 2013

Down on the Farm

Hi everyone! A new month starts tomorrow and a new challenge at Craft a Scene. During April our challenge theme is Down on the Farm or Ranch Scenes. Great chance to use your old barn stamps, fences, cattle, horses, cowboys, etc.

My first card:

This is a half sheet scene done on glossy cardstock. I started out with the new Stampscapes Old Barn stamp and then added other stamps to build a night farm scene. It ended up being a bit similar to a card I made last year, without me even realising it. All the stamping was done with Archival Jet Black Ink. I first applied yellow ink with a Colorbox Stylus tool, and then continued with the lighest shade of grey (Weather Vane) and adding darker and darker shades. The grassy areas were built with the Sedge Filler stamp and some stones. I love the Sedge Filler, it just magically creates a field of grass when you stamp it repeatedly.

As usual, highlights were added with a white gel pen and mist and shine by dry-brushing white pigment ink on the scene.

Thank you for looking! I hope you will join us during April!

Happy Stamping!

Anna-Karin

Supplies:
Stamps: Stampscapes: Cloud w Rising Moon Lg. 198G, Sedge Filler 251C, Prickly Branches 171G, 3 Rocks and Grass 299B, Rocks and Grass 301A, Pebbles, Rocks and Grass 323C, Old Barn 334F, Old Barn Fence (right) 336D, Old Barn Fence Right 337D, Hanging Branch 355G, Winter Twigs 367B, Winter Twigs Sm 368A; Sutter stamps: old fence, cowboy
Ink: Adirondack: Lemonade, Pebble, Mushroom, Slate, Pitch Black; Jenni Bowlin: Weather Vane, Yellow; Memento: London Fog, Gray Flannel; Colorbox Frost White
Surface: Kromekote clossy

Sunday, December 16, 2012

Watercolour Winter Scene

Today I am sharing my second scene for this month's Craft a Scene challenge - winter scenes. Don't miss the other DT scenes, it's a great variety of inspiration.

I felt like some watercolouring.

The images were stamped with Archival Jet Black ink on watercolour paper, which works best for watercolouring. You need to use a waterproof ink, since it must be able to handle the water. I lightly misted the scene with Goosebumps mist, a bit too lightly actually, you hardly see it, especially since the scene is coloured with light colours. You can see the mist, which gives a resist effect, in the shadow of the wolves. Let the scene dry.

The pine trees were painted with masking fluid, to protect the white, you can paint around them too, if you don't have masking fluid. Let dry again. I used only four colours: Cobalt Blue, Rose Madder, Neutral Tint and just a tad of Burnt Sienna. The sky was first painted with water and then with watery Rose Madder and Cobalt Blue. When dry, you can remove the masking fluid and continue painting the rest of the scene.

I added a bit of all the four colours on the snowy areas, creating shadows at the trees and the wolves, and making it somewhat darker at the front than at the back of the scene. The wolves were painted with Burnt Sienna and Neutral Tint.

While I was busy, I made a second version, because I needed more Christmas cards. It is almost exactly the same.

Thank you for looking! You still have another two weeks to join us in the challenge.

Happy stamping!

Anna-Karin

Supplies:
Stamps: Sutter: Snowy Fir Tree Large, Medium, Small set; Snowy Leaf Tree; Romping Wolves Small; Howler Small, sentiment
Ink: Ranger Archival Jet Black Ink
Paint: Daler & Rowney watercolours
Mist: Tsukineko Goosebumps Clear Texture Spray
Surface: Daler & Rowney watercolour paper (NOT)
Masking fluid: Daler & Rowney

Sunday, August 19, 2012

Earth laughs in flowers

Hi everyone! Today I am sharing my second card for this month Craft a Scene challenge: any outdoorsy scene. There is still lots of time to play along!

I felt like doing a watercolour scene:

First, the trees, fence and stones were stamped with Ranger Archival Jet Black ink on watercolour paper. After letting them dry for a while, I applied masking fluid to the Birch trees, and many dots of masking fluid in the grass, because I wanted to add flowers there later. I was happy to discover that the masking fluid didn’t affect the Archival ink at all, lots easier than cutting out a mask for the tree. Let the masking fluid dry completely before continuing.

I painted the scene with watercolours, starting with the sky. The hill in the distance is lighter than the grass areas at the front, which adds to a sense of distance. When it was dry, I added some birds to the sky, shadows at the oak tree and the fence and grasses. Texture was added to the grass by dry-brushing. After everything was dry again, I rubbed off the masking fluid and painted the flowers pink and red, and added a bit of grey and green to the Birch trees. Finally, the sentiment was stamped on the scene, using Jet Black ink and a stamp positioner.

Thank you for looking!

Anna-Karin

Supplies: Stampscapes: Oak Tree Sm. 177B, Fence 289D, Old Fence 293C, 3 Rocks and Grass 299B, Rocks and Grass 301A; Sutter Right Birch stamp; Daler & Rowney watercolours, watercolour paper and masking fluid.

Sunday, July 15, 2012

Magical Garden Scene

Today I have another scenic card to share which I made for Craft a Scene. This month’s theme is Inside the Garden and you could win a prize from this month's sponsor Heartfelt Creations.

I wanted to make a magical, fairytale garden and decided to do a nighttime scene using a monochrome colour scheme.


The scene is done on glossy cardstock (8.5x5.5 inches). All the stamping was done with Ranger Archival Ink Jet Black. As always, I planned the scene on scrap paper first. I wanted to use lanterns, but didn’t have any, so instead I stamped only the top part of a lamp post stamp, right on top of the wall, in three places. The scene was coloured with dye inks using a Colorbox Stylus tool (see this tutorial for this colouring technique), using shades of blue and turquoise, in this order Aqua, Speckled Egg, Peacock Feathers, Stream, Denim, Pitch Black.

When I was finished with the colouring I wanted to include just a bit of silver, so I restamped the leafy branches in the front with Versamark and silver embossed them. Highlights were added with a white gel pen and mist by dry-brushing white pigment ink on the scene.

Thank you for looking! I hope you will play along with us!

Anna-Karin

Supplies: Stampscapes: Buck Lg. 009B, Flock 112A, Oak Branch 203G, Sedge Filler 251C, Pebbles 256A, Twisting Leaves Sm. 275D, Eerie Moon 282F; Sutter: Weeping Willow medium and small, Walkbridge; Beeswax Wishing Well, Street Light; Wildlife Enterprises Stone Wall; Adirondack dye ink: Aqua, Stream, Denim, Pitch Black; Jenni Bowlin ink: Speckled Egg; Distress Ink: Peacock Feathers; Colorbox Frost White; silver embossing powder; white gel pen.

Wednesday, July 4, 2012

A bear family at the water

Today I have a piece of scenic stamping to share that I made for a Sutter Waterlife swap. I wanted lots of water on this scene and I did quite a few drafts on scrap papers before deciding on the final placement of everything.


The scene (21.5x14 cm, half sheet) is done on glossy cardstock and coloured with dye inks. Most of the stamping was done with Ranger Archival Jet Black, except for some of the trees and the grass texture whish was done with green ink, and the birds and water pattern were stamped with different blue inks. The colouring was done with a Colorbox Stylus tool, leaving areas of the water and sky the white of the paper. I used a craft nib to colour the bears and the waterfalls, since more precision was needed for those areas.

As usual I started with the lighter shades of inks and gradually built up colour. You can find my tutorial for this colouring technique here. Highlights were added with a white gel pen. Finally, I added quite a bit of mist at the waterfalls and in the water by dry-brushing white pigment ink on the scene. The mist at the waterfall furthest away, also pushes the falls back in the scene, creating perspective.

Thank you so much for visiting!

Anna-Karin

Supplies: Sutter Stamps: River Falls, Broad Waterfalls, River, Griz Waterhole, Drinking Griz, Fir medium; Stampscapes: Tree Duo Lg. 086B, Migrating Birds 152D, Water Pattern 231D, Sedge Filler 251C, Loon with Reflection 262A, Prickly Branches 272G; Adirondack: Willow, Pesto, Aqua, Stonewashed, Denim, Espresso, Slate; Distress Ink: Antique Linen, Vintage Photo, Walnut Stain, Peeled Paint; Jenni Bowlin: Chewing Gum, Weather Wane; Archival Ink Jet Black and Olive; Memento Bamboo Leaves; Colorbox Frost White; Kromekote glossy cardstock.

Sunday, July 1, 2012

Wild Garden Scene

Hi everyone! During July the challenge theme at Craft a Scene is Gardens. Have a look at the site to see the details and the fabulous DT work. I really enjoyed this theme, especially since I don’t think I have stamped any garden scenes before. I normally do more wild nature types of scenes.

My garden scene features the type of garden that is my favourite – a wild garden, where everything grows sort of where it wants to, no landscaping in site. A little boy is walking carrying his dog through the garden up the cottage on a hill. I added some birch trees (love birch trees), a rough stone wall and a jagged wooden fence.

My grandmother had white and pink flowers growing in her lawn when I was a child. They were seen as weeds, but I loved them and didn’t understand why she wanted them gone. I wanted those flowers in the grass of my stamped garden. To create the flowers, I used two great little flower stamps in one of my Stampscapes sets (Nature Sheet 4), stamped them repeatedly with Versamark and white embossed. This created great texture in the scene and since they were embossed, they resisted all the inking.

The scene is done on glossy cardstock (half page) and coloured with dye inks using a Colorbox Stylus tool and craft nibs – I recently did a tutorial for this technique of colouring, you can find it here. The birch tree and the boy were stamped first with Archival Jet Black and masked. The rest of the stamping was done with Jet Black and Olive ink. I used the Sedge Filler stamp to create a lot of the grass. The scene was coloured using the inks listed in the supply list, starting with the lightest shades and gradually building up colour.

Highlights and more flowers were added with a white gel pen, and even more flowers with yellow, pink and purple gel pens. I also stamped the flower textures stamps with yellow pigment ink. Three paper roses finished the garden.

Here's a close-up of the wild flowers:

Thank you for looking! I hope you will play along with us!

Anna-Karin

Supplies:
Stamps: Stampscapes: Ducks in Formation 027A, Rocks and Leaves 206E, Sedge Filler 251C, Pebbles 256A, Nature Sheet 4; Sutter: First Puppy, Log House, Country Fence, Mirrored Country Fence, Right Birch, Cottonwood, Pump small; Beeswax: Right Fence, Left Fence, Stone Path; Darkroom Door: Essentials 4, Essentials 5.

Ink etc: Adirondack: Willow, Aqua, Pesto, Stonewashed, Denim, Slate, Espresso; Distress Ink: Peeled Paint, Frayed Burlap, Antique Linen, Vintage Photo: Jenni Bowlin: Weather Wane, Chewing Gum; Memento: Bamboo Leaves; Ranger Archival Jet Black and Olive; Colorbox Frost White and yellow; Ranger Seafoam White embossing powder; Kromekote glossy cardstock; paper roses; gel pens.

Sunday, June 10, 2012

On the beach: scenic layout

Hi everyone! This is my first DT project for Craft a Scene. The theme for June is Beach – a bit of sand and water. I hope you will play along with us, and remember to check the site for the projects from the rest of the DT.

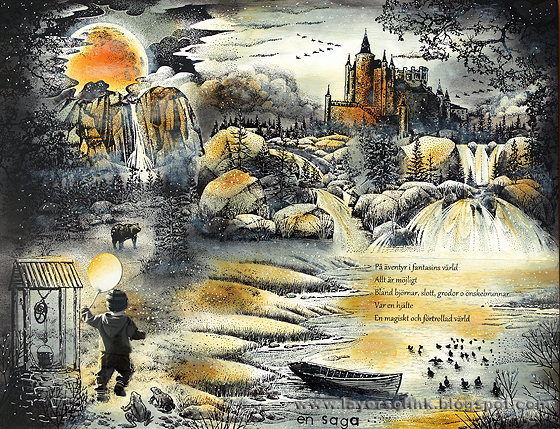
I did a full sheet (11.5x8 in) of scenic stamping which is part of a new series of scenes that I am making for my son. I place photos of him into the scenes so that it looks like he is running around in the scenes, and add a nice quote or piece of advice. This is the third such full sheet scene that I made, he loves looking at them, although he was a bit concerned about being alone in this one, he wanted me to come along in the boat. I really like the sentiment I used here – ‘May you always have a shell in your pocket’.

The scene is inspired by a beach we often go to, and I wanted to include a little tidal puddle of water, as well as some grass and lots of rocks and cliffs. I first planned the scene out on scrap paper. The two rocks in the water and the boat were stamped first and masked. I try to avoid masking if I can, but especially the boat needed to be masked. Seaside Cove is a massive stamp, and my version is unmounted, so I place it on my table and press paper on top. Bit tricky to get the horizon line straight, I measure and make a little mark on each side at the back of the cardstock and line the stamp up on my cutting board. The cliffs were stamped next as well as the rocks at the front. All the black stamping is done with Archival ink Jet Black.

The pond was stamped with Scattered Straw and Vintage Photo Distress Ink and the Sand Pattern was stamped with the same inks, the lighter shades in the middle of the beach and darker in the edges. The pebbles and rocks on the beach were stamped next. The grass was stamped with two shades of green ink (Memento Cottage Ivy and Bamboo Leaves), inking the stamp up with the lighter shade and then adding grassy lines with the darker ink in marker form.

The scene is done on glossy cardstock and coloured with dye inks applied with a Colorbox Stylus tool, and a pen nib for the small spaces, starting with the lightest shades of ink and gradually building up colour. I usually start with a layer of Adirondack ink, which gives a good base for further inking. Here I used as my first colours: Adirondack Sandal for the sand, Aqua for the sea and sky, Pebble for the stones and Willow for the green areas. I want to do a step-by-step tutorial on the colouring process, but I keep forgetting to take some of the photos because I am so into the process. There are a lot of good tutorials on the Stampscapes site, if you are interested. I will do a tutorial soon.

When the inking was done, I added some more stamping (the green leaves, more texture to the sand and the foreground grasses). Highlights were added with a white gel pen and a bit of mist was added to the sea by dry-brushing white pigment ink.

I only had a black and white copy of this photo at home, but when the scene was finished, I thought that the coloured version would look better, so I had it developed. The blue of his clothing (with sharks printed on it) worked well with the blue of the sea.

Thank you so much for looking! Happy stamping!

Anna-Karin

Supplies: Crafty Individuals sentiment and shell stamps; Sutter seagull and grass stamps; Beeswax boat stamp; Stampscapes: Reeds Lg. 068D, Leaf Sprig 127A, Rock (1) 129B, Rock Duo Sm. 131A, Rocky Cliff Left 133G, Seaside Cove 139H, Migrating Birds 152D, Boulders with Lichen 205F, Sedge Filler 215C, Tall Grass 253D, Tall Grass Sm. 254B, Pebbles 256A, Sand Pattern 168E, Prickly Brances 272G, Pond 279F, Cloud Strips Sm. 296C, 3 Rocks and Grass 299B, Rocks and Grass 301A, Gulls 302A.

Inks: Adirondack: Sandal, Hazelnut, Aqua, Stonewashed, Denim, Willow, Lettuce, Pesto, Pebble, Slate, Espresso, Pitch Black; Distress Ink: Antique Linen, Frayed Burlap, Vintage Photo, Scattered Straw, Pumice Stone; Jenni Bowlin: Weather Wane; Memento: Archival ink: Jet Black, Olive; Colorbox Frost White; white gel pen; Kromekote glossy cardstock.

Saturday, April 14, 2012

A fairy tale

This week we have another awesome case file at CSI: Color, Stories, Inspiration. Here’s the link to the challenge, where you can see the work of the rest of the DT. Case file #15:

I was inspired to do another scenic stamping piece as the base of my layout. From the evidence items I used: moon, something transparent and foliage. From the testimony I was inspired by the adventure and imagination themes, and I also wrote a little free poem. Here’s my layout:


The scene is done on glossy cardstock (8.5x11 inches) and coloured with dye inks using a Colorbox Stylus tool and Ranger craft nibs (for the small areas). Such a large scene using so many stamps (more than 20) requires a bit of planning, and I planned it out on scrap paper first. I knew I wanted to use the large moon stamp and the castle and needed to figure out a nice setting for the castle. All the stamping is done with Archival Jet Black ink. I use torn pieces of paper as masks where necessary. Since this is supposed to be a fairy tale setting, I left some items a bit out of proportion (the frogs are pretty big and the well is a bit small). As usual, I coloured it starting with the lighter inks and gradually building up darker colours. I started with Lemonade, which is a light yellow and then switched over to Weather Wane. For the orange shades Wild Honey and Spiced Marmalade were used. Then darker tones were added with Slate and Pitch Black. I left quite a lot of the white paper showing because I didn’t want the scene to be too dark. The moon is a yellow/orange harvest moon.

Highlights were added with a white gel pen, lots and lots of dots. Then white pigment ink was dry brushed onto the scene to create shine around the moon, and mist here and there. The title was stamped with alphabet stamps and the journaling was printed on a transparency and placed on the water.

I have a lot of photos of my son running, often away from me, so I was happy to use one of them. On this particular photo, he is carrying a balloon, which fit nicely with the scene. The light was also coming from the right direction. I cut him out and then applied a little bit of yellow and orange ink to the photo to make it blend in with the rest of the scene.

The journaling translates:
'On an adventure in the world of fantasy
Everything is possible
Among bears, castles, frogs and wishing wells
Be a hero
A magical and enchanted world'

Let me know if you have any questions about scenic stamping, it is lots and lots of fun to be able to create your own stamped landscapes.

Thank you for stopping by! Have a fabulous weekend!

Anna-Karin

Supplies: Stampscapes stamps: Cascading Falls 015G, Cloud Cumulus 018E, Ducks in Formation 027A, Meadow Lg. 057G, Reeds 067B, Side Falls Lg. 075G, Tall Rock with Falls Lg. 082G, Waterside Bluff (left) 148F, Waterside Bluff (right) 149G, Bear 167A, Cloud with Rising Moon Lg. 198G, Oak Branch 203G, Flock in Water 225D, Water Pattern 231C, Sedge Filler 251C, Pebbles 256A, Prickly Branches 272G, Cloud Strips Sm. 296C; Sutter stamps: Castle #2 H-1539, Old Well G-965; Beeswax stamps: Row Boat, Frogs; Hero Arts alphabet stamps; Adirondack dye inks: Lemonade, Slate, Pitch Black; Distress Ink: Wild Honey, Spiced Marmalade; Jenni Bowlin ink Weather Wane; Colorbox Frost White; white gel pen; Kromekote glossy cardstock; transparency.

Friday, December 2, 2011

Snowy Woods and Advent ATC 2

I have two things to share today, a snowy scene and the second of my Advent ATCs.

I made this scene for a swap to include a river and a forest. I went for a snowy look, but with a not yet frozen river. Lots of new November snow, but not yet cold enough for ice on the river/stream. I think the river perhaps looks a bit too blue, I could have added some more grey to the water.


In my first attempt at this scene, I stamped out everything in dark blue ink, but I just didn’t get the feeling I wanted. Instead I tried stamping the snow with Memento London Fog and did the rest of the stamping with Jet Black ink, except for the water which was stamped with Stonewashed. The deer were stamped first and masked, then the snowy ground stamps were stamped repeatedly to create the river and the snow around it. Finally, the snowy trees were stamped. I added a bit of grass with black ink to the snow to create more texture.

The scene is done on glossy cardstock and coloured with dye and pigment inks using a Colorbox Stylus tool. The dye inks in the supply list were used, starting with the lighter shades, and making sure to leave large areas mainly white. Snow and highlights were added with a white gel pen and white pigment ink was added in many places to create a frosty feeling. The foreground branches were stamped in both black dye and white pigment ink and a grass stamp was stamped with white pigment ink all over the scene, also in the sky.

Supplies: Sutter stamps: Snowy Fir Tree Large F-1261 Snowy Ground Set H-1256 Snowy Fir Medium C-1262 Snowy Fir Set Small E-1260, Deer Couple Medium E-1462, grass; Stampscapes: Prickly Branches 272G, Seaside Cove Sm. 308G, Rock 130B, Rocks and Grass 301A, Pebbles 256A, Tall Grass Sm. 254B; Adirondack: Aqua, Stonewashed, Slate, Pebble, Mushroom, Pitch Black; Memento London Fog; Archival Ink Jet Black; Colorbox Frost White; white gel pen; Kromekote glossy cardstock.

Here’s the ATC for the second of December in my ATC Advent Calender.


Watercolour paper was dipped into Distress Inks which had been smeared and misted on my craft sheet. Then it was misted a bit with red mist. The heart is die cut from grungepaper and embossed with about 4 layers of UTEE, finishing with one layer of red embossing powder. While it was still hot, a number ‘2’ stamp was stamped into it, the number stamp was first inked with gold ink. I love the sentiment on this ATC.

Supplies: Fancy Pants sentiment stamp; Making Memories wing stamps; Distress Ink: Fired Brick, Faded Jeans, Fired Brick reinker; grungepaper; UTEE; red embossing powder (I am not sure who makes the crown stamp, maybe 7Gypsies).

Wednesday, November 9, 2011

Harvest Moon

I made this card for a swap, with the theme Harvest Moon. I have only seen a real harvest moon once or twice and wanted to read up a little bit about it. The harvest moon is visible low on the horizon and therefore looks bigger, it also appears orange or reddish. The harvest moon got its name because it was seen to help farmer’s to be able to continue harvesting later in the evening. Inspired by this, I used a large moon stamp and coloured it orange.


I also added some orange into the rest of the scene, but kept the larger part of it in grey scale. The scene is done on glossy cardstock and coloured with dye inks using a Stylus Tool. The stamping was done with Archival Jet Black ink, Adirondack Slate (moon), Memento Tuxedo Black (grass – gives a more grey impression than the Jet Black ink). The grass was stamped in first to second generation images. I wanted to create the impression of quite long grass. Mist was added with white pigment ink and highlights with a white gel pen.

Thank you for visiting!!

Supplies: Sutter stamps: Old Barn F-1647, Homeward Cowboy Small E-1294, Mirrored Country Fence G-1469; Stampscapes: Cloud with Raising Moon Lg. 198G, Prickly Branches 272G, Oak Branch 203G, Reeds 067B, Plant 101A; Adirondack ink: Peach Bellini, Slate, Bottle; Distress Ink: Black Soot, Spiced Marmalade; Memento Tuxedo Black; Jenni Bowlin Chicken Feed; Archival ink Jet Black; Kromekote glossy cardstock.

Sunday, October 9, 2011

Spooky Christmas

This card is for one of the most unusual challenges I have ever done, a Stamptoberfest challenge to combine Halloween and Christmas stamps. Since we don’t celebrate Halloween, I don’t have any Halloween stamps, and instead I used bare branches, a somewhat spooky house and a moon stamp. I also used a black and white plus blue colour combo, to add to the spooky feeling, but I am not sure whether the card really looks spooky or more just wintery.


All the stamping, except for the moon was done with black ink. The Santa and reindeer stamp is part of a bigger collage stamp, I used a black marker to only stamp the Santa part of the stamp. The scene is done on glossy cardstock (11x21 cm) and coloured with dye-based inks, using a Colorbox Stylus tool. I started with the lightest blue and grey shades and gradually built up darker shades. Mist was added with white pigment ink and I also stamped the branches and trees with the white ink. Highlights were added with a white gel pen.

Thanks so much for stopping by!

Supplies: Stampscapes: Bare Branch 121B, Bare Branch Lg 122F, Spooky Branch Sm; Cloud with Moon Lg 105E, Reeds 067B, Tall Grass Sm 254B, Pebbles 256A; Sutter: Glacier Mountains H-2129, Wildlife Enterprises Bev’s Place, Snowy Fence, Snowy Trail D-1259; Crafty Individuals reindeer and Santa stamp; Adirondack dye ink: Aqua, Slate, Denim, Pitch Black; Distress Ink: Stormy Sky; Jenni Bowlin ink: Spice Tin; Archival Jet Black; Colorbox Frost White; white gel pen; Kromekote glossy cardstock.

Friday, September 30, 2011

Buck at waterfalls

I felt like doing a black and white scene today, here's the result:


The scene is done on glossy cardstock and coloured with dye inks using a Stylus Tool. All the stamping was done with Archival Jet Black ink. Grey and black dye ink was used to colour the scene, starting with the lighter shades of grey and gradually building up darker layers. Parts of the sky, the waterfalls and the lake were left the white of the paper. The water pattern stamp was stamped using first to fourth generation stamping, going lighter where the water is lighter. Mist was added with white pigment ink and highlights with a white gel pen.

Thanks for looking!!

Supplies: Sutter White Tail Buck; Stampscapes: Brook Falls 184G, Pines and Rocks 195G, Ducks in formation 027A, Reeds 067B, Reeds Lg 068D, Water Pattern 231C, Pine Tree 196F, Prickly Branches 271G; Adirondack inks: Lake Mist, Slate; Distress Inks: Pumice Stone, Black Soot; Archival Jet Black; Colorbox Frost White; white gel pen; Kromekote glossy cardstock.

Sunday, September 25, 2011

Watercolour Bridge Scene

This scene is for Play Date Café Challenge #100. Here’s the gorgeous inspiration panel:


I was inspired by the watercolour picture to the top left and built a scene around a bridge stamp. I used Distress Inks to colour the scene, smeared on my craft sheet, misted with water and applied with a paint brush.


The scene is 8.5" x 5.5" (22x14 cm). The stamping was done with black ink on watercolour paper. First, the bridge was stamped and then the rest of the scene was stamped around that. Trees were added on both sides to extend the scene, the river bank was extended with the Sedge Filler stamp. This is one of my favourite scenic stamps, it is a humble stamp that can make a big difference to a scene, filling out empty space, adding texture, patches and fields of grass. The Tall Grass stamp was also used here and there to build the grassy bank. The animals were added to the scene to give it some life.

Distress Ink Peeled Paint, Wild Honey and Rusty Hinge was used to colour the scene. By varying the amount of water, you can get a range of different shades from the same ink. After colouring, the Oak Branch and various grasses were stamped on the edges to frame the scene.

Thanks so much for looking!

Supplies: Beeswax Bridge Scene 1188R, Rock Wall 18E, Doe in snow 1213F; Stampscapes: Sedge Filler 251C, Tall Grass Sm. 254B, Lilly Grass 295C, Maple Pair 239D, Prickly Branches 272G, Migrating Birds 151E, Oak Branch 203g, Oak Branch Sm., Foliage 035A, Reed Lg. 067D, Cattails 016B; Sutter Swan Pair D-1485; Distress Ink: Peeled Paint, Wild Honey, Rusty Hinge; watercolour paper.

Tuesday, September 20, 2011

Seasonal watercolour cards

After I did the Spring Birch card yesterday, I wanted to do another three cards using the same technique, for the remaining seasons. I had a lot of fun with these. For all three cards, the stamping was done with Versafine Onyx Black on watercolour paper. Distress inks were smeared on my craft sheets, misted with water and applied with a paint brush.


The summer card is inspired by a tree I saw the other day which had lots of pink and purple flowers, but no green leaves.

Supplies: Stampscapes: Oak Tree Lg. 179G, Flock 112A, sentiment; Distress Inks: Shabby Shutters, Peeled Paint, Tumbled Glass, Dusty Concord, Worn Lipstick, Victorian Velvet; Versafine Onyx Black, watercolour paper.


I added lots of leaves to the autumn tree and some extra life in the form of a buck. I think I should have placed the buck on a hill that was closer, because it ended up looking a bit too big.

Supplies: Stampscapes: Leafless Limbs Lg. 053F, Buck Lg. 009B, Ducks in Formation 027A, Bare Branch 121B, sentiment; Distress Inks: Rusty Hinge, Wild Honey, Spiced Marmelade, Vintage Photo, Walnut; Versafine Onyx Black; Archival ink Coffee; watercolour paper.


The winter tree doesn’t have leaves, but I still wanted to use the same technique with the dots as on the other cards, so I let the dots be snow instead. Pumice Stone makes for a really nice snow colour.

Supplies: Sutter: Snowy Leaf Tree G1273; Stampscapes: Gulls 302A, sentiment; Distress Inks: Pumice Stone, Tumbled Glass, Stormy Sky, Faded Jeans; Versafine Onyx Black; watercolour paper.

Thank you so much for looking and visiting!!

Monday, September 19, 2011

Spring Birch

Some happy news, my Fall card was picked as the Super 6 winner at Card Patterns!

My mom once gave me a printed kitchen towel which is far too pretty to be used in the kitchen. Instead, I’ve hung it on my one bookshelf as an extra sun protection for the containers my photos are stored in. It hangs right in front of me as I sit at my desk and for quite some time now, I have wanted to do a card inspired by the towel. Recently, I got hold of this birch stamp which was perfect for the project. I love birch trees with their white trunks and spring green leaves.


The tree was stamped on watercolour paper and I drew a few additional branches to make it extend a bit more into the scene. The watercolour background was done with Distress Inks, smeared on my craft sheet, misted with water and applied with a paint brush. I used a torn piece of paper as a mask. The leaves were applied with the same technique, mixing Shappy Shutters and Crushed Olive, and using a brush in a pretty random manner. When the scene was finished, I was thinking that I should perhaps have left a little bit more of white space among the leaves.
Thanks so much for looking!

Supplies: Sutter Stamps Right Birch I-2151; Stampscapes Ducks in formation 027A; Distress Ink: Peeled Paint, Shabby Shutters, Crushed Olive, Tumbled Glass, Black Soot; Versafine Onyx Black; watercolour paper.