Showing posts with label Distress Markers. Show all posts

Monday, March 15, 2021

Mixed Squares Background

Hello friends! I hope your weekend was good! Today I have a mixed media tag to share with you, using fun and easy techniques.


We have a Recycle theme at the Simon Says Stamp Monday Challenge this week. I hope you will join us! And don't miss the gorgeous recycle project by our March guest designer Sandra Rupp.


Layers of ink - Mixed Media Squares Background Tutorial by Anna-Karin Evaldsson.

I like to work on cardboard from boxes and it is something that we all have around. It is a sturdy surface with lots of texture. I die cut a tag from a piece of cardboard. Other recycled items include: a pencil, buttons and fibers. Many years ago I found a big box of old buttons in a stationary shop in a small town in South Africa. Most of them appeared to have been cut from old clothes. I washed them and organised them in bags according to color and have used them on projects every since then. 

Layers of ink - Mixed Media Squares Background Tutorial by Anna-Karin Evaldsson. Apply texture paste through the Simon Says Stamp Mix and Match Squares Stencil.

I forgot to take a photo of the first steps. Tear the edges of the cardboard and apply gesso to the background. When the gesso is dry, apply Matte Texture Paste through the Simon Says Stamp Mix and Match Squares stencil. Let dry. Paint with Distress Paints and mist with water to help the paints blend.

Layers of ink - Mixed Media Squares Background Tutorial by Anna-Karin Evaldsson. Add shading with a Distress Marker.

When dry, apply a shadow with a Hickory Smoke Distress Marker. 

Layers of ink - Mixed Media Squares Background Tutorial by Anna-Karin Evaldsson.

I wanted a darker shadow and used some Black Soot too and blended it out a little with water.

Layers of ink - Mixed Media Squares Background Tutorial by Anna-Karin Evaldsson. Stamp with the Simon Says Stamp Mix and Match Squares stamp set.

Stamp the photo slide frame from the Simon Says Stamp Mix and Match Squares Stamp set with Spring Rain ink on white paper. I happen to really like photo slides, which is why I added one to this stamp set, and it is also in a true size. I will be using this stamp a lot. Cut the frame out and emboss it with three or four layers of clear embossing powder. Always be very careful when using a heat tool and never touch the melted powder until it has cooled down completely.

Layers of ink - Mixed Media Squares Background Tutorial by Anna-Karin Evaldsson.

Stamp three of the sentiments from Mix and Match Squares, on the squares. They are designed to coordinate with the squares on the stencil.

Layers of ink - Mixed Media Squares Background Tutorial by Anna-Karin Evaldsson.

Place the stencil back over the design and apply Moon Dust Stickles with a palette knife. I avoided the squares with the sentiments, which also gave a nice variation.

Layers of ink - Mixed Media Squares Background Tutorial by Anna-Karin Evaldsson.

The glitter adds a really nice touch, while the background color still shines through.

Layers of ink - Mixed Media Squares Background Tutorial by Anna-Karin Evaldsson.

I found a piece of cardstock where I had printed childhood photobooth images. It is printed on textured cardstock, so the photos also look textured. This is me and my Dad.

Layers of ink - Mixed Media Squares Background Tutorial by Anna-Karin Evaldsson.

I found the pencil on my desk and thought it would be fun to add to the project. I think one of the boys might have picked it up someplace. The buttons were stitched to the background with DMC floss.

I hope you will join us this week in our Recycle challenge. You have a chance to win a $25 gift voucher to do some fun shopping at Simon Says Stamp. You have until Monday 8am Ohio time. 1pm UK time, 2 pm CET to join in.


Do you use Instagram? If so please add #sssmchallenge so we can see your entries there too.


Thank you so much for taking the time to stop by here today! 

Happy crafting!

Anna-Karin

Supplies:

* Please note: the links are affiliate links, for which I receive a small percentage of sales generated by the link, at no extra cost to you.

Monday, September 2, 2019

Forest art journal page tutorial

Hello stampers! I hope you had a nice weekend. We had a soccer game, organised at home, went to IKEA, and went for walks. 

STAMPtember® has started with a bang at Simon Says Stamp and it is the 10th STAMPtember®, so there are even more surprises and inspiration. Don't miss it! It's a month long celebration of stamping.


At the Simon Says Stamp Monday Challenge Blog we have a 'Use a Clear Element' theme this week, and since it is the first week of a new month, the team is showcasing products by a specific company/designer. This week it is Visible Image. You can see their range of fantastic stamps and stencils here. You don't have to use Visible Image products to join in the challenge, but it is always fun if you do. 

Our September guest designer is the wonderful Anne Redfern. I hope you will visit her blog Redanne, if you haven't already done so. It is full of gorgeous projects.

Layers of ink - Forest art journal page tutorial by Anna-Karin Evaldsson.

We still have summer weather, but it is starting to get darker earlier in the evenings and some of the trees are starting to turn colors. So I decided to do an autumn forest scene in my Dina Wakley Media Journal - on one of the watercolor pages. I started out with a tag, but then changed my mind, since I wanted a long horizontal forest.

Layers of ink - Forest art journal page tutorial by Anna-Karin Evaldsson.

This is the Visible Image stamp set that I used, called Into the Woods. If you look at the packaging, it is easy to miss that there are in fact two horizontal forest scenes in the set. One is meant to be in the background, but I used it to extend my scene instead.

Layers of ink - Forest art journal page tutorial by Anna-Karin Evaldsson.

Start by inking up the stamp with Distress Inks, applying the lighter colors first. I used a brown marker for the tree trunks and branches. Mist with water about four times and stamp.

Layers of ink - Forest art journal page tutorial by Anna-Karin Evaldsson. Stamp Visible Image, into the woods.

Continue with the second stamp. You might get a visible joint, but we will hide that later. Add additional branches, by inking up just the branches and stamping them.

Layers of ink - Forest art journal page tutorial by Anna-Karin Evaldsson.

I also stamped some of the trees from the first stamp on the right hand side. Also, ink the stamps up randomly, mist with water, and stamp once on scrap paper, then stamp on the scene, to create the splotchy, textured effect that you see here.

Layers of ink - Forest art journal page tutorial by Anna-Karin Evaldsson. Watercolor the sky.

I wanted a vast, calm, blue sky and did it with Scribble Sticks.

Layers of ink - Forest art journal page tutorial by Anna-Karin Evaldsson.

Dissolve with water.

Layers of ink - Forest art journal page tutorial by Anna-Karin Evaldsson. Add color with Scribble Sticks.

I added more colors to the forest, bits of yellow, green, brown and gold. Leave as they are, or dissolve with water.

Layers of ink - Forest art journal page tutorial by Anna-Karin Evaldsson.

The sentiment words were stamped on Clearly for Art Modeling Film.

Layers of ink - Forest art journal page tutorial by Anna-Karin Evaldsson.

Color at the back with alcohol inks and a felt applicator.

Layers of ink - Forest art journal page tutorial by Anna-Karin Evaldsson.

Add roots with the brown Ground Espresso Distress Marker. I hadn't planned these to start with, but they fit with the sentiment.

Layers of ink - Forest art journal page tutorial by Anna-Karin Evaldsson.

Cut the words out and glue to the background.

Layers of ink - Forest art journal page tutorial by Anna-Karin Evaldsson.

You can quickly make clear words into any color, by using alcohol ink. Just remember to color on the back, otherwise you will smear the stamping.

Layers of ink - Forest art journal page tutorial by Anna-Karin Evaldsson.

I also stamped two owls with Hickory Smoke ink.

Layers of ink - Forest art journal page tutorial by Anna-Karin Evaldsson.

You can maybe see the subtle gold shine better here. It's difficult to capture on photo.

I hope you will join us this week in our Use a Clear Element challenge. As always, you have a chance to win a $50 gift voucher to do some fun shopping at Simon Says Stamp. You have until next Monday 8am Ohio time. 1pm UK time, 2 pm CET to join in.


Don't forget to follow Simon Says Stamp on Instagram, they post great stuff daily. 


Do you use Instagram? If so please add #sssmchallenge so we can see your entries there too.


Thank you so much for taking the time to visit my blog today!  

Happy stamping!

Anna-Karin

Supplies:

* Please note: the links are affiliate links, for which I receive a small percentage of sales generated by the link, at no extra cost to you.


Monday, April 1, 2019

Watercolor Stamping Tutorial

Hi everyone! I hope your weekend was good. We had a great weekend, with beautiful spring weather. The crocuses are now flowering and since we switched over to summer time, we have an extra hour of light in the evenings. 


It is the first of April, and you might already have heard a couple of April's Fools jokes. I am still thinking of a funny joke for the kids tonight. Our theme at the Simon Says Stamp Monday Challenge Blog is Don't Be Fooled, Be Foiled. Fun! Since it is the first Monday of a new month, the team is showcasing the products of a specific designer/company and this week the turn has come to Gina K Designs. Here you can find all the wonderful stamps, dies, stencils, ink, foil, paper products and more by Gina K. You don't have to use Gina K products to join us, but it is always fun if you do. 

Since it is a new month, we also have a new guest designer, and for April Sabrina Perna will be our guest. Stop by her blog It's Time To Create-my Mixed Media Corner and you will be treated with fantastic projects.

Layers of ink - Watercolor Stamping Tutorial by Anna-Karin Evaldsson. With Watercolor Flowers stamps by Gina K Designs.

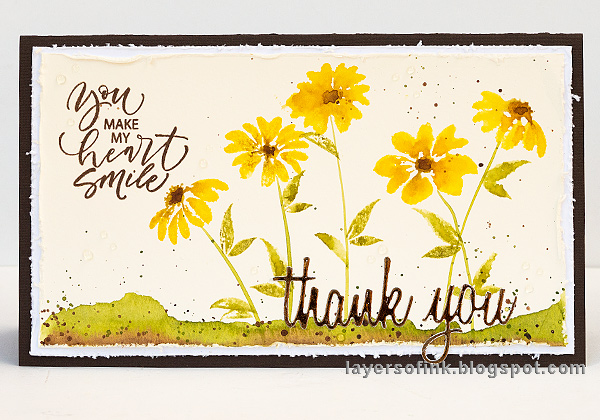
I made a set of two cards and a bookmark this week. Since I have been very much in a mood for yellow lately, these cards also feature yellow as the main color. The flowers were watercolor stamped, which is one of my all time favorite techniques. It is easy to do, and gives a slightly different result every time. No flower will look exactly like the other.

Layers of ink - Watercolor Stamping Tutorial by Anna-Karin Evaldsson. With Watercolor Flowers stamps by Gina K Designs.

These are the Gina K products that I used: Crystalline Drops, Watercolor Flowers, and Artist's Choice cardstock.

Layers of ink - Watercolor Stamping Tutorial by Anna-Karin Evaldsson. Ink the flower stamps.

Start by inking a flower with Mustard Seed Distress Ink. Add a darker shade towards the center with a Wild Honey marker and brown to the center with Gathered Twigs.

Layers of ink - Watercolor Stamping Tutorial by Anna-Karin Evaldsson. Distress Ink, inking.

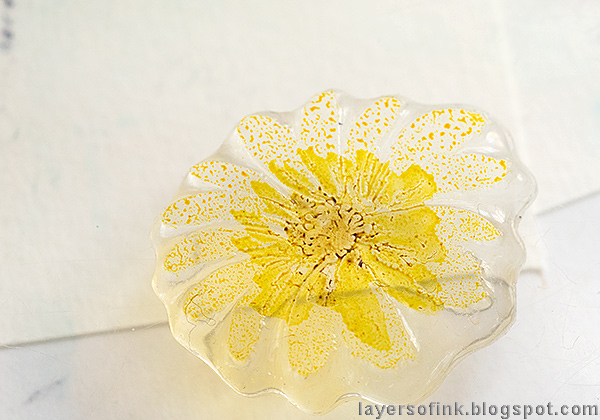
Here's a close up where you can better see the ink once it is applied to the stamp.


Mist with water about three times and stamp on watercolor paper.

Layers of ink - Watercolor Stamping Tutorial by Anna-Karin Evaldsson. With Watercolor Flowers stamps by Gina K Designs.

Depending on how much water you mist on the stamp, you will get a different look to the flowers. Here I used slightly too much water for the stamp in the middle, but I will fix that later.

Layers of ink - Watercolor Stamping Tutorial by Anna-Karin Evaldsson. Paint flower stems.

The Watercolor Flowers stamp set includes leafy stems, but I wanted my stems to be taller, so I painted them with watercolor paint instead. You can also use Distress Ink (smear on non-stick craft sheet, mist with water and pick up with the paint brush).

Layers of ink - Watercolor Stamping Tutorial by Anna-Karin Evaldsson. With Watercolor Flowers stamps by Gina K Designs.

One of my favorite things with the Watercolor Flowers set is that it contains lose leaf stamps. Stamp these to the stems, again misting with water first. For variation, I also used some of the leave stamps attached to stems, but wiped off the ink from the stem before stamping.

Layers of ink - Watercolor Stamping Tutorial by Anna-Karin Evaldsson. Paint watercolor grass.

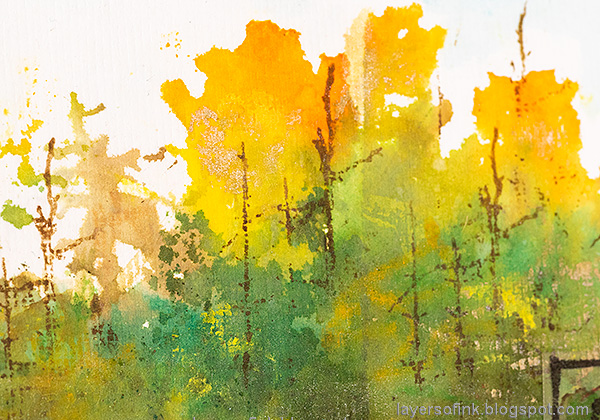
Paint a grassy base with watercolor paint or Distress Inks. I used water to soften the edge on the left-hand card, while leaving a sharper edge on the right-hand card. Splatter some brown and green paint on the background for texture.

Layers of ink - Watercolor Stamping Tutorial by Anna-Karin Evaldsson. With Watercolor Flowers stamps by Gina K Designs.

Stamp a sentiment with brown ink and distress the edges. Add dimension and shine with the Crystalline Drops. I hadn't used these before and was impressed with how easy it was to get perfectly round drops, even tiny ones.

Layers of ink - Watercolor Stamping Tutorial by Anna-Karin Evaldsson. Die cut words with Tim Holtz Sizzix dies.

Adhere Sizzix Permanent Adhesive to white card. Die cut words using the Tim Holtz Sizzix Celebration Words Script and Adventure Words Script sets.

Layers of ink - Watercolor Stamping Tutorial by Anna-Karin Evaldsson. Apply foil to the words.

Remove the adhesive covering and rub Ranger's Vintage Shiny Transfer Foil on top. I used soft vintage gold for one of the cards and a darker metallic brown for the other.

Layers of ink - Watercolor Stamping Tutorial by Anna-Karin Evaldsson. With Watercolor Flowers stamps by Gina K Designs.

I made one horizontal thank you card, already having left space for the sentiment stamp.

Layers of ink - Watercolor Stamping Tutorial by Anna-Karin Evaldsson.

You can always add more details with watercolor paint. I added some brown paint to the centers of some of the flowers, which made a difference especially to the flower that was stamped with too much water.

Layers of ink - Watercolor Stamping Tutorial by Anna-Karin Evaldsson. Add details with watercolor paint.

All the flowers and leaves will look different, which is one of the fun parts of the watercolor stamping technique.

Layers of ink - Watercolor Stamping Tutorial by Anna-Karin Evaldsson. Foiled words.

The foil gives a great shine to the words, and has a lovely vintage look.

Layers of ink - Watercolor Stamping Tutorial by Anna-Karin Evaldsson. Crystalline drops.

Here's a look at the harder, more defined, grassy edge of the horizontal card.

Layers of ink - Watercolor Stamping Tutorial by Anna-Karin Evaldsson. With Watercolor Flowers stamps by Gina K Designs.

The second card was given a lighter look and feel and was mounted on white and green cardstock. I added foil around the edges of a white cardstock matte, to coordinate with the word. Simply apply adhesive along the edge and rub a foil sheet on top. I used my ATG gun and just applied a thin line of tape along the edge.

Layers of ink - Watercolor Stamping Tutorial by Anna-Karin Evaldsson. Foil details.

Here you can see the foil edge better. I wanted it to look a little distressed and scraped it here and there to reveal the white paper. On the second card, I used clean water to soften the edge of the grass, which gives a different look to the harder edge of the first card.

Layers of ink - Watercolor Stamping Tutorial by Anna-Karin Evaldsson. DIY paper Bookmark.

When stamping the two cards, I tried out how much water was needed on a couple of scrap papers, one of them was this tall paper, which I decided to turn into a bookmark. The panel was layered on brown and white cardstock and I used a We R Memory Keepers Angle Corner Chomper to cut the upper corners. The edges were not distressed, since I wanted the bookmark to be as flat as possible.

I hope you will join us this week in our Don't Be Fooled, Be Foiled challenge. As always, you have a chance to win a $50 gift voucher to do some fun shopping at Simon Says Stamp. You have until next Monday 8am Ohio time. 1pm UK time, 2 pm CET to join in.


Don't forget to follow Simon Says Stamp on Instagram, they post great stuff daily. 


Do you use Instagram? If so please add #sssmchallenge so we can see your entries there too.


Thank you so much for taking the time to visit my blog today!  

Happy crafting!

Anna-Karin

Supplies:

* Please note: the links are affiliate links, for which I receive a small percentage of sales generated by the link, at no extra cost to you.