Hello all! We had a sudden change of weather and this weekend has been very warm. You can literary almost see the flowers blossoming. Today it is Monday and a new Simon Says Stamp Monday Challenge is up, Emboss It. I love both heat and dry embossing and there are so many different techniques you can do with both of them.
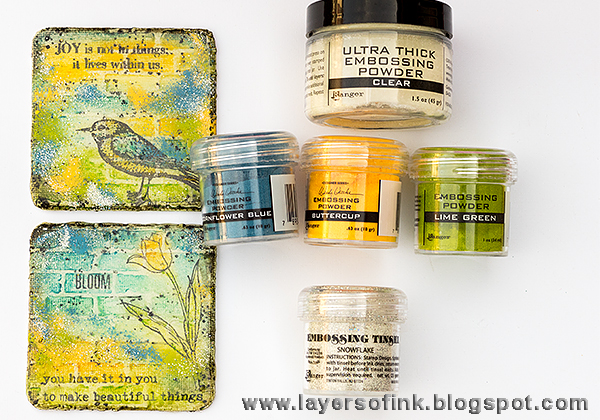
I decided to go all out for this challenge and made two mini art panels, which are coated with layers and layers of Ranger's
Ultra Thick Embossing Enamel (UTEE) and various coloured embossing powders. Recently, I found some magnets that I made 12 years ago, and had coated in UTEE. I think it was the first time I used UTEE and I can pretty clearly remember the evening I made those magnets. So that was the inspiration behind today's project. At first I planned for these to be magnets too, but then I decided that they should rather be mini panels. The stamps I used are by
Wendy Vecchi.
I worked on the smallest of
Dina Wakley's Media Boards, which is 3 x3 in. The corners were rounded with my
Corner Chomper. The brick background was die cut with
Tim Holtz new
Mixed Media Set 3. Love those cool bricks. Glue to the board with
Distress Collage Medium Matte. This was the first time I used Tim Holtz
Collage Brushes and I was impressed with how smoothly the medium was applied, with no pooling anywhere.
When dry, paint with gesso.
The images were stamped on tissue paper, since you can't get a detailed impression on such a textured surface. You need to use a waterproof ink for this. I often stamp more images than I need, in case I tear one of them.
Tear around the images and text. A torn edge disappears better on the background. Apply Gloss multi medium on the board and carefully place the tissue paper on top. Apply a second coat on top of the tissue. Gloss medium makes the tissue paper disappear better than matte medium, particularly on an already coloured background. On this project, you could have used matte medium instead.
I coated them with a layer of Matte Collage Medium, so that the Distress Crayons would adhere better.
Colour the boards with Distress Crayons and use your finger to smooth out and blend the crayons. Wipe with a very slightly moist cloth, and only on top of the bricks, to remove some of the colour.
Stamp with the texture stamp from Wendy Vecchi's
Faux Granite-Ware kit. Then give them a coat of Matte Collage Medium, working quickly so that you don't mix the colours too much. The reason for doing this is to prevent them from interacting with the embossing ink and powders.
Apply
embossing ink on one panel at a time and cover with UTEE. Pour the left-overs back into the jar and melt the powder with a
heat tool. Be
VERY careful with working with UTEE since it gets very hot. Don't touch it! Toss more UTEE on top and repeat this process about 5-6 times. You don't need to apply more embossing ink. If the UTEE cools down too much, just reheat. In the final layer, carefully sprinkle some coloured and glittery powders. Melt as before. Do not touch the panels until the UTEE has cooled down completely.
It is very hard to capture the effect of the UTEE. It looks like the panels are coated in a thick layer of vintage melted glass. Very cool. It also adds a lot of depth to the piece.
Here you can see the Cornflower and
Snowflake Tinsel powders floating in the top layer of UTEE, creating depth.
Wendy Vecchi always has such
wonderful sentiments in her stamp sets. Here I didn't use the last line of the sentiment, since it fit better in like this.
Don't sprinkle on too much coloured powder, since it is opaque and will cover up the background. I love the mix of all the four powders here.
The second panel focuses on this
pretty bird stamp and another lovely sentiment. By mistake, I stamped a few dots on the 'in' word, which makes it look like 'ni' instead. Oops.
It is easy to colour the shapes with the Distres Crayons, and they don't really cover up the stamped lines, as acrylic paint would.
The
Snowflake Tinsel powder contains glitter and white. The specks of white adds highlights to the board. I couldn't quite capture the effect of the glitter on photo.
Here's a close-up of another of the areas with coloured embossing powders.
You might see the dimensional effect of the UTEE a little better on this photo, with the light reflecting on the UTEE.
These were the original magnets, made 12 years ago. I used both coloured powders, metallic inks and Perfect Pearl powder on these magnets. As you can see, I also stamped into two of them. I skipped that step today, since it would have make it harder to see the details on my boards.
I hope you will join us in our
Emboss It challenge. As every week, you have a chance to win a $50 gift voucher from
Simon Says Stamp. You have until Monday 8am Ohio time. 1pm UK time, 2 pm CET to join in.

If you use instagram add
#sssmchallenge to your challenge entry uploads, so that we can see them on there too.


Thank you so much for visiting today!
Happy crafting!
Anna-Karin
Supplies: