Showing posts with label Patterned Paper. Show all posts

Wednesday, October 23, 2024

Vellum ghosts tutorial

Hi crafters! Today I have a fun Halloween project to share, with vellum ghosts and fun details.

Please note: this post has affiliate links, for which I receive a small percentage of sales generated by the link, at no extra cost to you.

Layers of ink - Vellum ghosts tutorial by Anna-Karin Evaldsson.

I wanted to make vellum ghosts using Tim Holtz Spooky Spirits stamp set. They live in a house with broken windows and various spooky elements. Do you see the eyes peeking out through one of the windows? A few weeks ago, I made mixed media ghosts with the same stamp set for the Simon Says Stamp store blog. Here comes another technique on how to make ghosts. 

Layers of ink - Vellum ghosts tutorial by Anna-Karin Evaldsson. Stamp with Simon Says Stamp Spooky Spirits.

Stamp three ghosts on Simon Says Stamp vellum using Tim's Spooky Spirits set. I cut them out with scissors, but there are also coordinating dies by Simon Says Stamp.

Layers of ink - Vellum ghosts tutorial by Anna-Karin Evaldsson. Emboss the vellum ghosts.

One of them got a hat from the Halloween sticker book. Turn the ghosts around, working on a Simon Says Stamp Pawsitively Perfect Craft Pad. Use a ball tool to emboss lines along all the stamped lines and in the shadow areas of the ghosts. Embossing vellum, turns it white.

Layers of ink - Vellum ghosts tutorial by Anna-Karin Evaldsson. Color with alcohol inks.

Color an idea-ology Halloween Transparency with alcohol inks to make it more distressed.

Layers of ink - Vellum ghosts tutorial by Anna-Karin Evaldsson.


Layers of ink - Vellum ghosts tutorial by Anna-Karin Evaldsson. Add distress glitter.

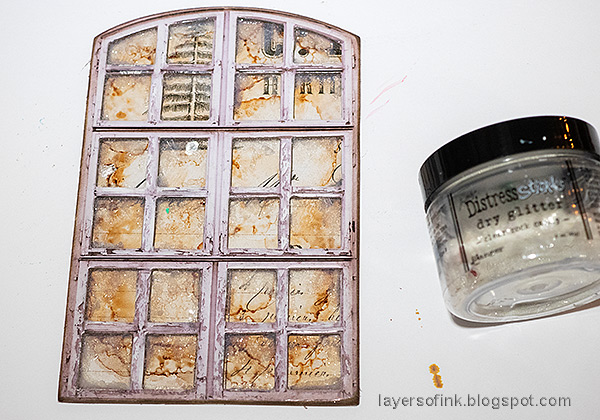
The back piece is made from Sizzix Little Sizzles Mat Board. I adhered a Tim Holtz Halloween Backdrops paper on top. Glue the transparent piece to the back of the window and adhere with Pawsitively Perfect Foam Tape. Add Simon Tacky Glue along some of the edges of the window and sprinkle Clear Rock Candy glitter on top. 

Layers of ink - Vellum ghosts tutorial by Anna-Karin Evaldsson.

The bats were die cut with Tim's Vault Wicked set, from black kraft-stock cardstock. Sand slightly. 

Layers of ink - Vellum ghosts tutorial by Anna-Karin Evaldsson.

I am very fond of vellum and its translucent qualities, perfect for ghosts. 

Layers of ink - Vellum ghosts tutorial by Anna-Karin Evaldsson.

The crow also comes from the Vault Wicked die set.  I sanded the edges of a sign post from Halloween Baseboards and added Clippings Stickers to it. 

Layers of ink - Vellum ghosts tutorial by Anna-Karin Evaldsson. Hiding ghosts.

I stamped a fourth vellum ghost and tucked it behind one of the windows, so that only the eyes show. The jewels are Simon Says Stamp Pawsitively Dazzling Gunmetal Gems. 

Layers of ink - Vellum ghosts tutorial by Anna-Karin Evaldsson. Add frosting to the window.

The glitter in the corners adds a frosted look, or it might be something slimy.

Layers of ink - Vellum ghosts tutorial by Anna-Karin Evaldsson.

The adhesive is hidden under the hat.

Layers of ink - Vellum ghosts tutorial by Anna-Karin Evaldsson.

I also added a Halloween Mini Skull and a bunch of additional gems.

Layers of ink - Vellum ghosts tutorial by Anna-Karin Evaldsson.

I hope you enjoyed this project! You can also make it with the mixed-media ghosts I made for the Boo Ghost Panel Tutorial on the Simon Says Stamp store blog.


Thank you so much for stopping by here today! Have a good weekend!

Happy crafting!

Anna-Karin

Supplies:

* Please note: the links are affiliate links, for which I receive a small percentage of sales generated by the link, at no extra cost to you.


Monday, October 7, 2024

Trio of Autumn Cards

Hello crafters! Today I have a trio of autumn cards to share, perfect for the season. Autumn is at it's most beautiful now.

Please note: this post has affiliate links, for which I receive a small percentage of sales generated by the link, at no extra cost to you.


This week we have a Patterned Paper theme att the Simon Says Stamp Monday Challenge Blog. I hope you will join us! It is a new month, and on the first Monday in a new month, the team is showcasing products by a specific designer/company. This week it is Stamperia. You can find their wonderful ranger of products here. You don't have to use Stamperia products to join, but it is fun if you do. 

We also have a new guest designer and this month we are welcoming Alison Bomber back to us as a guest. Don't miss the gorgeous project that Alison has created for you.

Layers of ink - Trio of Autumn Cards Tutorial by Anna-Karin Evaldsson.

I don't use nearly as much patterned paper that I used some years ago and really enjoyed making the projects for this week's challenge. Stamperia has such pretty patterned paper and the pads come with with sentiments and embellishments too. I made two cards and a tag, using Stamperia's beautiful Golden Harmony 8x8 in paper pad and some of their rub-ons.

Layers of ink - Trio of Autumn Cards Tutorial by Anna-Karin Evaldsson.

I had a hard time picking which papers to use, but ended up with these, and later also a tag. Cut the window shutters with a craft knife and fold out.

Layers of ink - Trio of Autumn Cards Tutorial by Anna-Karin Evaldsson. Give shape to the patterned paper.

I used the We R Memory Keeper Angle Chomper tool to create the tag. The topper comes from the Golden Harmony 8x8 in paper pad. Use Tim Holtz Shaping Kit and a Simon Says Stamp Pawsitively Perfect Craft Pad to give shape to various elements in the papers (the frame, pots, pumpkins and wood log).

Layers of ink - Trio of Autumn Cards Tutorial by Anna-Karin Evaldsson. Cut out paper pumpkins.

Cut out embellishments, sand the edges and give them shape too. 

Layers of ink - Trio of Autumn Cards Tutorial by Anna-Karin Evaldsson. Ink the edges.

Ink the edges. 

Layers of ink - Trio of Autumn Cards Tutorial by Anna-Karin Evaldsson.

Add lovely rub-ons to the designs and give them some shape too. I used Stamperia Golden Harmony Pumpkins and Forest Leaves and Animals.

Layers of ink - Trio of Autumn Cards Tutorial by Anna-Karin Evaldsson. Stamp with Simon Says Stamp Old Letter and Crackle background-.

Stamp the backgrounds here and there with Simon Says Stamp Old Letter and Crackle Background.

Layers of ink - Trio of Autumn Cards Tutorial by Anna-Karin Evaldsson. Ink the edges.

Ink the edges.

Layers of ink - Autumn Card Tutorial by Anna-Karin Evaldsson.

The card is quite large, 5x8 in. I thought that window was so pretty and it is fun to be able to add embellishment to the window sill. Quite a few of the elements here have dimension. The sentiments are a mixed of stamped sentiments, a rub-on and a sentiment cut out from the Golden Harmony 8x8 paper pad.

Layers of ink - Trio of Autumn Cards Tutorial by Anna-Karin Evaldsson. Glue bird and books to the window shelf.

A little bird, a stack of books and a cup of coffee were adhered to the window sill with two layers of Simon Says Stamp Pawsitively Perfect Foam Tape

Layers of ink - Trio of Autumn Cards Tutorial by Anna-Karin Evaldsson. Add Stamperia rub-on leaves.

The leaves are from the Golden Harmony Pumpkin rub-ons. These rub-ons are beautiful and very easy to apply to the paper. I stitched around the edges of the card.

Layers of ink - Trio of Autumn Cards Tutorial by Anna-Karin Evaldsson. Cut out and stamp sentiment.

Shine Brightly comes from the Simon Says Stamp Life is a Party stamp set. The other sentiment was cut from the paper pad and adhered with foam tape.

Layers of ink - Trio of Autumn Cards Tutorial by Anna-Karin Evaldsson. Adhere pumpkins with foam tape.

The pumpkins are so pretty and have quite a lot of dimension, which might be hard to see here.

Layers of ink - Trio of Autumn Cards Tutorial by Anna-Karin Evaldsson. Add books and an old letter.

I added a rub-on leaf to the letters and tucked it in behind the stack of books. I also added Rose Gold Sequins to the card.

Layers of ink - Trio of Autumn Cards Tutorial by Anna-Karin Evaldsson.

You might see the dimension a little better here.

Layers of ink - Squirrel Card Tutorial by Anna-Karin Evaldsson.

I see squirrels such as this one often on my forest walks. It is always fun to observe them. The squirrel, log, acorns and part of the title are rub-ons, from both the Forest Leaves and Animals and Golden Harmony Pumpkins sets.

Layers of ink - Squirrel Card Tutorial by Anna-Karin Evaldsson. Add acorns.

The leaves, frame and the pot has extra dimension created with the Shaping Tools.

Layers of ink - Squirrel Card Tutorial by Anna-Karin Evaldsson. Add paper leaves.

The leaves look almost real.

Layers of ink - Autumn Tag Tutorial by Anna-Karin Evaldsson.

Finally, the tag, also with added embellishments and rub-ons.

Layers of ink - Squirrel Card Tutorial by Anna-Karin Evaldsson.

I did some messy stitching over the topper. Harmony is adhered with foam tape. The stamped sentiment comes from Simon Says Stamp Seasons Greetings.

Layers of ink - Squirrel Card Tutorial by Anna-Karin Evaldsson.

And another bunch of pumpkins.

Layers of ink - Squirrel Card Tutorial by Anna-Karin Evaldsson.

I don't know if you can see the dimension of the pot here. It is a fun technique to use with patterned paper. Outline the shape first with the smallest stylus tool and then turn it around and use a larger stylus tool to give the shape.

Layers of ink - Trio of Autumn Cards Tutorial by Anna-Karin Evaldsson.


Join us this week in our Patterned Paper challenge! You have a chance to win a $25 gift voucher to do some fun shopping at Simon Says Stamp. You have until Monday 8am Ohio time. 1pm UK time, 2 pm CET to join in.


Do you use Instagram? If so please add #sssmchallenge so we can see your entries there too.


Thank you so much for stopping by here today! See you again soon!

Happy crafting!

Anna-Karin

Supplies:

* Please note: the links are affiliate links, for which I receive a small percentage of sales generated by the link, at no extra cost to you.


Friday, December 22, 2023

Candle in a window

Hi friends! Today I am sharing a project with a candle standing in a frosty window. 

Please note: this post has affiliate links, for which I receive a small percentage of sales generated by the link, at no extra cost to you.

Layers of ink - Candle in a window by Anna-Karin Evaldsson.

When I saw Tim Holtz Candleshop die set I knew I wanted to create a candles inspired by old-times brass candle-holders. There are three candles in the die set and I used the taller of the three. The base is Tim's Etcetera board and therefore very sturdy. I used a combination of pink, gold metal and neutral shades. 

Layers of ink - Candle in a window by Anna-Karin Evaldsson. Ink with Distress Ink.

I smeared various shades of red and pink Distress Ink on a non-stick craft sheet, misted with water and pressed watercolor paper into the ink. Let dry and repeat until you are happy with the colors.

Layers of ink - Candle in a window by Anna-Karin Evaldsson. Die cut Tim Holtz Sizzix candles

Die cut the candle from the pink papers and make similar papers in yellow and orange for the tip. 

Layers of ink - Candle in a window by Anna-Karin Evaldsson. Die cut Tim Holtz Candle Shop.

Die cut the stand from two shades of gold metallic kraft stock, Simon Says Stamp yellow glimmery cardstock and gold deco sheets. 

Layers of ink - Candle in a window by Anna-Karin Evaldsson.

Sand the metallic pieces slightly and ink with brown ink. Ink the edges of the candle pieces. Assemble. 

Layers of ink - Candle in a window by Anna-Karin Evaldsson. Color the window with alcohol ink.

For the window, I colored the back of Simon Says Stamp Acetate sheet with alcohol ink. 

Layers of ink - Candle in a window by Anna-Karin Evaldsson. Tim Holtz baseboards window.

Cut the acetate sheet and a piece of Tim Holtz Christmas Backdrops paper into the shape of the window. The window comes from Tim's Christmas Baseboard and Tranparencies set.

Layers of ink - Candle in a window by Anna-Karin Evaldsson. Add Rock Candy Glitter and Mica Flakes.

Glue together. Add Glossy Accents around the edges of the windows to created the look of frost. Sprinkle with Rock Candy glitter. There are some pieces of mica flakes in this jar of Rock Candy since I use them together often. If you want to, you can add Mica Flakes to the window too. 

Layers of ink - Candle in a window by Anna-Karin Evaldsson.

Cover a piece of Etcetera board (5.25 x 7.25) with Christmas Backdrops paper using matte medium. Place under a heavy book until dry. Sand the edges.

Layers of ink - Candle in a window by Anna-Karin Evaldsson. Die cut Tim Holtz Festive Gatherings.

I die cut branches from both shades of gold metallic paper, using Tim's Festive Gatherings die. Add pearls as berries.

Layers of ink - Candle in a window by Anna-Karin Evaldsson.

I really like the design of the Candleshop candles and candles aren't only for Christmas projects. 

Layers of ink - Candle in a window by Anna-Karin Evaldsson.

This shape of candle holder is very nostalgic to me, especially the brass version. 

Layers of ink - Candle in a window by Anna-Karin Evaldsson. Frosted windows.

The combination of Glossy Accents and Rock Candy glitter makes for a fun frosty effect, especially together with the small pieces of mica flakes. 

Layers of ink - Candle in a window by Anna-Karin Evaldsson.

The sentiment is from Tim's Christmas Baseboards and Transparencies. I also used a ribbon and a piece of lace, to form a table cloth for the candle to stand on.


Thank you for visiting my blog! 

Happy crafting!

Anna-Karin

Supplies:

* Please note: the links are affiliate links, for which I receive a small percentage of sales generated by the link, at no extra cost to you.