Showing posts with label Artistic Outpost. Show all posts

Saturday, October 5, 2013

CSI case file #92 - Bookmarks

Hello and welcome! During October we have a book theme at CSI: Color, Stories, Inspiration and lovely case files. Here's this week's case file:


I love the photo of the books with all the bookmarks and was inspired to scrap about my own little bookmark collection I had a child.

CSI case file 92 - Layers of ink
Having been a constant reader from when I learnt how to read, I also always loved paper of course and it is no wonder I liked bookmarks. I had a little pile in a drawer next to my bed and liked to always change to a new one whenever I started with a new book, picking the bookmark carefully to fit with the book. From the evidence list I used: pearls, book pages, velvet ribbon, something dangling, charms, lace and a handmade flower. I got a bit side-tracked with the testimony and started writing it on a library card, only to instead make a bookmark for it.

I white washed a page from Tom Sawyer and used on the page. The stamped images were coloured with coloured pencils.

I made a gelli print for the background using pink paint (actually I made a lot of different ones, but this is the one I picked for this layout). After mixing the paint and brayering it to the gel plate, I pressed a Dylusions stencil at the top and a Ronda Palazzari feather stencil at the bottom.

A layout about bookmarks had to have some bookmarks. I made one for the title and one for the journaling, by cutting it from patterned paper. It was stamped with Stamp Your Story stamps from Hero Arts.

The background is watercolour cardstock. I smeared Weathered Wood Distress Ink on my craft sheet, misted with water and pressed the paper into it. When it was dry, I stamped it using the same ink. The bookmarks on the inspiration photo had such pretty dangles. I made one myself using twine, a shell flower bead and a little charm. I think my younger self would have liked this bookmark.

 I stamped the gelli print paper with a text stamp and Victorian Velvet Distress Paint. Always remember to clean your stamp immediately after stamping with paint.

The flower was made from old book paper, using Eileen Hull's Sizzix Fringed Flower die, which is a favourite of mine. I die cut it twice from text paper, leaving me with six flowers. They were inked, crunched up a bit and layered together.

Thank you for looking! I hope you will get some crafty time this weekend!

Anna-Karin

Supplies:
Surfaces: Studio Calico 6 x 6 patterned paper; Neenah: Smooth Solar White cardstock, Smooth Cream Cardstock; Daler & Rowney watercolour paper; old book paper
Dies: Sizzix: 3-D Fringed Flower, Tag & Tie
Stamps: Hero Arts: La Lettre K5344, I love Books, Journal Letters CL697, Three Cats K5761; Artistic Outpost: Huck Finn, Think and Wonder, My Favourite Book; Graphic 45 School Days
Stencils: Dylusions: Letter Jumble; The Crafter's Workshop Ronda Palazzari: Mini Fancy Feathers
Ink: Distress Ink: Victorian Velvet, WeatheredWood; Ranger Archival Ink Jet Black; Stazon Jet Black
Paint: Distress Paint: Victorian Velvet, Picket Fence: DecoArt Americana
Coloured Pencils: Derwent
Embellishments: Lace trim, velvet ribbon; bead; charm
Tools: Sizzix Big Shot; Gelli Arts Gel Printing Plate 8 x 10

Wednesday, October 2, 2013

CSI Scrap365 Special Case File - Read

Hi everyone! This month we have a special case file at CSI:Color, Stories, Inspiration in cooperation with Scrap365 magazine. Scrap365 is a fabulous scrapbooking magazine, if you have never looked at it, I hope you will do so. There is so much inspiration, lots of technique articles and it features scrappers from all over the world. I am glad to be one of the CSI team members to be published in this Scrap365 issue (October/November, issue 18), with the layout in this post.

This special case file is open during the whole of October and the people who are picked as the five top layouts will be invited to be guest designers at CSI in December.
 
CSI Scrap365 Special Case File - Layers of ink
There is a book theme at CSI this month, and that is always a favourite of mine. I am very glad that my son loves books too and we spend a lot of time reading his books. This layout is about that. From the evidence items I used: circles, bird, book pages, crown, stencils, and hearts. From the testimony items: my layout is about books and reading and I also made a little book to hold my journaling and more photos.
 
I painted the background with acrylic paint and applied molding paste through a star and a text stencil. Lots of book related stamps were used. The yellow heart was die cut from mat board, inked yellow, stamped and coated with Glossy Accents. The wings were die cut from old book paper.

I wanted lots of textures on the page. The title was die cut from grungeboard which had been covered with sticky-back canvas. The letters were inked with Distress Inks. Love the molding paste text here 'We put our feelings and experiences onto paper.' Perfect! The hearts were die cut from mat board covered by text paper, using Karen Burniston's Flower & Heart die.

I love little houses and Tim Holtz Artful Dwellings die is a favourite of mine. The houses were die cut from grungeboard which had been covered with old book paper. I white washed the paper with Picket Fence Distress paint and stamped on top. Love these two sentiment stamps. The roofs were die cut from kraft-core cardstock, embossed and sanded. Two of the edges were die cut with the Torn Notebook die. The windows are mica pieces and curtains of lace. The little crown was die cut from mat board, inked yellow, stamped and coated with Glossy Accents.

I wanted my mini book to feel like a real book and made covers from mat board covered with canvas. They were inked and stamped with my favourite alphabet background stamp. Red kraft core paper was die cut with the Cameo Frame die, placing a Sized Oval in the middle to cut out a frame for the photo. I embossed and inked it and misted with Perfect Pearls for some shine.

I stamped the inside covers and pages with a Hero Arts ledger stamp, which gives great lines to write on. I photographed some current favourite books.

Journaling: I am so happy that you love books. You were just a small baby when I started to read to you and since then we have read every day. The more books the better, according to you. At night we often read first one or two scrapbooks (‘big photo books’) and you pick the colour of which album to read. After that, you pick two or three of your own books. The favourites differ and you like to switch between different books. You love my old ‘Donald Duck Book Club’ books, especially Peter Pan. Other favourites include: The Gruffalo, Mamma Mu, Pettson & Findus, Pippi Longstocking, Alfons, Pelle Svanslos, singing books, Laban and the Ten Little Race Cars. Your grandmother often reads the latter to you and you were happy when you got your own copy. You know all the books that rhyme by heart, and many of the others too. Sometimes you sit on your own and look in your books and tell the stories to your giraffe and elephant. We also sometimes pretend to be different characters in books. It is so cosy to sit and read together.

I placed Tim Holtz tiny screw brads in the corners of the book, to make sure it was stuck well to the layout.

And some more photos.

Thank you so much for looking! I hope you will join us this month in our special case file.

Anna-Karin

Supplies:
Surfaces: Tim Holtz Core’dinations Kraft-Core cardstock; Daler & Rowney Watercolour Paper; Sizzix Little Sizzles White Mat board 6 x13; Ranger Claudine Hellmuth Natural Sticky-Back Canvas; Neenah Smooth Cream cardstock; Old book and dictionary pages
Dies: Sizzix: Word PlayArtful DwellingsCameo Frame, Heart Wings, Mini Hearts, Flower & Heart, Heart & Wing, Mini Bird & Cage, Mini Openings, Tattered Banners, Torn Notebook, Sized Ovals
Embossing folder: Sizzix: Book Covers Set, Dot Matrix & Gridlock Set
Stamps: Stampers Anonymous Tim Holtz: School Desk, Warehouse District, Mini Muse, Tiny Things; Hero Arts: I Love Books, Life Can Be, Printer’s Lowercase; Artistic Outpost: Neverland, My Favorite Book
Ink: Distress Ink: Bundled Sage, Scattered Straw, Antique Linen, Gathered Twigs; Ranger Archival Ink: Jet Black; Tsukineko: Timber Brown Stazon Ink
Paint: Distress Paint: Picket Fence, Antique Linen, Walnut Stain
Mist: Ranger Perfect Pearls Mist Biscotti
Medium: Claudine Hellmuth Multi-Medium Matte; Golden Artist Colors Light Molding Paste
Stencil: The Crafter’s Workshop: Mini Art Is; Ranger Dylusions: Starry Starry Night
Embellishments: Tim Holtz Idea-ology Symphony Tissue Tape, Word Bands, Long Fasteners, Mini Fasteners; Studio Calico Wood Veneer Potty People; 7Gypsies Photo turn; twine; mica; lace trim

Tuesday, August 20, 2013

Friends Pop-Up Layout

Hi everyone! Today I am sharing a layout with three pop-up elements, which I made as a sample layout for Jennifer Grace's Projects that WOW online class in June this year.
 
Friends Pop-Up Layout - Layers of ink
I love using interactive elements on my projects, creating little surprises for the viewer to discover. All the three flaps on this layout open to reveal different pop-ups, made with Karen Burniston’s  Sizzix Journey dies. Pop-ups aren’t only for cards, but are perfect for layouts too, they are so much fun and give extra space for additional photos, journaling and embellishments.

The background is watercolour cardstock and Tim Holtz wallpaper stamp was stamped repeatedly and clear embossed. I smeared Distress Stains on my craft sheet, misted the paper with water and pressed into the ink. The embossing resists the ink. I also stamped the background with a bunch of different stamps, using Archival Jet Black ink and Peacock Feathers Distress Ink.

The first pop-up is made with the 3-D Butterfly Window. For a tutorial using the Butterfly Window die, check out this project of mine. Here, I placed it inside the new pop 'n cuts base die, which cuts a square card with an ornate edge. It was die cut from Tim Holtz French Industrial patterned paper, which is double-sided. The base die also includes a swirl, which I die cut from kraft-core cardstock and sanded. The little heart was die cut from mat board and embossed with Stampendous Aged Silver Embossing Enamel.

When you open the flap, it looks like this. You can place a paper behind the opening, but here I wanted to leave it open so that you can see the background. All I did was to stamp a ruler stamp and use that as a spine. The smaller butterfly is layered with a butterfly die cut from patterned paper and a Chit Chat sticker. The girl was stamped with Jet Black ink and coloured with Distress Inks.

The orange butterfly was die cut from Wendy Vecchi's white modeling film, using the Butterflies & Labels die. I coloured it with alcohol ink and stamped with an art quote stamp. It was heated with my heat gun and shaped. Modeling film keeps its shape perfectly. It was stapled to the pop-up together with a canvas butterfly.

The second pop-up is the Friend 3-D Phrase. This time, I used the Horizontal A2 base die and to cover up the cut out part of the label on the front, I cut a spine from manila cardstock, using the ornate edge from the square base die. It was inked and stamped. The butterflies were stamped with Peacock Feathers.

The word was inked with Distress Inks, and I stamped a 's' on the small heart. There is a coordinating Sizzlits die, which also includes a 's', but I didn't have it yet when I made this layout. You can see how I used it in this mini-book. The marching children stamp is a favourite of mine from Hero Arts and the sentiment comes from Artistic Outpost. I repeated the swirl stamp on all the pop-ups to bring them together.

The third pop-up hides under this flap and was also die cut using the horizontal base die. Again, I cut an extra cardbase from manila cardstock, to hide the opening behind the pop-up. It was inked and stamped, and die cut with the ornate edge from the square base die. The heart was heat embossed with Aged Silver powder. I used some of my mom's childhood photos for the layout.

For this one, I used the Funky Label pop-up and also die cut a photo with a smaller sized Funky Label Framelits. A layered butterfly was attached to the pop-up with a wire, so that it looks like it is fluttering above it. All the little hearts were die cut with the Flower & Heart die.

The dimensional flowers were made with the Bloom w/Leaves 3-D Flower, die cut from patterned paper, inked and rolled (check this tutorial for another example using these flowers).

The watch was die cut from grungeboard and embossed with Aged Silver. The clock face was stamped on manila cardstock and inked. I rubbed white paint into the words on the word band.

These butterflies were also die cut from white modeling film, inked with alcohol ink, stamped, heated and shaped. I love the dimension you get with the modeling film.
 
Thank you for looking!!
 
Happy crafting!
 
Anna-Karin
Supply list:
Surfaces: Ranger Manila cardstock; Tim Holtz Idea-ology French Industrial; Core’dinations Tim Holtz kraft-core cardstock; Daler & Rowney watercolour paper; Prima: Sunset Sunrise 6 x 6 pad; Studio Calico 6 x 6; Stamper’s Anonymous Wendy Vecchi Whiteout Clearly For Art Modeling Film; Sizzix Little Sizzles white mat board 6 x 13
Dies: Sizzix: Flower & Heart, Butterflies & Labels, Funky 3-D Label Pop-Up, Funky Labels Framelits, Friend 3-D Phrase, 3-D Butterfly Window, Square w/Ornate Edge Card, Horizontal A2 w/Circle Label Pop-Up, Heart & Wing Set, Bloom w/Leaves 3-D Flower, Mini Clock Key & Pocket Watch
Stamps: Stampers Anonymous Tim Holtz: Simple Sayings, Wallpaper & Wood, Worn Text, Tiny Textures, School Desk, Curiosities, Winged Things, Stuff to Say, Classics #4, Warehouse District, Attic Treasures, Classics # 5, Going Somewhere; Hero Arts: It’s a Parade, Be Happy Every Day, Basic Lowercase Letters; Darkroom Door: Garden Greetings; Artistic Outpost: Quotes & Quotables
Ink: Ranger Distress Ink: Peacock Feathers, Tumbled Glass, Antique Linen, Rusty Hinge, Gathered Twigs; Ranger Archival Ink Jet Black; Tsukineko VersaMark
Stain: Ranger Distress Stain: Peacock Feathers, Tumbled Glass, Antique Linen, Frayed Burlap, Salty Ocean
Alcohol Ink: Ranger Adirondack: Ginger, Sunset Orange
Embossing powder: Ranger Clear Powder; Stampendous Aged Silver Embossing Enamel
Embellishments: Tim Holtz Idea-ology: Chit Chat stickers, Label Letters, Game Spinners, Word Bands, Filmstrip Ribbon, Lavish Trimmings; Maya Road canvas butterflies; 7 Gypsies photo turns; cheese cloth; brads

Monday, July 8, 2013

Tiny Stamps and Trinkets Shadow Box

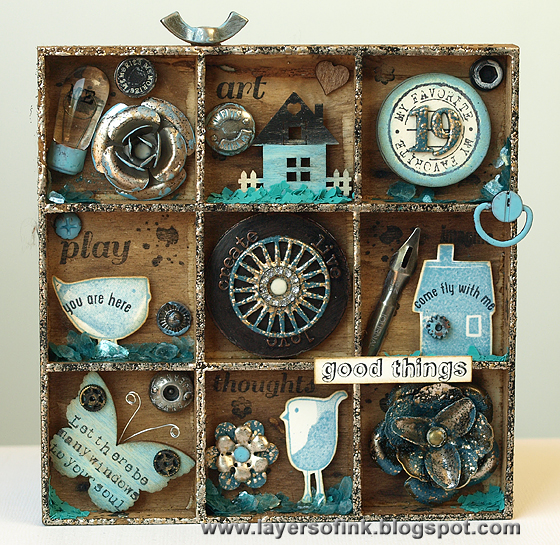
Hello everyone! This week we have a super fun challenge at Simon Says Stamp and Show, use small stamps (or stamp just a tiny portion of a large stamp). I often forget about the very small stamps that come on some sets and thought this was a great opportunity to use both tiny stamps, and lots of small embellishments.

I made a small shadow box filled with tiny stamps and trinkets:

Tiny Stamps and Trinkets Shadow Box - Layers of ink
I loved the idea of using tiny stamps and since they easily disappear on a large project I made a small shadow box, using the packaging of Prima wood icons. Prima's wood embellishments come in such cute little wooden boxes, when I saw it online the first time, I knew I wanted to make a shadow box out of it. They come in different sizes, the one that I used is 13 x 13 cm (5.25 x 5.25 in).  I really enjoy making shadow boxes, and they are perfect to showcase small dimensional details. Most of the embellishments come from Prima's Sunset Sunrise and Junkyard Findings collections.

First, I stained the box with a mix of Walnut Ink Crystals and warm water, which gives a really nice brown colour. Check out this project to see examples where I used it on paper and lace trim. I mixed up a medium-dark mixture and simply painted the box with it. Love how it makes the wood texture more visible. After the ink was dry, I stamped the box with tiny texture, word and flower stamps, mainly from Hero Arts, with Jet Black Stazon ink.

I dragged Ranger Emboss-It Dabber around the edges of the box and embossed with Stampendous Aged Silver Embossing Enamel. To embellish, I used a lot of different Prima embellishments and altered them with Distress Paint and Stampendous Aged Silver and Aged Teal Embossing Enamels. Be careful not to burn yourself when heat embossing metal. I used Ranger's Emboss-It Dabber and a Versamarker to apply embossing ink to the embellishments.

In this box, you can find a Typo Bulb, special screw and metallic rose. The bulb was painted with Broken China and Antique Linen Distress Paint was rubbed into the letters of the screw.

'Art' comes from Hero Arts My Favorites set. The wooden house was painted with Broken China, Black Soot and Picket Fence Distress Paint. The little heart is from Studio Calico. When I had finished decorated all the boxes, I glued sapplied Glossy Accents here and there and sprinkled with Stampendous Teal Color Fragments and Mica Flake. Here you see the Color Fragments.

The circle was die cut from mat board with the smallest Sized Circles and the My Favorites stamp was stamped on top. The Prima metallic numbers were embossed with Aged Teal powder.  I stacked some scrap pieces of mat board behind the circle to lift it from the background.

A painted screw head, bird stamped with Hero Arts Cerulean ink, ink splotch stamp, jeans button and mica flakes.

The center box has layered Prima metallic embellishments (Washers, Roses), with the gear being embossed with the teal powder. I rubbed some black paint on the largest circle and stacked them all together. The brad was dipped into Antique Linen Distress Paint.

The house was stamped with Cerulean ink and cut out. The tiny sentiment fit perfectly on top. Broken China paint was rubbed on the pen nib and the little gear.

The wood veneer butterfly was painted with Broken China and stamped with a small sentiment stamp. It was embellished with tiny gears and a wire. I stacked left over grungeboard behind the wings to give it dimension. Most of the embellishments were glued to the box with hot glue. Another jeans button is hiding in the corner.

The larger metallic flower was embossed with Aged Teal and the smaller with Aged Silver. The brad was dipped in Broken China paint. The bird is standing on a mica floor. I love mica and the Stampendous boxes of mica flakes are wonderful. The funky bird was stamped with Hero Arts Cerulean ink and mounted on several tiny pieces of scrap mat board. I used a tiny Hero Arts flower here and there on the project, which I had never used before and had hardly noticed. My son found it and loved it, otherwise, I would never have thought of using it here.

The last box was filled with this gorgeous dimensional rose, embossed with Aged Teal and a bit of Aged Silver powder.

I stamped the edges of the box with sentiment stamps from My Favourites and Remember, as well as the tiny flower and a butterfly stamp.

The other edges.

This is the top of the shadow box, with a cool Prima Special Screw.

I hope you will use some of your tiny stamps this week and show us the result. As always, one random participant wins a $50 gift voucher from Simon Says Stamp.


Thank you for looking!!

Happy crafting!

Anna-Karin

Supplies:
Surfaces: Prima wood packaging; mat board; cream cardstock
Stamps: Hero Arts: Collage Friend AC022, Remember AC028,  My Favorite AC030, My Words CL695, Come Fly With Me 331481,  Darkroom Door: New York Vol. 1; Artistic Outpost: Windows & Doors
Dies: Sizzix Sized Circles
Ink: Ranger Archival Ink Jet Black; Stazon Jet Black; Tsukineko Walnut Ink Antiquing Crystals; Hero Arts Cerulean; Ranger Emboss-It dabber; Versamarker
Embossing powders: Stampendous: Aged Silver Embossing Enamel, Aged Teal Embossing Enamel
Paint: Distress Paint: Broken China, Black Soot, Antique Linen
Embellishments: Prima: Mini Flowers, Mini Numbers, Roses, Washers, Small Typo Bulbs, Jeans Buttons, Special Screws, Screw Heads, Clock PartsHouses & Buildings; Studio Calico wood veneer shapes: Tiny Hearts, Butterflies; Tim Holtz Idea-ology: Pen Nibs; Stampendous: Teal Encrusted Jewel kit

Monday, June 24, 2013

Country Life Triptych

Hello and welcome! This week our challenge at Simon Says Stamp and Show is all about stripes. As every week, don't miss the gorgeous work by my team mates. We also have a new team mate, Meihsia Lui, check out her blog, it is full of inspiration. I am looking forward to seeing everything she will make.

I was inspired to do a triptych showcasing some old family photos.

For my stripes, I used Wendy Vecchi's Yikes...Stripes stencil, together with her Metallic Gold Embossing Paste. It was meant to symbolise newly plowed soil on a farm. My other type of stripes are the rays from Tim Holtz Psychedelic Grunge set, gold embossed as the sun above the photo.

The triptych was made with Tim Holtz Arch Frame die. I measured the distance between the cutting lines on the sides of the arch and cut and folded a long strip of manila cardstock, so that one side could be placed inside the cutting line. It didn't work to cut all three panels at once, because the Arch Frame has a scoring line, which cuts through the paper if you cut too many at once. The trick is to place the one folded edge just inside the one cutting edge, and to let the cutting edge on the other side remain just outside the cutting plates - then it won't cut. First I cut two of the panels, and then the third. I hope that makes sense, I forgot to take photos.

I applied gold embossing paste through the Yikes Stripes stencil with a palette knife, making sure to get an uneven edge at the top. After it was dry, I stamped grass from Darkroom Door and a pretty flower stamp from Tim Holtz and clear embossed them. The triptych was inked with Squeezed Lemonade, Scattered Straw and Gathered Twigs, the clear embossing will resist the ink. Images from Tiny Things were stamped here and there with Gathered Twigs.

On the first panel, I stamped a great Tim Holtz sentiment and die cut a Mini Pocket Watch from grungeboard. I die cut a circle from grungeboard using the smallest Sized Circle die and painted it with Antique Linen and Mustard Seed Distress Paint.The clock in the Going Somewhere set was stamped on top and placed in the middle of the pocket watch. I smeared gold paste around the clock face.

When the paste on the watch had dried, I coated the centre with Glossy Accents. Here you can see the shine of the paste and Glossy Accents better. The gold paste dries to a wonderful shine.

This photo is of one of my dad's friends and his brother. Love it. Sentiments from Tim's Simple Sayings were used here and there. The rays were gold embossed to symbolise the sun shining over the fields.


For texture, I used the chicken wire stamp on the Mixed Media set. It was stamped with Scattered Straw, holding the stamp in my hand for a more random impression. I avoided stamping on the sentiments, so that they would stand out nicely.

Here you can see the gold paste stripes better. I used some Chit Chat stickers too.

When folded up, this is the front of the triptych. I used a photo of my dad with a wheelbarrow, and the church in the background. The rays were gold embossed on the front too.

When you open the front, you see this page, with a flower, more sentiments, a little butterfly and sweet chickens. The flower stamp was stamped a second time with Scattered Straw, to create a shadow effect.

I hope you will join us this week! As always our sponsor Simon Says Stamp gives a $50 gift voucher to one random participant.


Thank you for looking!

Happy Stamping!

Anna-Karin

Supplies:
Surfaces: Ranger Manila cardstock; Tim Holtz Idea-ology Grungeboard
Dies: Sizzix: Arch Frame, Clock Key & Pocket Watch, Sized Circles
Stamps: Stamper's Anonymous Tim Holtz: Psychedelic GrungeClassics #5, Going Somewhere, Mixed Media, Mini Ornates, Tiny Things, Simple Sayings, Nature's Moment; Darkroom Door: Wildflowers Vol. 2; Artistic Outpost: Country Life
Ink: Distress Ink: Squeezed Lemonade, Scattered Straw, Gathered Twigs; Archival Ink Jet black; Versamark
Embossing powder: Ranger: Clear, Gold
Paint: Distress Paint: Antique Linen, Mustard Seed
Stencil: Wendy Vecchi: Yikes...Stripes
Medium: Wendy Vecchi Stamper's Anonymous Metallic Gold Embossing Paste, Ranger Glossy Accents
Embellishments: Tim Holtz Idea-ology: Chit Chat stickers, Game Spinners, Long Fasteners