Hello everyone! Since Mother's Day is coming up soon, I thought I would use that as a theme for a
Sizzix step-by-step tutorial. The first time I saw
Eileen Hull's Heart Box die I knew I wanted to use it to make a shadow box wall hanging. This project can be adapted to fit any theme, and you don't have to make three hearts as I did, do just one or how many as you would like.
This is a tall project and hard to photograph, but I still wanted to give you an idea of how it looks assembled. I made three heart shadow boxes using similar photos of my grandmother and my mom as a baby, my mom and me, and finally me and my son. I was lucky to find photos that were similar and printed them all in black and white. I love how this turned out.
To give you a better idea before we start, here is the first heart shadow box, I used a mix of dies to make the flowers.
Start by die cutting three hearts and six sides (three left and three right hand sides) from cream or white mat board. Here you can see that the die both cuts and scores the mat board, which makes assembly very easy.
Cut strips of natural sticky back canvas to fit both inside and outside the sides of the heart boxes (2.5x18.5 cm). Fray the one long edge a bit and adhere to the mat board. I used a glue stick on the mat board first, to make sure the canvas would stick down well. It is good to fold the sides a bit along the score lines, to make sure that you will still be able to get the right shape to attach to the heart. Swipe Picket Fence Distress Paint across the canvas, not covering it completely.
Ink with a bit of Frayed Burlap using an ink blending tool.
Do the same thing on all the other sides, on the inside and outside. The canvas gives a real nice feel to the boxes.
Stamp four of the sides with the long sentiment stamp from Tim Holtz Stamper's Anonymous Stuff to Say set, using Archival Jet Black ink. I was happy to discover how perfectly this stamp fit the hearts, both in size and with the words on the stamp. Don't start stamping at the top all the time, but instead alternate where particular words are situated, for more variation. Make sure that you pair up the sides of the boxes, since there is a left and a right. On the last pair, stamp the three words from one of the other stamps in the same set, masking out the two words you don't want with a piece of scrap paper when inking the stamp. Apply strong adhesive to the flaps. I used Ranger's Wonder Tape, you can see it on the second piece from the left.
Adhere the sides to the heart base. I added a few tiny staples too, but I am not sure if they were really necessary.
Now to the photos. I used 4x6 photos, which are slightly too small for the hearts, but it doesn't matter, since we will cover up that part with flowers. Use one of your mat board negative die cuts and place it on top of the photo to determine where you want the heart to be. You can cut the photo heart with the die, but to make sure I got exactly the part I wanted, I used a pen and then cut the heart out with scissors. You need to make it slightly smaller than the base heart, since otherwise it won't fit.
Die cut three hearts from cardstock and trim them with scissors so that they fit inside the heart boxes.
Distress the edges of the photos slightly, with sandpaper and a needle tool. Adhere first the cardstock heart and then the photo hearts to the boxes.
Punch two holes at the top and base with a Crop-a-dile, except for at the base of the last heart. It might be easier to do this before assemblying the hearts, but I didn't think of it until they were stuck.
Ink the edges with Frayed Burlap, Scattered Straw and Bundled Sage distress ink. The kraft-core and tissue flowers were swept through Picket Fence Distress Stain which had been smeared on my craft sheet.
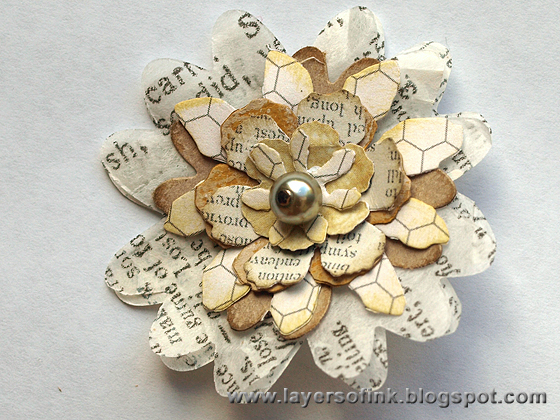
Shape the edges of the petals of the 3-D flowers a bit and then roll them up with tweezers or a toothpick. I usually only start with tweezers and then remove them and roll the rest with my fingers.
You'll end up with 3-D flowers in two different sizes. Ink the edges a bit.
For something a bit different, I decided to use beads and pearls as flower centers. You could use a brad instead. Place the pearls on head pins.
Layer the flowers into smaller and larger flowers and place a head pin through the center of each one.
Cut the end and make a double loop at the back.
Press it flat with pliers.
Smear a little bit of Antique Linen Distress Stickles on the flowers. I love the subtle, vintage shine from this distress stickles. Fold the leaves in the middle to shape them.
Dye crinkle ribbon with Bundled Sage, Scattered Straw and just a little bit of Frayed Burlap Distress Stain.
I used little pieces of cheesecloth to add a soft feeling to the hearts, as well as some extra beads and pearls. I had some sweet water pearls that aren't of great quality, many of them being flat on one side, which was perfect for this project since they were easy to glue to the heart shadow boxes. I used hot glue for the flowers and Glossy Accents for the pearls. Tuck leaves in where they fit. I didn't use all the leaves and had some flowers left for another project too.
Thread a piece of the crinkle ribbon through the holes at the top and tie a bow, tie another piece to it to hang the wall hanging with. I glued two flowers to the top of the heart.
White paint was rubbed into the sentiment of the Word Band, to make it stand out more. Glue to the heart with hot glue, but only after you have threaded the ribbon through the holes, otherwise that will be pretty tricky. The hearts didn't close completely at the base, and I added a little bit of hot glue there too, pressing the two ends together.
The second heart with me and my mom, I like this photo the best. At the base of the hearts, I used smaller flowers, and the larger ones sit in the 'empty' corners of the photos.
First glue the cheesecloth and then layer the flowers and leaves on top. I tied the Word Stick around one of the flower bead centers.
A close-up of the flowers and pearls at the base of this heart. I glued a little pearl inside the 3-D flower too. I threaded the ribbon through first here, since I saw that I would cover up the holes.
The last shadow box, with the tiniest baby. I found a pearl that looked like a heart and glued it to the photo.
Close-up of the flowers, cheesecloth, leaves and pearls.
This sweet sentiment was the perfect way of finishing the wall-hanging.
I tied the hearts together with the crinkle ribbon, just making simple knots, you could tie bows as well.
Love the look of the stamping on the side of the hearts.
The last heart, time to hang this up on a wall or give away as a gift.
Thank you for looking at this long tutorial!
Happy Crafting!
Anna-Karin
Supplies:
Surfaces:
Sizzix Little Sizzles cream mat board 6x13; Claudine Hellmuth natural sticky-back canvas; Tim Holtz Core'dinations kraft-core cardstock; Tim Holtz Idea-ology Terminology tissue wrap; 7Gypsies Off the Wall 8 x 8 paper pad; Studio Calico Classic Vol. 2
Stamps: Stamper's Anonymous Tim Holtz: Stuff to Say
Ink: Ranger Archival Jet Black; Distress Ink: Bundled Sage, Scattered Straw, Frayed Burlap
Stain: Distress Stain: Bundled Sage, Scattered Straw, Frayed Burlap, Picket Fence
Paint: Distress Paint Picket Fence
Stickles: Ranger Distress Stickles Antique Linen
Embellishments: Tim Holtz Idea-ology Word Bands, Word Sticks, Crinkle Ribbon; assorted pearls and beads; head pins; cheesecloth
Adhesive: Ranger Glossy Accents, Ranger Wonder Tape; hot glue


O.M.G Anna-Karin! I really LOVE this project. What a beautiful memory piece. That's great that you had three photos that would work here. The stamping does look so pretty on the fabric and the colors you chose were perfect. Also love the tip on the pearl and headpin- have to try that. This is such a beautiful project and amazing tutorial. Thanks!
ReplyDeleteTHUD. Amazing!
ReplyDeleteWow, so much love in this creation!
ReplyDeleteMajo
What an amazing techniques and gorgeous results! Amazing artwork!
ReplyDeletekind regards, Alie :-)
These are just beautiful, what an amazing gift!
ReplyDeleteWhat an amazing piece of art. Just beautiful! So many great techniques. Thanks for the tutorial.
ReplyDeleteThisis so beautiful, gorgeous soft colours and fab flower details! Trace x
ReplyDeleteWOW! This is so beautiful! So many amazing techiniques! You are a wonderful artist!
ReplyDeleteThese are really beautiful! Great details!
ReplyDeleteAn absolutely beautiful project! Lots of wonderful details that can also be used on other projects. Thanks for sharing your creativity!
ReplyDeleteAbsolutely enchanting... I adore the fact that you have the three generations of photos, and all your amazing attention to detail has made this into such a special creation - a wonderful, wonderful make!
ReplyDeleteAlison xx
Amazing tutorial. This project is so pretty, I don't know how you could think of giving it away, or even replicating it. The pictures are so dear, what a nice find. This will be a piece to cherish!
ReplyDeleteThis is a lovely way to keep family heirlooms. You have such an eye for detailing. Blessings!
ReplyDeleteoh my word, anna-karin! first off i so appreciate the tutorial for these off the page dies. i have been wanting to try them and this helps so much. secondly, your project is gorgeous! i have to make one for our home, too! - vivian
ReplyDeleteWhat a beautiful project!!! Such a beautiful way to keep your special Mother and Baby photos. Thanks for sharing and also for the very clear tutorial.!!! Thanks again
ReplyDeleteCongratulations on your beautiful project. I love it, TFS
ReplyDeleteFabulous project. Love all the tips you give too. TFS. It's beautiful.
ReplyDeleteEdna x
Oh my gosh ... this is so lovely! Such a wonderful gift idea. Wow!
ReplyDelete