Monday, February 28, 2022

Peace Mixed Media Tag

Hi friends, I hope you are well. I have a mixed media tag to share today. 

Please note: this post has affiliate links, for which I receive a small percentage of sales generated by the link, at no extra cost to you.

Layers of ink - Peace Mixed Media Tag Tutorial by Anna-Karin Evaldsson.

I felt a need to do a project relating to the recent terrible events in the Ukraine. My son can't understand how a war like that can even take place, he thinks that adults should know better, which is so true. Since I didn't have a dove stamp or die, I decided to let a humble blue tit carry my message and a peace branch instead. 

Layers of ink - Peace Mixed Media Tag Tutorial by Anna-Karin Evaldsson.

The tag was first coated with gesso and I pulled the palette knife up and down to create texture. When dry, paint with Distress Paint and mist with water so that the paints blend.

Layers of ink - Peace Mixed Media Tag Tutorial by Anna-Karin Evaldsson.

When the paint was dry, I applied white paint through the Simon Says Stamp Polka Hearts stencil, aiming for a soft effect, looking almost like clouds.

Layers of ink - Peace Mixed Media Tag Tutorial by Anna-Karin Evaldsson.

War destroys life and leads to fear and suffering, there are no winners, which is why I added cracks in that beautiful blue sky. I started with blue cracks, but felt that they were too soft, and added some in black too.

Layers of ink - Peace Mixed Media Tag Tutorial by Anna-Karin Evaldsson.

The bird was die cut from watercolor paper.

Layers of ink - Peace Mixed Media Tag Tutorial by Anna-Karin Evaldsson.

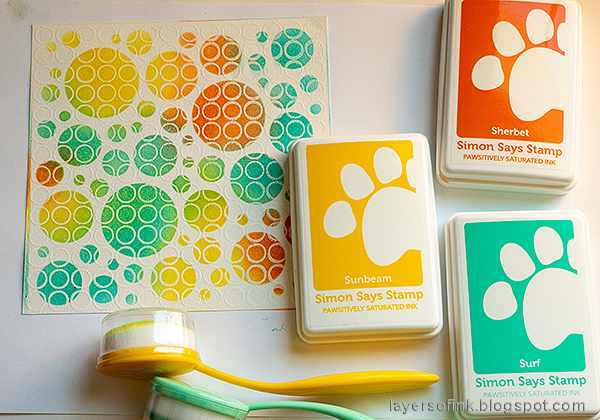
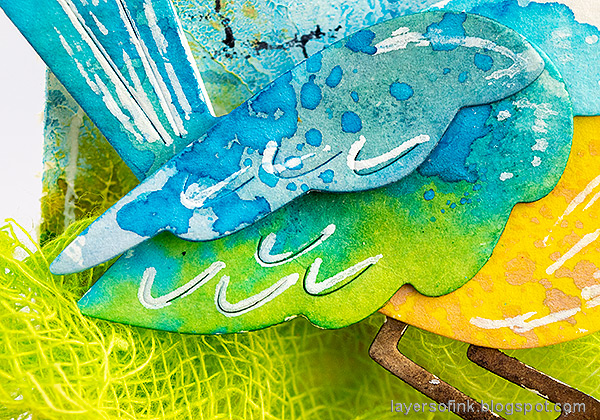
I smeared Distress Ink on a non-stick craft sheet, misted with water and pressed the bird pieces into the ink. The eye part was painted. Later I also added some Distress Oxide Ink, for more texture.

Layers of ink - Peace Mixed Media Tag Tutorial by Anna-Karin Evaldsson.

Assemble the bird and then add details with a white gel pen and a black eye with a black pen.

Layers of ink - Peace Mixed Media Tag Tutorial by Anna-Karin Evaldsson.

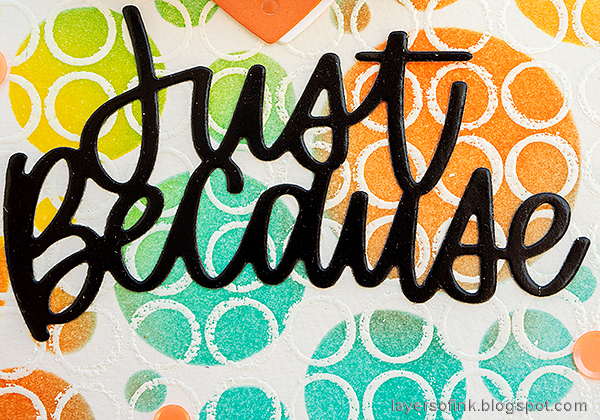
For the sentiment, I stamped the ticket from Simon Says Stamp Mixed Labels with Marine ink and 'peace' with Royal ink.

Layers of ink - Peace Mixed Media Tag Tutorial by Anna-Karin Evaldsson.

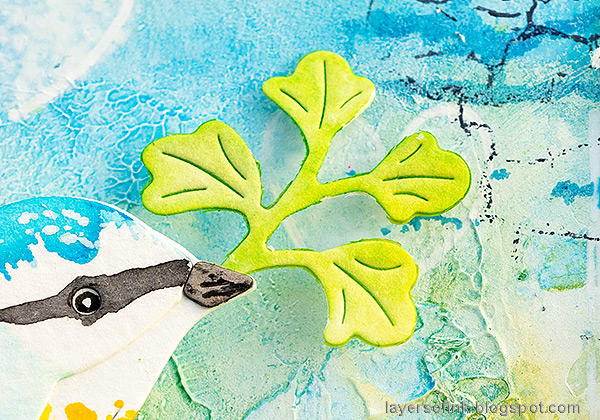
The branch was die cut with the the small Simon Says Stamp Fine Textured Leaf and colored it with green shades of Distress Ink.

Layers of ink - Peace Mixed Media Tag Tutorial by Anna-Karin Evaldsson.

The bird got a little home made of cheese cloth dyed with Distress Ink.


Layers of ink - Peace Mixed Media Tag Tutorial by Anna-Karin Evaldsson.

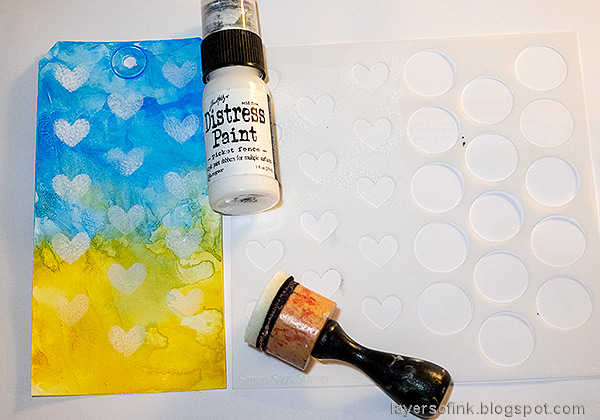
Here you can see the details of the added Distress Oxide dots and the white gel pen work.

Layers of ink - Peace Mixed Media Tag Tutorial by Anna-Karin Evaldsson.

And hopefully a brighter day will soon dawn, because no one should have to experience war, particularly not children.


Thank you so much for taking the time to stop by here today!

Happy crafting!

Anna-Karin

Supplies:

* Please note: the links are affiliate links, for which I receive a small percentage of sales generated by the link, at no extra cost to you.

Stencil Circle Layers

Hello friends! I hope you are well. Today we have a 'Use at least one stencil' theme at the Simon Says Stamp Monday Challenge blog.

Please note: this post has affiliate links, for which I receive a small percentage of sales generated by the link, at no extra cost to you.


I love stencils and all the techniques you can do with them, and on top of that, they take almost no space to store. I hope you will join us and don't miss the last project by our February guest designer Susan Babcock aka Susanbcards.

Layers of ink - Stencil Circle Layers Card Tutorial by Anna-Karin Evaldsson.

I made a cheerful card today, since I was in the mood for some bright colors, in the midst of dark international events. The background combines stamping and stenciling for a quick and fun result.

Layers of ink - Stencil Circle Layers Card Tutorial by Anna-Karin Evaldsson.

I had this piece stamped with the Simon Says Stamp Circle Pattern on my desk. It was embossed with white powder for a previous project. You can use any background stamp for this technique.

Layers of ink - Stencil Circle Layers Card Tutorial by Anna-Karin Evaldsson. Ink through the Simon Says Stamp Mix and Match Circles Stencil.

Place the Simon Says Stamp Mix and Match Circles stencil over the paper. Ink with the new Pawsitely Saturated Inks. I just love these colors and the ink and blend beautifully. I used Sunbeam, Surf, and Sherbet.

Layers of ink - Stencil Circle Layers Card Tutorial by Anna-Karin Evaldsson.

Die cut a Dotted Heart from white paper and leave the dots in the heart. Ink with Sherbet ink. The dots will end up slightly darker than the rest of the heart.

Layers of ink - Stencil Circle Layers Card Tutorial by Anna-Karin Evaldsson.

Distress the edges of the papers and stitch a black border around the card. Add some sequins for a final touch. I used the Simon Says Stamp Triangle Trays for the first time when adding sequins and thought they worked so well. It was really easy to pour the sequins back into the bag.

Layers of ink - Stencil Circle Layers Card Tutorial by Anna-Karin Evaldsson.

From a distance the white embossing is almost invisible on the white paper, compared to the inky circles where it stands out clearly.

Layers of ink - Stencil Circle Layers Card Tutorial by Anna-Karin Evaldsson.

I die cut a second heart and off-set it slightly under the sherbet heart. Die cut a banner using Tim Holtz Halloween Vault Series and stamp a sentiment from Simon Says Stamp Love Garden Greetings on top.

Layers of ink - Stencil Circle Layers Card Tutorial by Anna-Karin Evaldsson.

The Just Because title was die cut from the new Simon Says Stamp Black Glossy Cardstock, which gives extra punch and a nice finished look to the words.

I hope you will join us this week in our Use At Least One Stencil theme. You have a chance to win a $25 gift voucher to do some fun shopping at Simon Says Stamp. You have until Monday 8am Ohio time. 1pm UK time, 2 pm CET to join in.


Do you use Instagram? If so please add #sssmchallenge so we can see your entries there too.


Thank you so much for visiting my blog today! 

Happy crafting!

Anna-Karin

Supplies:

* Please note: the links are affiliate links, for which I receive a small percentage of sales generated by the link, at no extra cost to you.

Friday, February 25, 2022

Watercolor Daffodils Card Tutorial

Hi friends! I have another spring-time project to share with you today, even though we have a lot of snow.

Please note: this post has affiliate links, for which I receive a small percentage of sales generated by the link, at no extra cost to you.

Layers of ink - Watercolor Daffodils Card Tutorial by Anna-Karin Evaldsson.

With the terrible events taking place at present, I wanted to do a hopeful project. Daffodils and crocuses are among my favorite spring flowers and they were both on this stamp. The stamp comes from the Spring Stem set from the new Good Luck Charm release by Simon Says Stamp. I did some no-line watercoloring here. 

Layers of ink - Watercolor Daffodils Card Tutorial by Anna-Karin Evaldsson.

Start by stamping the image with Antique Linen on watercolor paper.

Layers of ink - Watercolor Daffodils Card Tutorial by Anna-Karin Evaldsson.

Mix shades of yellow, green and purple watercolor paint and loosely paint the flowers. Leave some of the white paper showing for highlights. 

Layers of ink - Watercolor Daffodils Card Tutorial by Anna-Karin Evaldsson.

Add more color, some grass/ground and splatter the background with green and yellow paint.

Layers of ink - Watercolor Daffodils Card Tutorial by Anna-Karin Evaldsson.

When dry, I added details with colored pencils and highlights with a white gel pen.

Layers of ink - Watercolor Daffodils Card Tutorial by Anna-Karin Evaldsson.

You can see the pencil and white gel pen work better here. It's a favorite technique of mine.

Layers of ink - Watercolor Daffodils Card Tutorial by Anna-Karin Evaldsson.

I dropped in some blue paint on the crocuses, before the purple paint was dry.

Layers of ink - Watercolor Daffodils Card Tutorial by Anna-Karin Evaldsson.

There is also a little blue dropped into the grass, and those areas of blue are one of my favorite parts of this card.

Layers of ink - Watercolor Daffodils Card Tutorial by Anna-Karin Evaldsson.

'Spring' from Simon Says Stamp All Seasons Tree was stamped repeatedly with Pearfection ink.

Layers of ink - Watercolor Daffodils Card Tutorial by Anna-Karin Evaldsson.

The main sentiment was also stamped with Pearfection ink. 

For another daffodil project, check out my Daffodil Art Journal Page from earlier this week.


Thank you so much for taking the time to stop by here today!

Happy crafting!

Anna-Karin

Supplies:

* Please note: the links are affiliate links, for which I receive a small percentage of sales generated by the link, at no extra cost to you.

Monday, February 21, 2022

Daffodils Art Journal

Hi friends! Storm Franklin is bringing us a whole lot of wet snow at the moment, but to cheer that weather up, I have a spring-time art journal page to share.

Please note: this post has affiliate links, for which I receive a small percentage of sales generated by the link, at no extra cost to you.


Our theme this week at the Simon Says Stamp Monday Challenge Blog is Art Journaling. If you have never art journaled before, I hope you will try it. It is very fun, creative and freeing. You don't have to have an art journal, but you can use lose pages instead and bind them later and glue them into a notebook.

Don't miss the beautiful art journal page by our February guest designer Susan Babcock aka Susanbcards.

Layers of ink - Daffodils Art Journal Page Tutorial by Anna-Karin Evaldsson.

We spotted some snowdrops last week, which was the first sign of spring this year, although they are now buried under lots of snow. I love daffodils and made an art journal page featuring the beautiful Off The Edge Daffodils stencil from Simon Says Stamp's new Good Luck Charm release.

Layers of ink - Daffodils Art Journal Page Tutorial by Anna-Karin Evaldsson.

Place the stencil on a page in Dina Wakley's 6x6 in White Journal. Mist with Squeezed Lemonade, Scattered Straw and a little Twisted Citron.

Layers of ink - Daffodils Art Journal Page Tutorial by Anna-Karin Evaldsson.

When dry, place the stencil back again and add a little bit of Distress Oxide ink with ink blending brushes, just to darken some of the areas.

Layers of ink - Daffodils Art Journal Page Tutorial by Anna-Karin Evaldsson.

Splatter a little Twisted Citron spray on the page.

Layers of ink - Daffodils Art Journal Page Tutorial by Anna-Karin Evaldsson.

I die cut the Simon Says Stamp Circle Loops from yellow glitter paper. The sentiments were stamped on white paper and cut into strips. These are from Anna's Flowers and Mixed Labels.

Layers of ink - Daffodils Art Journal Page Tutorial by Anna-Karin Evaldsson.

The Simon Says Stamp Capital B Beautiful die was die cut from white and yellow Memory Box Frosted Glitter paper and pieced together. The stamped label comes from Simon Says Stamp Mixed Labels.

Layers of ink - Daffodils Art Journal Page Tutorial by Anna-Karin Evaldsson. Stamp sentiments.

This type of detailed outline stencil works very well together with mists and gives a really quick background.

Layers of ink - Daffodils Art Journal Page Tutorial by Anna-Karin Evaldsson. Simon Says Stamp Forest Scenery.

Some additional sentiments and sequins to finish the page. 

For more inspiration using the Simon Says Stamp Good Luck Charm release, check out my Black Glossy Background Card and Radiating Squares Art Journal page.

I hope you will join us this week in our Art Journal theme. You have a chance to win a $25 gift voucher to do some fun shopping at Simon Says Stamp. You have until Monday 8am Ohio time. 1pm UK time, 2 pm CET to join in.


Do you use Instagram? If so please add #sssmchallenge so we can see your entries there too.


Thank you so much for visiting my blog today! 

Happy crafting!

Anna-Karin

Supplies:

* Please note: the links are affiliate links, for which I receive a small percentage of sales generated by the link, at no extra cost to you.