Tuesday, June 30, 2020

Summer Garden Globe Tutorial

Hello crafters! I have a sweet miniature tutorial to share with you today. Snowglobes aren't only for winter projects and here I created a summer garden inside one of Tim Holtz Snowglobes. There is both glitter and mica flakes and if you shake the globe they move around.

Layers of ink - Summer Garden Miniature Globe Tutorial by Anna-Karin Evaldsson.

The sun is shining and when I spotted one of Tim's Snowglobes I thought I would create a small Swedish summer garden inside the globe, complete with a red cottage, flowers, grass, trees and a white picket fence. You could also place a miniature version of your own home in the globe, or someone else's and give it as a gift to them.

Layers of ink - Summer Garden Miniature Globe Tutorial by Anna-Karin Evaldsson. Die cut the shapes.

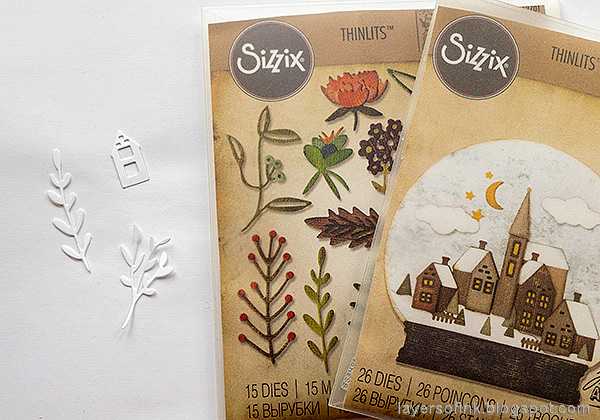
I started out by die cutting a house from Tim's Snowglobe 2 set and some greenery from Funky Floral 2.

Layers of ink - Summer Garden Miniature Globe Tutorial by Anna-Karin Evaldsson. Color with prismacolor pencils.

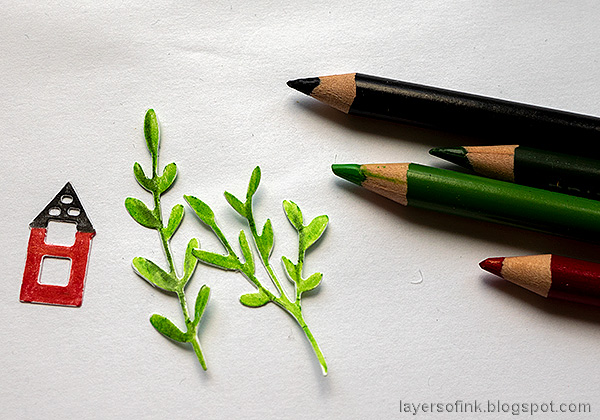
Since my colored pencils were on my desk, I decided to use them to color the shapes. You can use ink instead or markers, or for a quicker version, die cut the shapes from colored paper.

Layers of ink - Summer Garden Miniature Globe Tutorial by Anna-Karin Evaldsson.

Later I also made a tree from a leaf die.

Layers of ink - Summer Garden Miniature Globe Tutorial by Anna-Karin Evaldsson. Die cut tiny flowers.

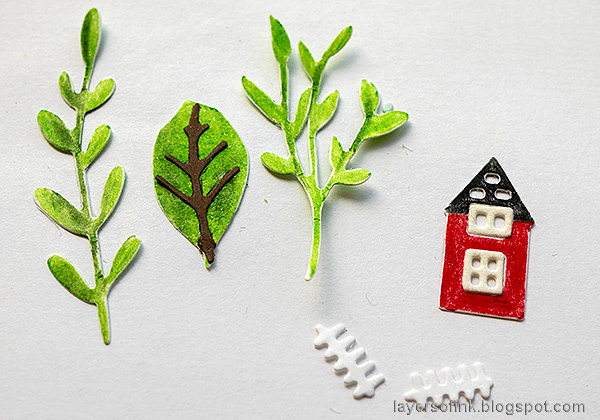
Die cut tiny flowers from various shades of SSS cardstock and from white glimmery cardstock.

Layers of ink - Summer Garden Miniature Globe Tutorial by Anna-Karin Evaldsson. Create grass from texture paste.

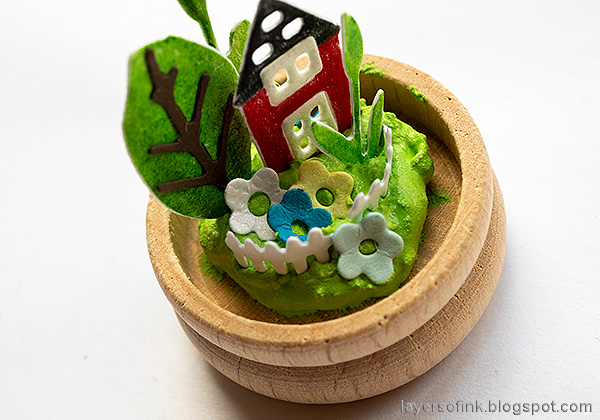
Mix a little Mowed Lawn Distress Paint into Matte Texture Paste and place a blog into the base of the globe. Don't let it go all the way to the edge. Press the shapes into the paste to build your scene. A pair of tweezers makes it easier. The paste acts as an adhesive.

Layers of ink - Summer Garden Miniature Globe Tutorial by Anna-Karin Evaldsson. Add rock candy glitter.

Mix a little green alcohol ink into Rock Candy Distress Glitter and sprinkle it over the paste. Leave to dry for a while, so that the shapes don't fall out when you glue the dome on top.

Layers of ink - Summer Garden Miniature Globe Tutorial by Anna-Karin Evaldsson. Place Tim Holtz mica flakes into the dome.

Scoop a small amount of Tim's mica flakes into the globe.

Layers of ink - Summer Garden Miniature Globe Tutorial by Anna-Karin Evaldsson.

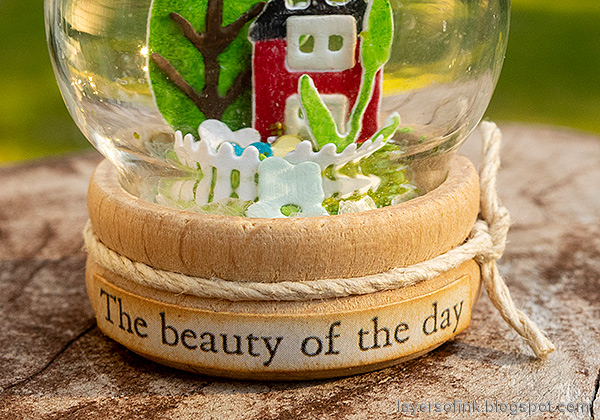
Add a little matte medium around the rim of the globe and adhere to the base. Leave it to dry upside down. Then tie a piece of twine around the base and add a Clippings Sticker as a sentiment.

Layers of ink - Summer Garden Miniature Globe Tutorial by Anna-Karin Evaldsson.

Here you can see the little scene from above. When you color the shapes with colored pencils, the edges stay white. I liked that in this case, particularly since I wanted the house to have white edges. If you don't want the white edges, color with ink or markers instead.

Layers of ink - Summer Garden Miniature Snowglobe Tutorial by Anna-Karin Evaldsson.

Here you can see the mica mixed up with some of the green glitter. You can add more mica if you want to.

Layers of ink - Summer Garden Miniature Snowglobe Tutorial by Anna-Karin Evaldsson.

Here's the little scene from the back.

Layers of ink - Summer Garden Miniature Globe Tutorial by Anna-Karin Evaldsson.

Just to give you an idea of how small and cute the globe is. For more inspiration on miniature globes check out my two winter globes: Winter Cottage in a Snow Globe and Christmas Forest tutorials. A similar project, but slightly larger is my Miniature House in a Shadow Box.


Thank you so much for taking the time to visit my blog today!  

Happy crafting!

Anna-Karin

Supplies:

* Please note: the links are affiliate links, for which I receive a small percentage of sales generated by the link, at no extra cost to you.


Monday, June 29, 2020

Wanderlust Inky Card

Hello stampers! After a week of very warm weather we got some much needed rain during the night and today it is slightly cooler. I have an inky card to share with you, with both stamping and stenciling techniques.


Our theme this week at the Simon Says Stamp Monday Challenge Blog is Take Me For A Ride. Don't miss checking out the last project by our June guest designer Sandra Rupp.

Layers of ink - Wanderlust Inky Card Tutorial with stamping and stenciling by Anna-Karin Evaldsson.

I went on an imaginary historical car drive, building a scene with stamps and stencils by Tim Holtz. The card is meant to depict hope, with the glittery rays and the colorful buildings. You can of course use the techniques with other stamps and stencils too.

Layers of ink - Wanderlust Inky Card Tutorial with stamping and stenciling by Anna-Karin Evaldsson. Emboss the vintage car.

Start by stamping the vintage car from Tim's Elements of Time set on heavystock paper with SSS embossing ink. Sprinkle Gunmetal powder on the lower part and Hammered powder on the top two-thirds. Always be very careful when using a heat gun and never touch the melted powder until it is completely cool.

Layers of ink - Wanderlust Inky Card Tutorial with stamping and stenciling by Anna-Karin Evaldsson.

Cut the car out and add some color with colored pencils.

Layers of ink - Wanderlust Inky Card Tutorial with stamping and stenciling by Anna-Karin Evaldsson.

Cut a piece of modeling film and color with Latte Alcohol Ink.

Layers of ink - Wanderlust Inky Card Tutorial with stamping and stenciling by Anna-Karin Evaldsson.

Glue it to the back of the windows.

Layers of ink - Wanderlust Inky Card Tutorial with stamping and stenciling by Anna-Karin Evaldsson. Stamp and mask the city.

Stamp the city from the Rock Star set on a piece of heavystock cardstock and on SSS masking paper. Cut out the masking paper version.

Layers of ink - Wanderlust Inky Card Tutorial with stamping and stenciling by Anna-Karin Evaldsson. Stencil the rays to the sky.

Adhere the mask and place the Shifter Rays Stencil until you are happy with the look. Ink with Fossilized Amber and Spiced Marmalade.

Layers of ink - Wanderlust Inky Card Tutorial with stamping and stenciling by Anna-Karin Evaldsson.

Clean the stencil, turn it around and position it so that the yellow rays are covered. Ink with three shades of blue Distress Ink.

Layers of ink - Wanderlust Inky Card Tutorial with stamping and stenciling by Anna-Karin Evaldsson.

Ink with a little Antique Linen to tone down the colors.

Layers of ink - Wanderlust Inky Card Tutorial with stamping and stenciling by Anna-Karin Evaldsson. Add Moon Dust Stickles.

Clean the stencil again and place it back so that it covers the blue rays. Apply Moon Dust Stickles with a palette knife. Let dry.

Layers of ink - Wanderlust Inky Card Tutorial with stamping and stenciling by Anna-Karin Evaldsson. Color with Prismacolor pencils.

Remove the mask and color the buildings with colored pencils. I used Prismacolor pencils. I stamped one building on each side of the city, so that the cityscape would cover the whole card.

Layers of ink - Wanderlust Inky Card Tutorial with stamping and stenciling by Anna-Karin Evaldsson.

Stamp the stars from Rock Star with Fossilized Amber ink and emboss with SSS clear embossing powder. Then ink the area with Pumice Stone and a little Broken China. Place the Burlap stencil on top and ink with Black Soot ink. Stamp sentiments with stamps from Noble Gents

Layers of ink - Wanderlust Inky Card Tutorial with stamping and stenciling by Anna-Karin Evaldsson. Shifter Ray stencil sky.

I have used this technique with Stickles quite a bit lately, since I really like the results and the new Ranger Stickels jars are stunning with some larger pieces of glitter. I wish you could see the sparkle in real life. For more examples check out my: DIY Bird Notebooks, Magical Gnome Forest and Ink, Stamps and Glitter tag.

Layers of ink - Wanderlust Inky Card Tutorial with stamping and stenciling by Anna-Karin Evaldsson. Ranger Hammered Mixed Media powder.

The Mixed Media Hammered powder gives a cool vintage metallic look to the car. Adhere the car with foam tape.

Layers of ink - Wanderlust Inky Card Tutorial with stamping and stenciling by Anna-Karin Evaldsson.

I also stamped a compass and added two game spinners. The gold hearts were on my desk from a previous project and were die cut with the SSS Clipping Heart die.

Layers of ink - Wanderlust Inky Card Tutorial with stamping and stenciling by Anna-Karin Evaldsson.

When looking for a piece of modeling film for the car's windows, I found this stamp from Good Thoughts stamped on the film. I cut it out and stapled it to the sky.

Layers of ink - Wanderlust Inky Card Tutorial with stamping and stenciling by Anna-Karin Evaldsson.

The embossed stars have a great textured look to them. I matted the panel on black metallic kraft stock paper and sanded the edges slightly. The wanderlust stamp is an arched stamp, but I managed to place it on my acrylic block in a way that it stamped almost straight instead. I wanted a straight sentiment to mimic a road.

I hope you will join us this week in our Take Me For A Ride challenge. You have a chance to win a $25 gift voucher to do some fun shopping at Simon Says Stamp. You have until next Monday 8am Ohio time. 1pm UK time, 2 pm CET to join in.


Don't forget to follow Simon Says Stamp on Instagram, they post great stuff daily. 


Do you use Instagram? If so please add #sssmchallenge so we can see your entries there too.


Thank you so much for taking the time to visit my blog today!  

Happy crafting!

Anna-Karin

Supplies:

* Please note: the links are affiliate links, for which I receive a small percentage of sales generated by the link, at no extra cost to you.

Sunday, June 28, 2020

SSS Send Happiness

Hi everone!! I hope you are well! We have a heat wave here at the moment and it is a bit too hot for my liking. The evenings are very nice though and I took two long walks the past two evenings. We only have a few hours are darkness at night at this time of the year, which is lovely.


Simon Says Stamp has a new release. It is called Send Happiness and it is full of wonderful stamps, dies, stencils, sequins and some great slimline envelopes. There was a blog hop to celebrate it yesterday and another one today. I missed it since my parcel isn't here yet. The virus situation is causing delays in international shipping.

I wanted to do a quick post anyway because this release is extra special for me. The reason for that is that I designed one of the stamp sets. It is my very first stamp set and something I wanted to do for a long time. I am very happy! I can't wait to see what people will create with it.

Here is a link to yesterday's blog hop and you can find today's blog hop here. Don't miss all the inspiration and there are prices to be won too.

You can see the whole release below.

* Please note: the links are affiliate links, for which I receive a small percentage of sales generated by the link, at no extra cost to you.


Such a happy release and perfect for both sending happiness and creating happiness for yourself in the process. I love how all the products go together so well and are very versatile. Could you guess which is the stamp set that I designed? Inspired by nature and with a favorite quote (it is the Thoughtful Flowers set).


For more Send Happiness inspiration, remember to check out the Sunny Days Ahead gallery at SSS, and if you make something with products from the range, it is fun if you post it in the gallery too. There are galleries for all releases, and for the card kits, full of inspiration.

I am looking forward to crafting with Send Happiness products, and I hope the postman will hurry up.

Thank you so much for taking the time to visit my blog today! I will see you again tomorrow.

Happy crafting!

Anna-Karin


Wednesday, June 24, 2020

DIY Bird Notebooks

Hello crafters! Today I have a tutorial for two notebooks to share with you. The techniques work just as well for cardmaking or art journaling. I made these as teacher's gifts.

Layers of ink - DIY Bird Notebooks Tutorial by Anna-Karin Evaldsson.

As you already know, I love birds, and the Great tit and Eurasian blue tit are two of my favorite birds. They often make their way onto my projects. I used Tim Holtz Feathered Friends die set for the birds. You can color them in any way you'd like. When I want a specific bird, I usually look in a bird book for inspiration. The backgrounds were done with Collage Paper, a homemade stencil and Grit-Paste.

Layers of ink - DIY Bird Notebooks Tutorial by Anna-Karin Evaldsson. Cut the notebook covers.

Start by cutting four covers from Little Sizzles Mat Board, 6 x 4 in. You can also use chipboard, but then add a layer of gesso, otherwise the grey color will dull the collage paper. Adhere Tim's Typography Collage Paper to the front covers with matte medium. Also add a layer of matte medium on top of the collage paper.

Layers of ink - DIY Bird Notebooks Tutorial by Anna-Karin Evaldsson. Cut the notebook covers.

Glue natural sticky-back canvas to the back covers with matte medium. The canvas is self-adhesive, but for notebook, I usually glue them down.

Layers of ink - DIY Bird Notebooks Tutorial by Anna-Karin Evaldsson. Cut the notebook covers. Paint the collage paper.

Add Distress Paint to the covers, but don't cover up the designs completely.

Layers of ink - DIY Bird Notebooks Tutorial by Anna-Karin Evaldsson. Die cut the stencil.

Die cut the Simon Says Stamp Archie Jr Solid die from cardstock, to make a stencil.

Layers of ink - DIY Bird Notebooks Tutorial by Anna-Karin Evaldsson. Apply Grit-Paste

Smear Translucent Grit-Paste through the stencil with a palette knife. Let dry.

Layers of ink - DIY Bird Notebooks Tutorial by Anna-Karin Evaldsson. Apply Nebula Stickles Glitter Gel.

Place the stencil back over the design, and apply Nebula Stickels Glitter Gel through it.

Layers of ink - DIY Bird Notebooks Tutorial by Anna-Karin Evaldsson. Die cut the Feathered Friends.

The Feathered Friends were die cut from Tim's Cracked Leather watercolor paper, with the wings being die cut from ordinary watercolor paper.

Layers of ink - DIY Bird Notebooks Tutorial by Anna-Karin Evaldsson. Watercolor the birds.

Mix watercolor paint and paint the pieces.

Layers of ink - DIY Bird Notebooks Tutorial by Anna-Karin Evaldsson. Add details to the birds.

Assemble the birds and then add details and highlights with a black pen and a white gel pen.

Layers of ink - DIY Bird Notebooks Tutorial by Anna-Karin Evaldsson. Bind the books.

Ink the canvas and punch holes with a Crop-a-dile. Cut inside pages from your favorite sketching paper. Round the edges of the two corners on the outside and do the same on all the inside pages. The book was bound with Tim's Mini Book Rings.

Layers of ink - DIY Bird Notebooks Tutorial by Anna-Karin Evaldsson.

I used Field Notes ephemera and Mummy Cloth to make a little nest for the birds. The edges of the ephemera were inked with Vintage Photo. The sentiment was stamped on one of Tim's Journal Cards with Paper Artsy's Sunshine & Rain set by Alison Bomber.

Layers of ink - DIY Bird Notebooks Tutorial by Anna-Karin Evaldsson. Euroasian blue tit.

The cracked paper adds a great texture to the birds, which fit well for the look of feathers. Seeing a Euroasian blue tit always makes me happy.

Layers of ink - DIY Bird Notebooks Tutorial by Anna-Karin Evaldsson.

The sentiment stamped on the oval label comes from the SSS Tabbed Sentiment set.

Layers of ink - DIY Bird Notebooks Tutorial by Anna-Karin Evaldsson.

Since the Grit-Paste is translucent, some of the background shows through, making the letter appear to be in different shades. The gold stars are a part of the Nebula Glitter.

Layers of ink - DIY Bird Notebooks Tutorial by Anna-Karin Evaldsson.

The second book also has some Field Notes ephemera. I usually avoid bulky or dimensional objects on notebooks, since the book will not lie flat if there is something bulky on the cover.

Layers of ink - DIY Bird Notebooks Tutorial by Anna-Karin Evaldsson. Watercolor Great tit.

Here you can see the details on the bird a little better. I am very fond of using a white gel pen for highlights and some scribbles.

Layers of ink - DIY Bird Notebooks Tutorial by Anna-Karin Evaldsson.

The sentiment comes from Paper Artsy Sunshine and Rain. I rounded the edges to make it look more like a school label.

Layers of ink - DIY Bird Notebooks Tutorial by Anna-Karin Evaldsson. Ranger Distress Grit-Paste Translucent.

Adding Stickles through a stencil is such a fun technique and gives an instant glittery look, without any mess. For more inspiration check out my Magical Gnome Forest and Ink, Stamps and Glitter projects.


Thank you so much for taking the time to visit my blog today!  

Happy crafting!

Anna-Karin

Supplies:

* Please note: the links are affiliate links, for which I receive a small percentage of sales generated by the link, at no extra cost to you.