Thursday, November 30, 2023

Advent Calendar Countdown Tags

Hi crafters! December is starting tomorrow and I am happy to have finished my Advent calendar countdown tags just in time. 

Please note: this post has affiliate links, for which I receive a small percentage of sales generated by the link, at no extra cost to you.

Layers of ink - Advent Calendar Countdown Tags Tutorial by Anna-Karin Evaldsson.

The base for the calendar was made in 2015. I make new tags every year and reuse the base. You can make a similar base or perhaps hang the tags in your tree or on the wall. The tags later go into my December Daily, as dates for the journaling pages. In earlier years, I have made larger tags, which I have written the journaling on, but this year I made a different kind of December Daily journal, which you can see to the left.
 
Layers of ink - Advent Calendar Countdown Tags Tutorial by Anna-Karin Evaldsson.

Here are all the finished tags. I made 26 since Christmas is celebrated until Boxing Day here and I like to include that whole weekend in my journal.

Layers of ink - Advent Calendar Countdown Tags Tutorial by Anna-Karin Evaldsson. Die cut tags with Simon Says Stamp Label Tags.

Start by smearing Distress Ink on a non-stick craft sheet, mist with water and press watercolor paper into the ink. When dry, die cut 26 tags using Simon Says Stamp Label Tags. 

Layers of ink - Advent Calendar Countdown Tags Tutorial by Anna-Karin Evaldsson. Stamp numbers with Tim Holtz Worn Text.

I used Tim Holtz Worn Text for the numbers. They were all stamped with shades of green Distress Ink. Mist with water before stamping.

Layers of ink - Advent Calendar Countdown Tags Tutorial by Anna-Karin Evaldsson. Stamp sentiments from various sets.

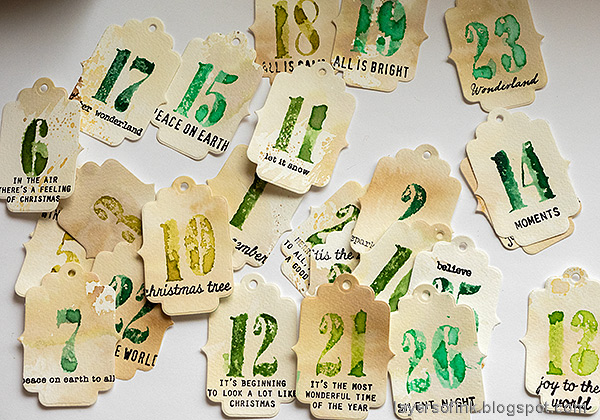
Next, I stamped a small sentiment on each tag. The sentiments come from Simon Says Stamp Season's Greetings and from various Tim Holtz sets.

Layers of ink - Advent Calendar Countdown Tags Tutorial by Anna-Karin Evaldsson. Stamp stars, pine branches, snowflakes and more.

I used traditional Christmas colors, since my December Journal was made with traditional colors. Mist each stamp with water before stamping, for a watercolor look. The stamps are from different Tim Holtz Christmas sets.

Layers of ink - Advent Calendar Countdown Tags Tutorial by Anna-Karin Evaldsson.

I think I might have used 'Hello December' on a countdown tag before, usually on the very first tag of the month.

Layers of ink - Advent Calendar Countdown Tags Tutorial by Anna-Karin Evaldsson.

A few of my sentiments went a bit off the edge, but I was fine with that. 

Layers of ink - Advent Calendar Countdown Tags Tutorial by Anna-Karin Evaldsson.

Its a lot of fun stamping in this way and I love being surrounded by a whole pile of stamps.

Layers of ink - Advent Calendar Countdown Tags Tutorial by Anna-Karin Evaldsson.

Some of the sentiments fit perfectly, as if they were made for this label tag die. The star stamp is from Jolly Holiday.

Layers of ink - Advent Calendar Countdown Tags Tutorial by Anna-Karin Evaldsson.

The Simon Says Stamp Label Tags come in a set of three sizes.  This is the mid-sized tag. I really like the shape of them. You can find another example, where I used both the smaller and the larger tag here.

Layers of ink - Advent Calendar Countdown Tags Tutorial by Anna-Karin Evaldsson.

I really like how the Lucky Clover ink the the left almost shines.

Layers of ink - December Journal and Countdown Calendar by Anna-Karin Evaldsson.

This is how I plan to use them as dates in my December Journal. You can find the journal and its tutorial here. 

Layers of ink - Advent Calendar Countdown Tags Tutorial by Anna-Karin Evaldsson.

I hope you enjoyed this tutorial! The tags can also be made as gift tags. Just skip the number and write the person's name there instead. 

You can find the previous years' countdown tags here: 201520162018201920202021 and 2022.


Thank you for visiting my blog! 

Happy crafting!

Anna-Karin

Supplies:

* Please note: the links are affiliate links, for which I receive a small percentage of sales generated by the link, at no extra cost to you.


Wednesday, November 29, 2023

Snowy Winter Landscape Canvas

Hello friends! We have gotten a whole lot of snow and the world is beautiful outdoors. I made a mixed media canvas with a winter landscape.

 Please note: this post has affiliate links, for which I receive a small percentage of sales generated by the link, at no extra cost to you.

Layers of ink - Snowy Glittery Forest Canvas Tutorial by Anna-Karin Evaldsson.

I wanted the landscape to look a bit like a hill from the side, with the trees climbing higher towards the right-hand edge. I always add words to my projects, but in this case I decided to skip it, in order to only get that frosty and glittery feel. The project is very glittery, which you might not see on the photos since it was overcast when I took them. The canvas is 5.5x8 in.


Layers of ink - Snowy Glittery Forest Canvas Tutorial by Anna-Karin Evaldsson. Die cut Tim Holtz Forest Shadows.

Coat the canvas with gesso and then die cut Tim Holtz Forest Shadows from watercolor paper and coat with gesso.

Layers of ink - Snowy Glittery Forest Canvas Tutorial by Anna-Karin Evaldsson. Add Ranger Crackle Paste.

Apply Ranger Crackle Paste to the canvas and press trees into the paste. The crackles will appear as the paste dries. The thicker the paste, the larger the crackles. You need to add a little matte medium behind the trees where they overlap.

Layers of ink - Snowy Glittery Forest Canvas Tutorial by Anna-Karin Evaldsson. Paint with Distress Paint.

Paint with blue and grey shades of Distress Paint. Mist with water to blend and so that the paint seeps into the crackles.

Layers of ink - Snowy Glittery Forest Canvas Tutorial by Anna-Karin Evaldsson. Paint the trees.

Paint the trees and mist with water.

Layers of ink - Snowy Glittery Forest Canvas Tutorial by Anna-Karin Evaldsson. Add texture paste and glitter for snow.

Glue the trees to the canvas with matte medium. Apply a little Texture Paste to the branches and sprinkle with Rock Candy Glitter.

Layers of ink - Snowy Glittery Forest Canvas Tutorial by Anna-Karin Evaldsson.

Apply a thick layer of texture paste as a snowy hill. Place a few drops of Salvaged Patina paint into the paste. Cover with Rock Candy glitter.

Layers of ink - Snowy Glittery Forest Canvas Tutorial by Anna-Karin Evaldsson. Apply Sizzix Luster Wax.

Apply a little Sizzix Luster Wax in Silver and Ivory, for extra shine.

Layers of ink - Snowy Glittery Forest Canvas Tutorial by Anna-Karin Evaldsson. Die cut stars from glitter paper.

Die cut the stars from Forest Shadows from Simon Says Stamp White Glittery cardstock.

Layers of ink - Snowy Glittery Forest Canvas Tutorial by Anna-Karin Evaldsson.

The texture paste and Rock Candy combo looks like cold snow.

Layers of ink - Snowy Glittery Forest Canvas Tutorial by Anna-Karin Evaldsson.

I painted the trees darker on one side as a shadow.

Layers of ink - Snowy Glittery Forest Canvas Tutorial by Anna-Karin Evaldsson. Snowy trees.

I like the combination of larger and smaller trees in the Forest Shadows set.

Layers of ink - Snowy Glittery Forest Canvas Tutorial by Anna-Karin Evaldsson.

More tree details. You could also make these trees for a card.

Layers of ink - Snowy Glittery Forest Canvas Tutorial by Anna-Karin Evaldsson.

It was hard to capture just how much the snow glitters since the day was so grey (and it was snowing). I added a little Silver Wax to the snow too.

Layers of ink - Snowy Glittery Forest Canvas Tutorial by Anna-Karin Evaldsson.

The mix of larger and smaller crackles makes for an interesting textured background.

Layers of ink - Snowy Glittery Forest Canvas Tutorial by Anna-Karin Evaldsson.

This is about how our forest looks right now, although with even more snow.

Layers of ink - Snowy Glittery Forest Canvas Tutorial by Anna-Karin Evaldsson.

I hope you enjoyed this tutorial. The canvas will make a great gift and you can easily adapt it to a smaller or larger size.


Thank you for visiting my blog! 

Happy crafting!

Anna-Karin

Supplies:

* Please note: the links are affiliate links, for which I receive a small percentage of sales generated by the link, at no extra cost to you.


Monday, November 27, 2023

Winter Pine Forest Tag

Hi friends! I hope you are well! We went from autumn to winter in just a day and have the most beautiful snowy landscape now. 

Please note: this post has affiliate links, for which I receive a small percentage of sales generated by the link, at no extra cost to you.


This week at the Simon Says Stamp Monday Challenge Blog we have a Tree theme. I love trees and add them to my projects often. Don't miss the last project by Anita Rao who is our guest designer during November.  

Layers of ink - Winter Pine Forest Tag tutorial by Anna-Karin Evaldsson.

I was inspired by the falling snow and created a winter pine forest tag, with quick and easy techniques. I was going to add more texture to the sky area, but the misting created such a great pattern that I decided to leave it and just added a few stars.

Layers of ink - Winter Pine Forest Tag tutorial by Anna-Karin Evaldsson. Emboss Simon Says Stamp Tall Pine.

Die cut a tag from watercolor paper. Ink the Simon Says Stamp Tall Pines folder with embossing ink. Sprinkle with white powder and emboss.

Layers of ink - Winter Pine Forest Tag tutorial by Anna-Karin Evaldsson. Mist with spray.

Mist with various Distress Spray Stains. 

Layers of ink - Winter Pine Forest Tag tutorial by Anna-Karin Evaldsson. Die cut Tim Holtz Shadow Trees.

Die cut Tim Holtz Forest Shadows from watercolor paper. Apply embossing ink here and there and emboss with white powder. Always be very careful when using a heat tool and do not touch the melted powder until it has cooled down completely.

Layers of ink - Winter Pine Forest Tag tutorial by Anna-Karin Evaldsson.

Apply Distress Ink to a non-stick craft sheet, mist with water and press the paper into the ink. Let dry and repeat until you are happy with the look.

Layers of ink - Winter Pine Forest Tag tutorial by Anna-Karin Evaldsson. Die cut stars from glitter paper.

Die cut the stars from Tim's Forest Shadows from Simon Says Stamp White Glitter Paper.

Layers of ink - Winter Pine Forest Tag tutorial by Anna-Karin Evaldsson. Stamp sentiment with Simon Says Stamp All Seasons Tree.

Stamp the sentiment from Simon Says Stamp All Season's Tree on white paper and cut into a strip.

Layers of ink - Winter Pine Forest Tag tutorial by Anna-Karin Evaldsson.

Die cut the Forest Shadows from Simon Says Stamp silver glitter paper and place behind the colored die cuts. This adds a glittery shadow to the trees.

Layers of ink - Winter Pine Forest Tag tutorial by Anna-Karin Evaldsson. Create the paper forest.

I stamped another two sentiments and cut into strips. 

I hope you will join us this week in our Trees challenge. You have a chance to win a $25 gift voucher to do some fun shopping at Simon Says Stamp. You have until Monday 8am Ohio time. 1pm UK time, 2 pm CET to join in.


Do you use Instagram? If so please add #sssmchallenge so we can see your entries there too.


Thank you so much for stopping by here today! 

Happy crafting!

Anna-Karin

Supplies:

* Please note: the links are affiliate links, for which I receive a small percentage of sales generated by the link, at no extra cost to you.


Friday, November 24, 2023

Home December Journal Tutorial

Hello friends! It is time to share one of my favorite projects each year. My December journal, inspired by Ali Edwards concept of documenting the month of December. I have been doing this since 2012, making this my twelfth December daily journal.

Please note: this post has affiliate links, for which I receive a small percentage of sales generated by the link, at no extra cost to you.


Layers of ink - December Daily Journal Tutorial by Anna-Karin Evaldsson.

This year I made a journal celebrating Christmas at home and using traditional Christmas colors. The book is about 6.5 x 5 in and my December Countdown Tags (which I will share soon) will also go into it. The cover is a window from Tim Holtz idea-ology Baseboards and Transparencies, with an added red door on top. 

Layers of ink - December Daily Journal Tutorial by Anna-Karin Evaldsson. Use ideaology and Sizzix mat board.

These are the pieces used for the cover. The back is a Sizzix Little Sizzles Mat Board cut into the same size as the green window.

Layers of ink - December Daily Journal Tutorial by Anna-Karin Evaldsson.

The mat board was covered with Tim Holtz Christmas Backdrops paper. Sand the edges.

Layers of ink - December Daily Journal Tutorial by Anna-Karin Evaldsson. Ink with Ground Espresso.

Ink the edges with brown ink.

Layers of ink - December Daily Journal Tutorial by Anna-Karin Evaldsson. Emboss with white powder.

White emboss snowflakes at the top of the door. As you can see, I turned the baseboard piece around because I wanted the larger windows at the top.

Layers of ink - December Daily Journal Tutorial by Anna-Karin Evaldsson. color with alcohol ink.

Color Simon Says Stamp Acetate with alcohol ink.

Layers of ink - December Daily Journal Tutorial by Anna-Karin Evaldsson.

Stamp stars from Jolly Holiday with black Stazon ink.

Layers of ink - December Daily Journal Tutorial by Anna-Karin Evaldsson.

Sand and ink the edges of various ephemera and baseboard pieces. I also stamped sentiments and cut into strips. The gold letters were die cut with Tim Holtz Emporium dies from gold kraft stock paper. 

Layers of ink - December Daily Journal Tutorial by Anna-Karin Evaldsson.

Glue the door to the background with matte medium. Apply some matte medium to the windows and sprinkle Rock Candy glitter on top, to create frost.

Layers of ink - December Daily Journal Tutorial by Anna-Karin Evaldsson. Stamp with Simon Says Stamp Ledger Paper.

I used a mix of my favorite papers and stamped some of them with Simon Says Stamp Ledger Paper Background and Red Geranium ink.

Layers of ink - December Daily Journal Tutorial by Anna-Karin Evaldsson.

Punch holes with a Crop-a-dile and bind with rings.

Layers of ink - December Daily Journal Tutorial by Anna-Karin Evaldsson.

I sanded the edges of quote strips from Tim's Christmas Baseboards & Transparencies. Ink and glue to the background.

Layers of ink - December Daily Journal Tutorial by Anna-Karin Evaldsson.

Glue ephemera here and there.

Layers of ink - December Daily Journal Tutorial by Anna-Karin Evaldsson.

I used 24 as a number instead of 25, since the main family celebration during Christmas in Sweden takes place on Christmas Eve.

Layers of ink - December Daily Journal Tutorial by Anna-Karin Evaldsson.

Apply glue to the candy sticks and cover with Rock Candy glitter. Apply Texture Paste to the base of the book as snow, sprinkle with Rock Candy.

Layers of ink - December Daily Journal Tutorial by Anna-Karin Evaldsson.

The first page in the journal is a card from Christmas ephemera and the second page is a piece of Christmas Backdrops. I wanted the tree and the holly to show through the windows.

Layers of ink - December Daily Journal Tutorial by Anna-Karin Evaldsson. Add ice to the windows with glitter.

Here you can see that the tree is visible through the window to the left. 

Layers of ink - December Daily Journal Tutorial by Anna-Karin Evaldsson.

I will add a photo to the panel to the right.

Layers of ink - December Daily Journal Tutorial by Anna-Karin Evaldsson.

Using a mix of papers adds interest and I am also planning to write with different types of pens. My December Countdown tags will be added to the pages, and some photos too, although I do not use that many photos in my December Journals. The focus is on the text.

Layers of ink - December Daily Journal Tutorial by Anna-Karin Evaldsson.

Matte medium and Rock Candy is a fun way of adding frost to windows.

Layers of ink - December Daily Journal Tutorial by Anna-Karin Evaldsson.

I might add more pages to the journal if needed and in that case it is possible to change to bigger binder rings. These are Tim Holtz Mini Book Rings.

Layers of ink - December Daily Journal Tutorial by Anna-Karin Evaldsson.

I am looking forward to filling my journal with Christmas memories.

You can find my previous Christmas Daily journals here:


Thank you for visiting my blog! 

Happy crafting!

Anna-Karin

Supplies:

* Please note: the links are affiliate links, for which I receive a small percentage of sales generated by the link, at no extra cost to you.