Saturday, September 30, 2023

Snowmen Tag STAMPtember® Tim Holtz Exclusive

Hello crafters! It is the last day of September and also the last day of STAMPtember® at Simon Says Stamp. Today I am happy to share a project made with the much-awaited Tim Holtz Exclusive collaboration.

Please note: this post has affiliate links, for which I receive a small percentage of sales generated by the link, at no extra cost to you.

Layers of ink - Snowmen Mixed Media Tag Tutorial by Anna-Karin Evaldsson.

I made a snowman tag with the great Tim Holtz STAMPtember® 2023 Exclusive set. You will get a rubber stamp set, two stencils, Sparkle Texture Paste and Glow Grit Paste. The stars in the background glow in the dark. 

Layers of ink - Snowmen Mixed Media Tag Tutorial by Anna-Karin Evaldsson. Stamp Tim Holtz Simon Says Stamp STAMPtember 2023.

The stamp set has fun images perfect for Christmas crafting and lots of sentiments. Stamp the snowman three times on watercolor paper. 

Layers of ink - Snowmen Mixed Media Tag Tutorial by Anna-Karin Evaldsson. Color with Distress Watercolor pencils.

I colored the snowmen with Distress Watercolor Pencils. Pick the paint up from the tip with a paint brush.

Layers of ink - Snowmen Mixed Media Tag Tutorial by Anna-Karin Evaldsson. Cut out the snowmen.

Cut them out. I cut off the broom from one of the snowmen. 

Layers of ink - Snowmen Mixed Media Tag Tutorial by Anna-Karin Evaldsson.

Apply Distress Micro Glaze to the snowmen, to prevent the color from bleeding out into the paste later.

Layers of ink - Snowmen Mixed Media Tag Tutorial by Anna-Karin Evaldsson. Paint the tag with acrylic paint.

Cover a tag with gesso using a palette knife and let dry. Paint the top with Distress Paint.

Layers of ink - Snowmen Mixed Media Tag Tutorial by Anna-Karin Evaldsson. Emboss the snowflakes.

When dry, white emboss the stars and snowflake to the sky.

Layers of ink - Snowmen Mixed Media Tag Tutorial by Anna-Karin Evaldsson. Add Glow Grit-Paste.

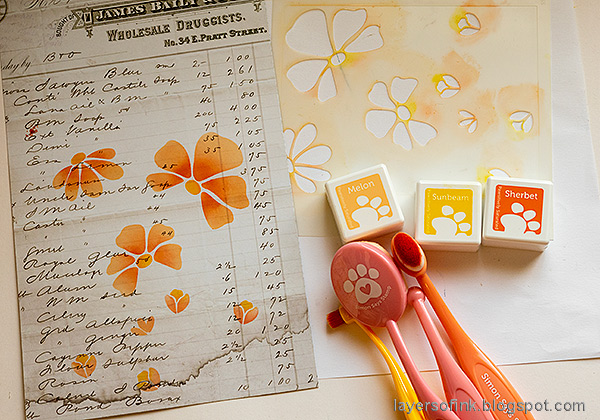
Next add Glow Grit Paste through one of the two stencils in the set. Let dry.

Layers of ink - Snowmen Mixed Media Tag Tutorial by Anna-Karin Evaldsson.

Add a second application of Glow Grit Paste to cover the sky. 

Layers of ink - Snowmen Mixed Media Tag Tutorial by Anna-Karin Evaldsson. Add Ranger texture paste sparkle.

I mixed a tiny bit of white paint into the Sparkle Texture Paste to make the paste more opaque. Add a thick layer as snow.

Layers of ink - Snowmen Mixed Media Tag Tutorial by Anna-Karin Evaldsson.

Place the snowmen into the paste. The one to the right was adhered with Simon Says Stamp Pawsitively Perfect Foam Tape. Add a little Sparkle paste on top and also to their hats and arms.

Layers of ink - Snowmen Mixed Media Tag Tutorial by Anna-Karin Evaldsson. Dye the ribbons.

The ribbon was dyed to coordinate with the colors of the snowmen.

Layers of ink - Snowmen Mixed Media Tag Tutorial by Anna-Karin Evaldsson.

Tie the ribbons to the tag.

Layers of ink - Snowmen Mixed Media Tag Tutorial by Anna-Karin Evaldsson. Glue sentiments.

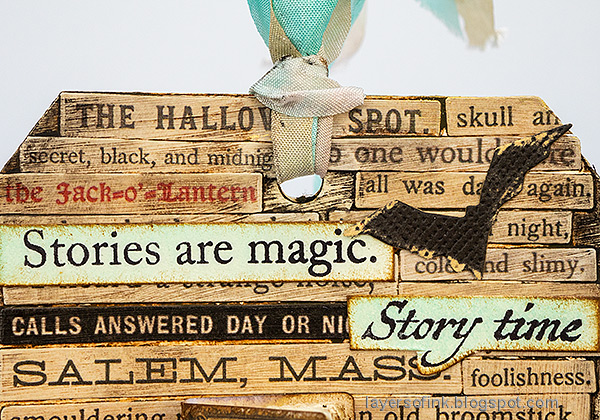
Sentiments were stamped and cut into strips. I like the full stop at the end of each of these three.

Layers of ink - Snowmen Mixed Media Tag Tutorial by Anna-Karin Evaldsson.

The glow in the dark stars have a yellow tint to them.

Layers of ink - Snowmen Mixed Media Tag Tutorial by Anna-Karin Evaldsson. Add glossy accents.

I added Glossy Accents to the eyes and buttons.

Layers of ink - Snowmen Mixed Media Tag Tutorial by Anna-Karin Evaldsson.

There is a bit of Sparkle paste on the hats of the snowman too.

Layers of ink - Snowmen Mixed Media Tag Tutorial by Anna-Karin Evaldsson.

Here you can see the Glossy Accents well.

Layers of ink - Snowmen Mixed Media Tag Tutorial by Anna-Karin Evaldsson.

The Sparkle Texture Paste has a shiny texture.

Layers of ink - Snowmen Mixed Media Tag Tutorial by Anna-Karin Evaldsson.

The glitter effect is a little hard to capture. 

Layers of ink - Snowmen Mixed Media Tag Tutorial by Anna-Karin Evaldsson. Glow in the dark stars.

Here you can see the glow in the dark effect of the stars/snowflakes. Very cool to walk past when it is dark.

Layers of ink - Snowmen Mixed Media Tag Tutorial by Anna-Karin Evaldsson.

Thank you so much for stopping by here today! Remember that the Tim Holtz Exclusive set is limited and won't return to Simon Says Stamp again.


Happy crafting!

Anna-Karin

Supplies:

* Please note: the links are affiliate links, for which I receive a small percentage of sales generated by the link, at no extra cost to you.


Friday, September 29, 2023

Stenciled Flowers Art Journal Page

Hello crafters! September is almost over and today I am sharing an art journal page made with a floral stencil. The project can be turned into a card or a tag instead.  

Please note: this post has affiliate links, for which I receive a small percentage of sales generated by the link, at no extra cost to you.

Layers of ink - Stenciled Flowers Art Journal Tutorial by Anna-Karin Evaldsson.

I used a stencil set from the Simon Says Stamp STAMPtember® release, called Floral Whimsy. The set consists of four stencils and I used them together with Pawsitively Saturated inks. It is fun to add stenciled designs to patterned paper and here I used one of Tim Holtz Halloween Backdrops papers. It gives a slight tint and you might already know that I love script. 

I worked on a burlap page in my Dina Wakley Blue Edition journal.


Layers of ink - Stenciled Flowers Art Journal Tutorial by Anna-Karin Evaldsson. Ink through Simon Says Stamp Floral Whimsy.

Line the stencil up with the bottom and side edges of the paper. The paper is exactly the right width for these stencils. I used Simon Says Stamp Pawsitively Saturated ink cubes sets and blending brushes.

Layers of ink - Stenciled Flowers Art Journal Tutorial by Anna-Karin Evaldsson. Add more Pawsitively Saturated Inks.

Continue with the second stencil, adding more flowers.

Layers of ink - Stenciled Flowers Art Journal Tutorial by Anna-Karin Evaldsson.

Next, ink through the third stencil with leaves using shades of green. I added Pearfection too, for a warmer shade.

Layers of ink - Stenciled Flowers Art Journal Tutorial by Anna-Karin Evaldsson. Add inky dots.

Finally, ink through the last stencil using brown inks.

Layers of ink - Stenciled Flowers Art Journal Tutorial by Anna-Karin Evaldsson. Add highlights with a white gel pen.

I added dots and highlights with a white gel pen.

Layers of ink - Stenciled Flowers Art Journal Tutorial by Anna-Karin Evaldsson. Add highlights with a white gel pen. Stitch around the card.

I trimmed the paper and placed it on a sheet of Simon Says Stamp Tangerine glitter cardstock. Pierce holes and stitch with DMC floss. I didn't want to waste too much glitter cardstock and cut out a rectangle in the middle.

Layers of ink - Stenciled Flowers Art Journal Tutorial by Anna-Karin Evaldsson. Add highlights with a white gel pen.

I added cheese cloth under the panel and adhered to a burlap page.

Layers of ink - Stenciled Flowers Art Journal Tutorial by Anna-Karin Evaldsson. Add highlights with a white gel pen.

I like how the ledger paper lines and script show through the flowers.

Layers of ink - Stenciled Flowers Art Journal Tutorial by Anna-Karin Evaldsson.

I also added some sequins, since I often turn to sequins for an extra touch, color, shine and interest without almost any bulk.

Layers of ink - Stenciled Flowers Art Journal Tutorial by Anna-Karin Evaldsson. Die cut the sentiment.

The page celebrates the last flowers of summer and I die cut the title with the Simon Says Stamp Bold Thankful die three times from Lavender cardstock, a left-over piece of the patterned paper inked with the same inks as the flowers and Simon Says Stamp purple glitter cardstock. 


Happy crafting!

Anna-Karin

Supplies:

* Please note: the links are affiliate links, for which I receive a small percentage of sales generated by the link, at no extra cost to you.


Wednesday, September 27, 2023

Story Time Tag with Minibooks

Hello friends! Today I have a fun Halloween tag to share, with a story time theme and five tiny dimensional books.

Please note: this post has affiliate links, for which I receive a small percentage of sales generated by the link, at no extra cost to you.

Layers of ink - Storytime Tag with Minibooks tutorial by Anna-Karin Evaldsson.

I love to read and I read a lot of different kinds of stories. I had such fun making the tiny books on this tag and adding titles and other details. The entire background of the tag is filled with words and sentences, from Tim Holtz Halloween sticker books.

Layers of ink - Storytime Tag with Minibooks tutorial by Anna-Karin Evaldsson.

The books have real pages and quite a bit of dimension.

Layers of ink - Storytime Tag with Minibooks tutorial by Anna-Karin Evaldsson. Cover the tag with Tim Holtz clippings stickers.

Start by covering an entire tag with clippings stickers from Tim Holtz Halloween sticker book. Coat with Matte Medium. Try to vary the stickers when it comes to size and color.

Layers of ink - Storytime Tag with Minibooks tutorial by Anna-Karin Evaldsson. Color with Distress Crayons.

Scribble Distress Crayons all over the tag, and then remove most of it with a slightly moist cloth. Add more until you are happy with the look.

Layers of ink - Storytime Tag with Minibooks tutorial by Anna-Karin Evaldsson. Create tiny book covers.

The tiny book covers come from Tim Holtz Halloween 2023 Ephemera Pack. Fold along the spine, sand the edges and then ink. 

Layers of ink - Storytime Tag with Minibooks tutorial by Anna-Karin Evaldsson. Tear old book paper and add to the books.

Tear the pages from an old book and fold in half to form a signature. Use a ruler when tearing to get a straight, but still torn, edge. Add enough signatures in each book to fill them and glue with Simon glue along the spine. Ink the edges of the pages a little.

Layers of ink - Storytime Tag with Minibooks tutorial by Anna-Karin Evaldsson. Stamp sentiments.

Stamp and die cut a label from Simon Says Stamp Mixed Labels and the coordinating die set. The label was stamped on Tim Holtz Halloween Backdrops paper. Ink the edges. The remaining two sentiments were stamped on heavystock paper which was inked with Salvaged Patina. 

Layers of ink - Storytime Tag with Minibooks tutorial by Anna-Karin Evaldsson.

The ribbon was dyed with Salvaged Patina and Frayed Burlap Distress Ink. 

Layers of ink - Storytime Tag with Minibooks tutorial by Anna-Karin Evaldsson.

I added titles to the book from the Halloween Sticker Book and a spider from Tim's idea-ology Spiders & Branches Adornments

Layers of ink - Storytime Tag with Minibooks tutorial by Anna-Karin Evaldsson.

The bats were die cut from black kraft core paper with Tim's Big Frights set.

Layers of ink - Storytime Tag with Minibooks tutorial by Anna-Karin Evaldsson. More tiny books.

These two are my favorites of the book covers. 

Layers of ink - Storytime Tag with Minibooks tutorial by Anna-Karin Evaldsson.

You could also add blank pages to the books and write your own words in them, or stamp tiny sentiments.

Layers of ink - Storytime Tag with Minibooks tutorial by Anna-Karin Evaldsson.

The torn edges adds a nice texture and old feeling to the books.

Layers of ink - Storytime Tag with Minibooks tutorial by Anna-Karin Evaldsson.

The little books can also be made in other themes and added to a card, or placed in a tiny bookshelf. I did something similar to that on this bookshelf project. 

Layers of ink - Storytime Tag with Minibooks tutorial by Anna-Karin Evaldsson.


Thank you so much for stopping by here today! See you soon again.


Happy crafting!

Anna-Karin

Supplies:

* Please note: the links are affiliate links, for which I receive a small percentage of sales generated by the link, at no extra cost to you.