
Hello friends! Today I have a fun Halloween tag to share, with a story time theme and five tiny dimensional books.
Please note: this post has affiliate links, for which I receive a small percentage of sales generated by the link, at no extra cost to you.

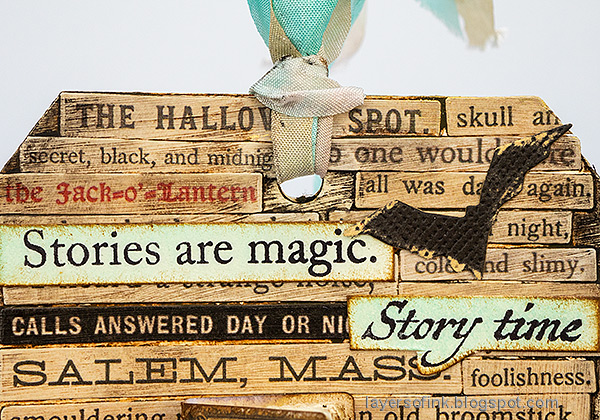
I love to read and I read a lot of different kinds of stories. I had such fun making the tiny books on this tag and adding titles and other details. The entire background of the tag is filled with words and sentences, from Tim Holtz Halloween sticker books.

The books have real pages and quite a bit of dimension.

Start by covering an entire tag with clippings stickers from Tim Holtz Halloween sticker book. Coat with Matte Medium. Try to vary the stickers when it comes to size and color.

Scribble Distress Crayons all over the tag, and then remove most of it with a slightly moist cloth. Add more until you are happy with the look.

The tiny book covers come from Tim Holtz Halloween 2023 Ephemera Pack. Fold along the spine, sand the edges and then ink.

Tear the pages from an old book and fold in half to form a signature. Use a ruler when tearing to get a straight, but still torn, edge. Add enough signatures in each book to fill them and glue with Simon glue along the spine. Ink the edges of the pages a little.

Stamp and die cut a label from Simon Says Stamp Mixed Labels and the coordinating die set. The label was stamped on Tim Holtz Halloween Backdrops paper. Ink the edges. The remaining two sentiments were stamped on heavystock paper which was inked with Salvaged Patina.
The ribbon was dyed with Salvaged Patina and Frayed Burlap Distress Ink.

I added titles to the book from the Halloween Sticker Book and a spider from Tim's idea-ology Spiders & Branches Adornments.

The bats were die cut from black kraft core paper with Tim's Big Frights set.

These two are my favorites of the book covers.

You could also add blank pages to the books and write your own words in them, or stamp tiny sentiments.


The little books can also be made in other themes and added to a card, or placed in a tiny bookshelf. I did something similar to that on this bookshelf project.


Happy crafting!
Anna-Karin
Supplies:
* Please note: the links are affiliate links, for which I receive a small percentage of sales generated by the link, at no extra cost to you.
* Please note: the links are affiliate links, for which I receive a small percentage of sales generated by the link, at no extra cost to you.

No comments:
Post a Comment
Thank you so much for leaving a comment! Happy Crafting!