Monday, January 28, 2019

Vintage Valentine's Card

Hi crafters! I hope you weekend was a good one. We got even more snow and the kids are enjoying it. And so do I, especially now when there is enough snow to cover up the layer of ice, so that I can go for walks without having to think about slipping on ice. It was very icy the last couple of weeks, so it is a welcome change.


This week we have a Love is in the air challenge at the Simon Says Stamp Monday Challenge Blog. I hope you will join us! And don't miss the gorgeous project by our January guest designer Wendy Baysa

Layers of ink - Vintage Valentine's Card Tutorial by Anna-Karin Evaldsson.

I made a Valentine's day card, inspired by vintage Valentine's cards. I was reading about Esther Howland who popularized Valentine's Day cards in the US. She developed a card making business and designed very detailed and elaborate cards. The cards had a lot of lace and gold details, as well as pretty focal images, all of which I included here.

Layers of ink - Vintage Valentine's Card Tutorial by Anna-Karin Evaldsson. Texture paste lace stencil.

Some of the vintage cards had a background of lace over red cardstock, which I imitated by using texture paste and Tim Holtz's Ornate Stencil on red SSS Schoolhouse Red cardstock. If you add a little bit of white paint to the paste, it becomes more opaque and less of the red paper shines through. You can maybe see the difference between the paper to the left (without paint) and the one to the right (with paint).

Layers of ink - Vintage Valentine's Card Tutorial by Anna-Karin Evaldsson. Die cut frames.

To make a layered frame, I die cut the Simon Says Stamp Outline Floral Frame from watercolor paper and the Leafy Frame from vellum.

Layers of ink - Vintage Valentine's Card Tutorial by Anna-Karin Evaldsson. Layer card elements.

I inked the watercolor paper with Distress Inks. These are the layers: white cardbase, sanded gold kraft paper, red stencilled paper, lace trim, vellum leafy frame, and watercolor floral frame. The lace trim was glued around the edges of the red cardstock, and adds dimension, since it is thicker than the other surfaces.

Layers of ink - Vintage Valentine's Card Tutorial by Anna-Karin Evaldsson.

To give the ephemera piece the look of an old bookmark, I first sanded it slightly, inked it and then applied gold Stickles around the edges. A piece of cheese cloth was placed underneath the image.

Layers of ink - Vintage Valentine's Card Tutorial by Anna-Karin Evaldsson.

The sentiment was die cut from gold paper using Tim's Handwritten Love set.

I hope you will join us this week in our Love is in the air challenge. As always, you have a chance to win a $50 gift voucher to do some fun shopping at Simon Says Stamp. You have until next Monday 8am Ohio time. 1pm UK time, 2 pm CET to join in.


Don't forget to follow Simon Says Stamp on Instagram, they post great stuff daily. 


Do you use Instagram? If so please add #sssmchallenge so we can see your entries there too.


Thank you so much for taking the time to visit my blog today!  

Happy crafting!

Anna-Karin

Supplies:

* Please note: the links are affiliate links, for which I receive a small percentage of sales generated by the link, at no extra cost to you.


Monday, January 21, 2019

Hot Air Balloon Shaker Tutorial

Hi everyone! It is Monday again, and I hope you had a good weekend. It's been very cold here and the boys had fun in the snow. Yesterday the sun was shining, and few things are more beautiful than sun shining over a snow-filled landscape.


This week we have a Alcohol - Drinks of Inks challenge at the Simon Says Stamp Monday Challenge Blog. I hope you will join us! And don't miss the gorgeous project by our January guest designer Wendy Baysa

Layers of ink - Hot Air Balloon Shaker Card Tutorial by Anna-Karin Evaldsson.

I made a fun hot air balloon shaker card this week, which Leo immediately wanted to keep for himself. I used Ranger's alcohol ink both to color the acetate and to color glossy cardstock for the sentiment and small balloon. The card background was done with the Sizzix Hot Air Balloon Impresslits Cut and Emboss. This card might look complex, but it is super quick to do.

Layers of ink - Hot Air Balloon Shaker Card Tutorial by Anna-Karin Evaldsson.

Start by folding a piece of watercolor paper. Smear Distress Inks on a craft sheet, by smearing three lines of ink, to create an ombre effect. Mist with water and press the paper into the ink. Let dry and then repeat until you are happy with the result. 

Layers of ink - Hot Air Balloon Shaker Card Tutorial by Anna-Karin Evaldsson.

The Hot Air Balloon Impresslits Cut and Emboss embosses and die cuts in one go, so the background is very quick to create. 

Layers of ink - Hot Air Balloon Shaker Card Tutorial by Anna-Karin Evaldsson.

Sand the embossed areas to reveal the white of the paper. 

Layers of ink - Hot Air Balloon Shaker Card Tutorial by Anna-Karin Evaldsson.

For the shaker window, I cut two pieces of acetate and colored one of them with yellow and orange alcohol ink, using an ink blending tool with a felt applicator.

Layers of ink - Hot Air Balloon Shaker Card Tutorial by Anna-Karin Evaldsson.

Adhere one of the sheets to the inside of the card, and then place foam tape all around the window. Place sequins and beads in the window and add the other piece of acetate on top. At this stage, I changed my mind and turned the shaker part around, with the orange acetate facing inwards. I liked it better when the sequins and beads were their true color.

Layers of ink - Hot Air Balloon Shaker Card Tutorial by Anna-Karin Evaldsson.

Color a piece of gloss cardstock with the same to shades of alcohol ink. Die cut one of the sentiments from the Hot Air Balloon Impresslits set and five tiny balloons from the cardstock.

Layers of ink - Hot Air Balloon Shaker Card Tutorial by Anna-Karin Evaldsson.

For the inside, I cut/embossed a second balloon panel and adhered it with foam tape. This step is not necessary, but it gives a neater look to the inside. Here you can see how the shaker looks from the orange side.

Layers of ink - Hot Air Balloon Shaker Card Tutorial by Anna-Karin Evaldsson.

Here are the tiny balloons. Aren't they cute? Glue them here and there.

Layers of ink - Hot Air Balloon Shaker Card Tutorial by Anna-Karin Evaldsson.

I cut a piece of burlap to use as a basket for the balloon, and layered the sentiment on lace trim.

Layers of ink - Hot Air Balloon Shaker Card Tutorial by Anna-Karin Evaldsson.

Shaker cards are such fun, and the Sizzix Hot Air Balloon Impresslits Cut and Emboss makes this one quick and simple to make. For an even quicker version, use plain cardstock instead of inking watercolor paper.

Layers of ink - Hot Air Balloon Shaker Card Tutorial by Anna-Karin Evaldsson.

If you open the card, the shaker is transparent and Leo likes to look through it. Here I held it up against some background trees, so you can see that it is transparent.

I hope you will join us this week in our Alcohol - Drink or Ink challenge. As always, you have a chance to win a $50 gift voucher to do some fun shopping at Simon Says Stamp. You have until next Monday 8am Ohio time. 1pm UK time, 2 pm CET to join in.


Don't forget to follow Simon Says Stamp on Instagram, they post great stuff daily. 


Do you use Instagram? If so please add #sssmchallenge so we can see your entries there too.


Thank you so much for taking the time to visit my blog today!  

Happy crafting!

Anna-Karin

Supplies:

* Please note: the links are affiliate links, for which I receive a small percentage of sales generated by the link, at no extra cost to you.


Monday, January 14, 2019

Recycled Tag Tutorial

Hello friends! I hope you had a good weekend! We were out playing in the snow, with a new red plastic sledge. When Leo and I walked out the door, we realised that both the sledge, his overall, my jacket, my hat, and his stroller were red, with bits of blue here and there, so he concluded that red and blue are his favorite colors. I like bright colored winter clothes, since so many winter jackets are black or dark blue, winter is dark enough, a bit of color is fun. And that red stroller, always made for an interesting spot of color in nature photos.


This week at the Simon Says Stamp Monday Challenge Blog we have a Recycle Something theme. Don't miss the project by our January guest designer Wendy Baysa


Layers of ink - Recycled Tag Tutorial by Anna-Karin Evaldsson.

Today's project is also pretty colorful and was put together using almost only recycled items, with the addition of a couple of odds and ends that I found on my desk. The base of the tag is cardboard, which makes it very sturdy and gives it a nice feel. I also used a brown paper bag, old book paper, old buttons, netting from fruit packaging, and plastic packaging from a die. 

Layers of ink - Recycled Tag Tutorial by Anna-Karin Evaldsson. Coloring with Ranger alcohol ink.

Starting out, I die cut a tag from Sizzix plastic packaging, embossed it in a swirls folder and and then colored it with alcohol ink, aiming for a splotchy appearance. I used: Turquoise, Indigo and Limeade, coloring on the embossed side of the plastic. You can also use Clearly For Art Modeling Film, if you don't have plastic packaging.

Layers of ink - Recycled Tag Tutorial by Anna-Karin Evaldsson. Adding Stickles glitter glue.

Apply Crystal Stickers in the recessed areas. Let dry.

Layers of ink - Recycled Tag Tutorial by Anna-Karin Evaldsson. Using cardboard in art.

A second tag was die cut from cardboard and I tore off some of the top layer. It was coated with gesso. This step brightens the colors of the alcohol ink, since the background becomes lighter.

Layers of ink - Recycled Tag Tutorial by Anna-Karin Evaldsson. Using old book pages in art.

Then I glued old book paper on the background, all of these papers were already torn up, and had been used in other projects.

Layers of ink - Recycled Tag Tutorial by Anna-Karin Evaldsson.

Die cut hearts from a brown paper bag and an old book page, using the SSS Windows to my Heart die, from the new You Are Loved collection.

Layers of ink - Recycled Tag Tutorial by Anna-Karin Evaldsson. Dimensional hearts.

I also had leftover watercolor hearts from my SSS You Are Loved blog hop project from last week. Staple the hearts together and scrunch them up to give them dimension. Ink the edges. Here you can also see the yellow/orange plastic netting.

Layers of ink - Recycled Tag Tutorial by Anna-Karin Evaldsson.

The glitter adds a nice touch to the background. Staple the plastic tag to the cardboard one. I only stapled it at the top, which makes it look more dimensional, since the plastic doesn't lie flush against the cardboard and text.

Layers of ink - Recycled Tag Tutorial by Anna-Karin Evaldsson.

On my desk, I also found a piece of torn vellum, a ribbon that was gifted to me by a stamping friend many years ago, and a strip of book paper, which turned out to be almost like found poetry. The title was die cut with the Big Happy die, from a brown paper bag and from black cardstock.

Layers of ink - Recycled Tag Tutorial by Anna-Karin Evaldsson. Old buttons.

And another sentiment from a book. The buttons are all recycled from old clothing.

Layers of ink - Recycled Tag Tutorial by Anna-Karin Evaldsson.

Here's another look at the layers of alcohol ink, glitter, and text.

Layers of ink - Recycled Tag Tutorial by Anna-Karin Evaldsson.

The hearts are dimensional and are a great way to use up little scraps. You can die cut a whole bunch and keep them ready for a project.

I hope you will join us this week in our Recycle Something challenge. As always, you have a chance to win a $50 gift voucher to do some fun shopping at Simon Says Stamp. You have until next Monday 8am Ohio time. 1pm UK time, 2 pm CET to join in.


Don't forget to follow Simon Says Stamp on Instagram, they post great stuff daily. 


Do you use Instagram? If so please add #sssmchallenge so we can see your entries there too.


Thank you so much for taking the time to visit my blog today!  

Happy crafting!

Anna-Karin

Supplies:

* Please note: the links are affiliate links, for which I receive a small percentage of sales generated by the link, at no extra cost to you.


Thursday, January 10, 2019

SSS You Are Loved Blog Hop

Hello and welcome to my blog! I am happy to take part in the Simon Says Stamp blog hop to celebrate the release of the You Are Loved collection. This is the last stop on the hop, and you should have arrived here from the wonderful Barb Engler.

The You Are Loved collection contains a wide range of new dies, stamps, stencils, watercolor cards and sequins. You can see the whole collection here.


There is also a free gift for you. If you use the code LVE584, when you make an order, you will get a  a free Tim Holtz Festive Berries Distress Oxide Ink Pad (while supplies last!) with any purchase. The code will expire Sunday, 1/13 at 11:59 pm EST.

I made a wall-hanging and a card, both with step photos. As usual, you can use the techniques on almost any type of project. Let's start.

 Layers of ink - Mixed Media Heart Windows Tutorial by Anna-Karin Evaldsson.


I really like the Windows to my Heart die and thought it would look good as a background. The wall-hanging is about 6 x 6 in and I used mat board as my base. I found a sweet photo of my mother and grandmother, which fit well on the project. For a different look, use other colors.

Layers of ink - Mixed Media Heart Windows Tutorial by Anna-Karin Evaldsson. With Simon Says Stamp You Are Loved Collection.

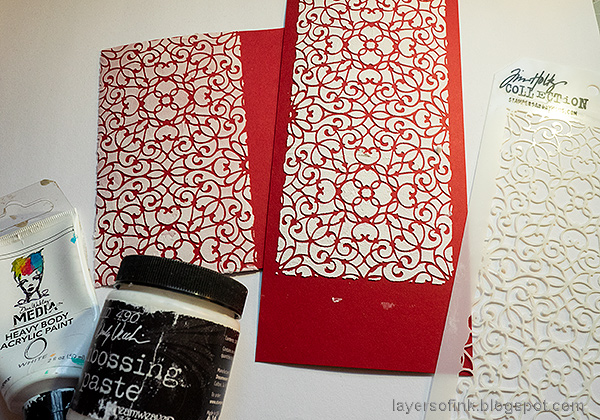
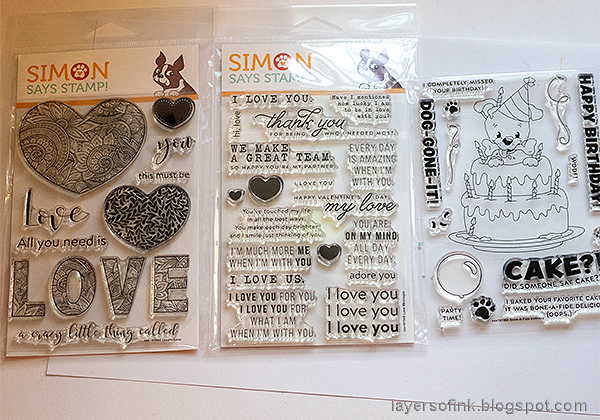
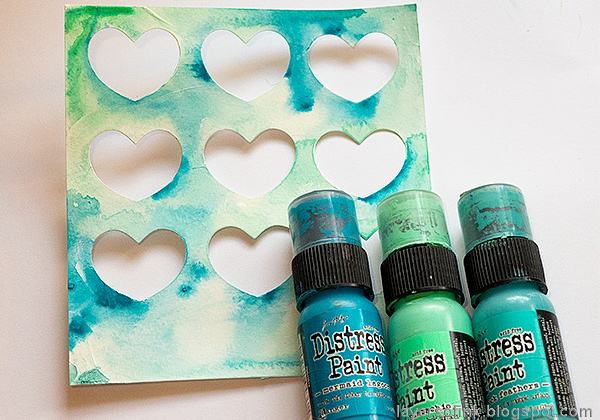
This is the die and the stencil set that I used: Windows to my Heart and Heart Layers.

Layers of ink - Simon Says Stamp You are Loved Collection.

And these are the three stamp sets: Ornate Love, Love Messages and Bone-a-Fide Birthday.

Layers of ink - Mixed Media Heart Windows Tutorial by Anna-Karin Evaldsson. Die cut the heart windows.

I wanted nine heart windows on my panel, but the die only has six. To get three more, I marked the center of the die and placed the second cutting pad just inside that mark. My hearts aren't lined up perfectly, but it didn't matter.

Layers of ink - Mixed Media Heart Windows Tutorial by Anna-Karin Evaldsson.

Coat the watercolor paper with gesso, to prepare it for the next step.

Layers of ink - Mixed Media Heart Windows Tutorial by Anna-Karin Evaldsson. Apply paint to the paper.

Paint watered down Distress Paints on the panel and mist with more water.

Layers of ink - Mixed Media Heart Windows Tutorial by Anna-Karin Evaldsson. Stencil hearts, with SSS Heart Layers.

When dry, stencil the smallest hearts from the Heart Layers set with Peacock Feathers paint.

Layers of ink - Mixed Media Heart Windows Tutorial by Anna-Karin Evaldsson.

The background Sizzix mat board was also coated with gesso, and then painted brown. When dry, I adhered old book paper to it and added a layer of matte medium on top too.

Layers of ink - Mixed Media Heart Windows Tutorial by Anna-Karin Evaldsson.

White wash with Picket Fence paint, to tone down the text a little.

Layers of ink - Mixed Media Heart Windows Tutorial by Anna-Karin Evaldsson. Apply Crackle Paint.

Glue the heart window panel to the background with matte medium. When dry, apply 
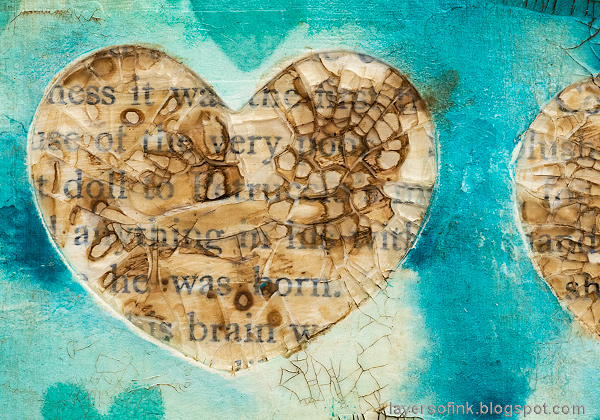
Rock Candy Distress Crackle paint, using a palette knife. Press with the knife, so that you get a thicker layer of paint in the windows, and a very thin layer on the rest of the panel. Don't worry about perfection here. Cracks appear as the paste dries. The thicker the layer, the larger the cracks.

Layers of ink - Mixed Media Heart Windows Tutorial by Anna-Karin Evaldsson.

Water down brown paint and apply to the cracks. Wipe off the excess with a cloth. If you want a less grungy look, use a different color paint for the cracks. White looks wonderful too.

Layers of ink - Mixed Media Heart Windows Tutorial by Anna-Karin Evaldsson. Crackled heart windows.

Here's a look at the finished hearts. They look almost like crackled glass, and the words show through in fragments.

Layers of ink - Mixed Media Heart Windows Tutorial by Anna-Karin Evaldsson. Crackle paste background.

You can use a brown Distress Crayon where the cracks are smaller, apply it with your finger, and again wipe of the excess. The crayon can be used for the larger cracks too, but I thought that the paint gave a better result there, and it is quicker. These fine cracks give a very cool texture.

Layers of ink - Mixed Media Heart Windows Tutorial by Anna-Karin Evaldsson. Rock Candy hearts.

Three gumdrop hearts were colored with alcohol ink and I also used some Clippings Stickers. Apart from that, I didn't add many embellishments, since I wanted the window hearts to show. For a different idea with the Windows to my Heart die, creating dimensional hearts, check out my Celebrate 2019 layout from earlier this week.
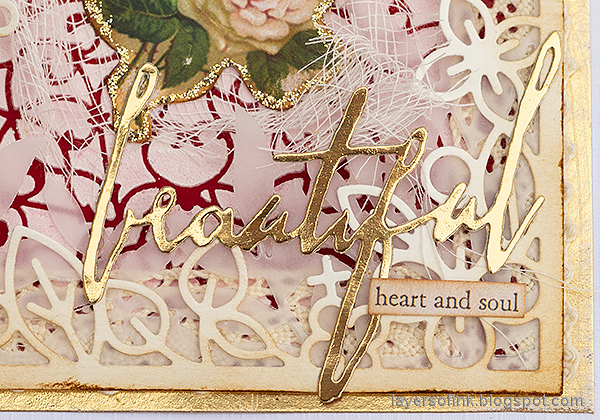
Layers of ink - Mixed Media Heart Windows Tutorial by Anna-Karin Evaldsson. With SSS Ornate Love.

Stamp LOVE from the Ornate Love set with brown Archival Ink and ink with Distress Ink. Cut out and glue to the panel.
 Layers of ink - Birthday Cake Card Tutorial by Anna-Karin Evaldsson. With Simon Says Stamp Bone-a-fide set.

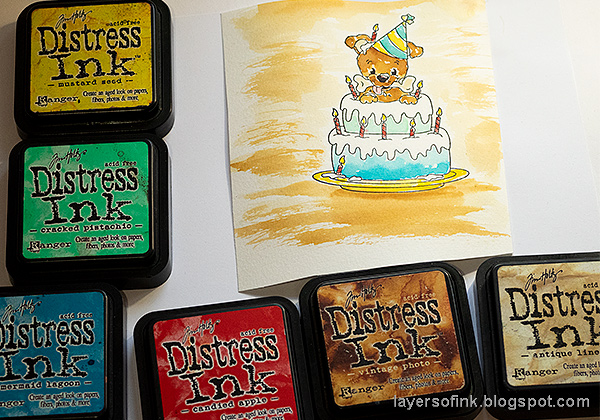
The card has a completely different look from the panel, and I thought Leo might get this card on his birthday. The dog in the birthday cake from Bone-a-Fide Birthday is such a fun and cute image, and it is fun to color too. I watercolored the image loosely with Distress Ink.

Layers of ink - Birthday Cake Card Tutorial by Anna-Karin Evaldsson. Paint with Distress Ink.

Stamp on watercolor paper with Archival Ink. Smear Distress Inks on a craft sheet, mist with water and pick up with a paint brush. Color the image loosely, leaving some of the white of the paper showing.

Layers of ink - Birthday Cake Card Tutorial by Anna-Karin Evaldsson.

For some bling, apply Glossy Accents to the candles and Crystal Stickles to the icing.

Layers of ink - Birthday Cake Card Tutorial by Anna-Karin Evaldsson.

Here's a closer look at the happy dog.

Layers of ink - Birthday Cake Card Tutorial by Anna-Karin Evaldsson.

I distressed the edges, and used vellum and another piece of watercolor paper as a matte.

Layers of ink - Birthday Cake Card Tutorial by Anna-Karin Evaldsson.

The background is a dry embossed panel, made with the Sizzix 3-D Confetti Hearts folder (you can find a tutorial for it here).

Layers of ink - Birthday Cake Card Tutorial by Anna-Karin Evaldsson.

I used a wire to attach the balloon to the background, giving it some dimension too.

Layers of ink - Birthday Cake Card Tutorial by Anna-Karin Evaldsson.

The Crystal Stickles have different shades of colors in it and looks different depending on how the light falls on it, something that will be fascinating for a child.

There are of course prizes to be won and at each stop on the hop SSS is giving away a $25 coupon, randomly drawn from those who leave a comment. The winners will be posted post on the Simon Says Stamp store blog on Wednesday, the 16th of January.

Here are all the stops along the hop:

Anna-Karin Evaldsson (you are here)

For more You Are Loved inspiration, remember to check out the You Are Loved gallery at SSS, and if you make something with products from the range, it is fun if you post it in in the gallery too. There are galleries for all releases, and for the card kits, full of inspiration. There is also going to be a second blog hop tomorrow, so don't miss that.

Thank you so much for visiting today and I hope you will have a lovely weekend!

Happy crafting!

Anna-Karin

Supplies:

* Please note: the links are affiliate links, for which I receive a small percentage of sales generated by the link, at no extra cost to you.