Friday, November 30, 2018

December Countdown Calendar

Hello friends! It is the last day of November and I have done the finishing touches to the journaling tags for my December Countdown Calendar. This is a Sizzix tutorial showing you how to do the tags.

Layers of ink - December Countdown Calendar Tutorial by Anna-Karin Evaldsson, with Sizzix dies by Tim Holtz.

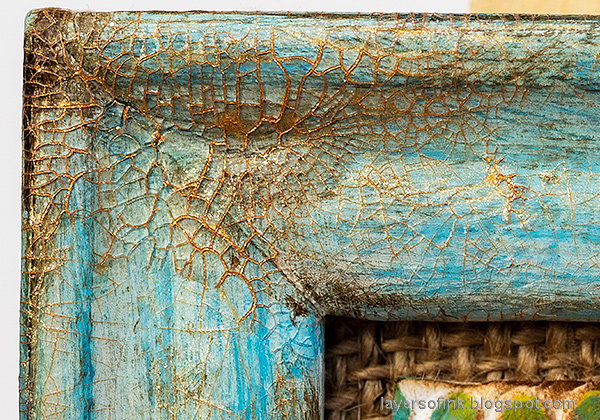
I made the wall-hanging for my countdown calendar three years ago, with the plan of reusing it for my countdown tags. It hangs on a wall in the living room, and every day I take one of the tags off the hook. The tag then goes into my December Daily journal, with memories and stories from that particular day written on the tag. I used dies and stamps by Tim Holtz for this project.

Layers of ink - December Countdown Calendar and Journal Tutorial by Anna-Karin Evaldsson.

I like the way my December Daily journal and countdown calendar coordinate, with the latter doubling as journaling cards. I also have an ATC advent calendar, which I made years ago, and I always enjoy taking it out on the first of December.
 Layers of ink - December Countdown Calendar Tutorial by Anna-Karin Evaldsson. Die cutting the tags.

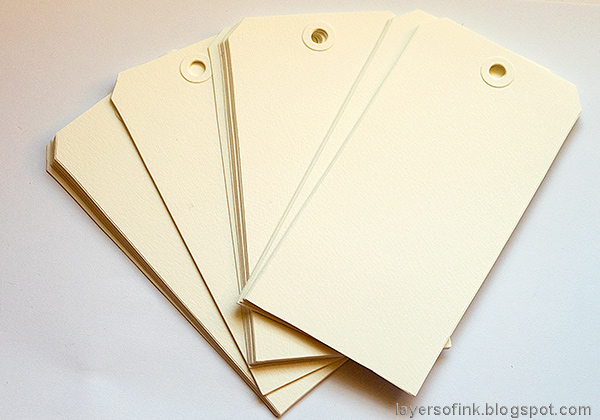
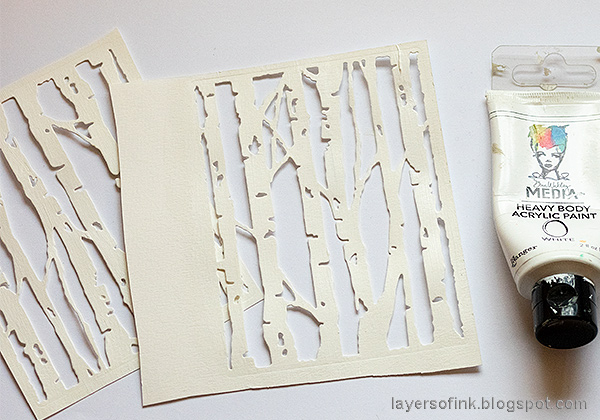
Start by die cutting tags from watercolor paper, or another paper, using the largest die in the Stacked Tags set. Use the small dies in the set to die cut the holes and the reinforcers. Glue the reinforcers to the tag. I die cut everything with the Sizzix Foldaway Big Shot.

Layers of ink - December Countdown Calendar Tutorial by Anna-Karin Evaldsson. Die cutting the numbers.

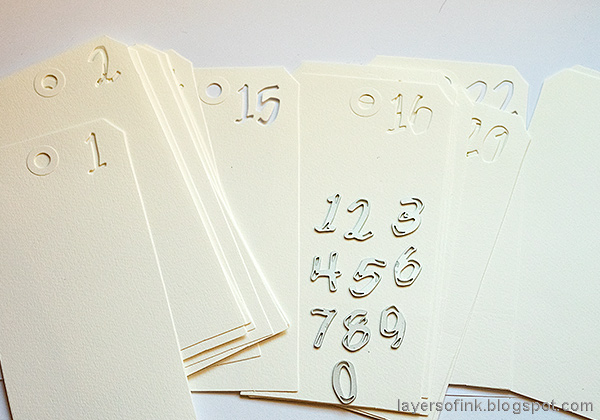
On my first December journal, I die cut the number of the day, but after that I have mainly stamped it. This year, I decided to die cut the numbers, since it adds such a nice touch, and I like that you can glimpse the next tag through the negative die cut. Use the Cutout Script Thinlits set, together with the Sizzix Magnetic Platform to die cut numbers out of each tag. My tags go to the 26th of December, to also include Boxing Day.

Layers of ink - December Countdown Calendar Tutorial by Anna-Karin Evaldsson. Inking with Distress Ink.

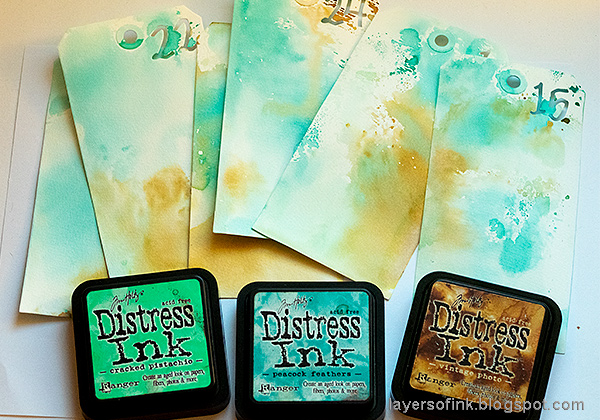
Smear Distress Inks on a craft sheet, mist with water and press each tag into the ink. Repeat on the back.

Layers of ink - December Countdown Calendar Tutorial by Anna-Karin Evaldsson.

I like to use the ledger stamp from Tim Holtz's School Desk set on my journaling tags. It was stamped with Forget-Me-Not ink on both the front and the back of the tags.

Layers of ink - December Countdown Calendar Tutorial by Anna-Karin Evaldsson. Stamping the tags with Tim Holtz stamps.

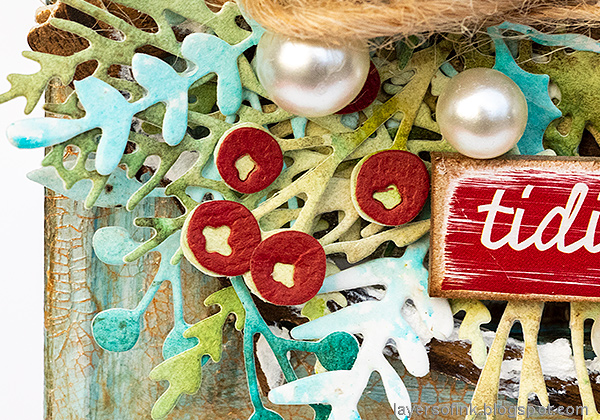
Now comes the super fun part. Sit down surrounded by Christmas stamps and stamp away. I use a lot of the Christmas stamps I have at home on this project. Most of them are from Tim Holtz and you can find them in the supply list below. Mix image, word and background stamps. I used quite a lot of the designs from the Winter Watercolor set, to add branches and flowers.

Layers of ink - December Countdown Calendar Tutorial by Anna-Karin Evaldsson. Stamped journal cards.

Here's a look at some of the tags. They are all different, and both sides are stamped, since when they are in the journal, you see both sides.

Layers of ink - December Countdown Calendar Tutorial by Anna-Karin Evaldsson. Stamped journaling tags.

More tags. I really have such fun just stamping like this, without much of a plan, and if you make a mistake, it doesn't matter.

Layers of ink - December Countdown Calendar Tutorial by Anna-Karin Evaldsson.

Some of the tags have images that were a little more planned, such as the 24th always having a Santa stamp, since that is the day when Santa comes to visit here.

Layers of ink - December Countdown Calendar Tutorial by Anna-Karin Evaldsson. Placing tags in December Daily journal.

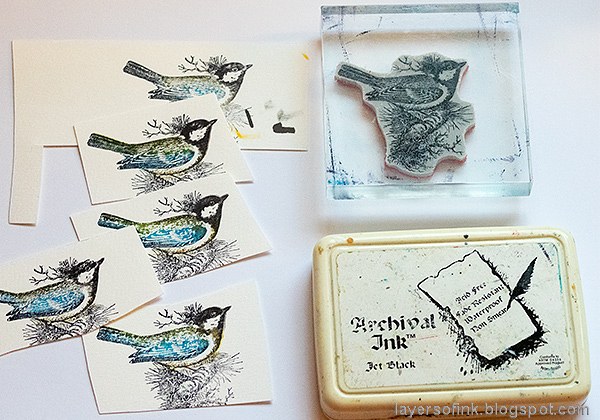
In my December Daily journal, I have Tim's Tag Pockets, ready to be filled. I just add journaling and some times a small photo, but the focus in my December journal is on the words. I normally scrapbook my Christmas photos instead, mainly since I don't print photos at home. The bird stamp is from the Festive Overlay set, and is the same stamp that I used on my Christmas Bird Frame tutorial earlier this week.

Layers of ink - December Countdown Calendar Tutorial by Anna-Karin Evaldsson. Placing tags in December Daily journal.

At the back of the journal, I add extra unnumbered tags, in case I need more space. They are also used to write down the gifts everyone received each year. I started writing down my birthday and Christmas gifts when I learned how to write, and those lists are a lot of fun to have and bring back many memories.

Layers of ink - December Countdown Calendar and Daily Journal Tutorial by Anna-Karin Evaldsson.

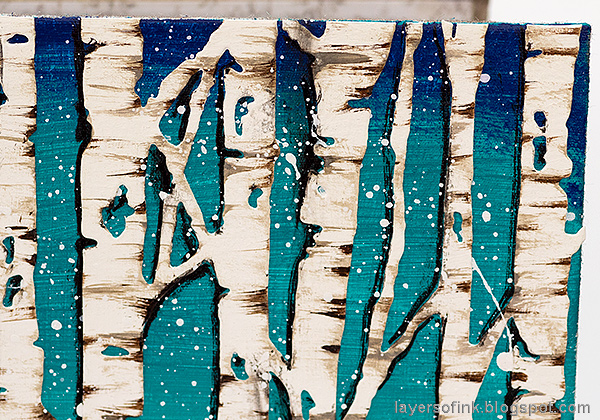
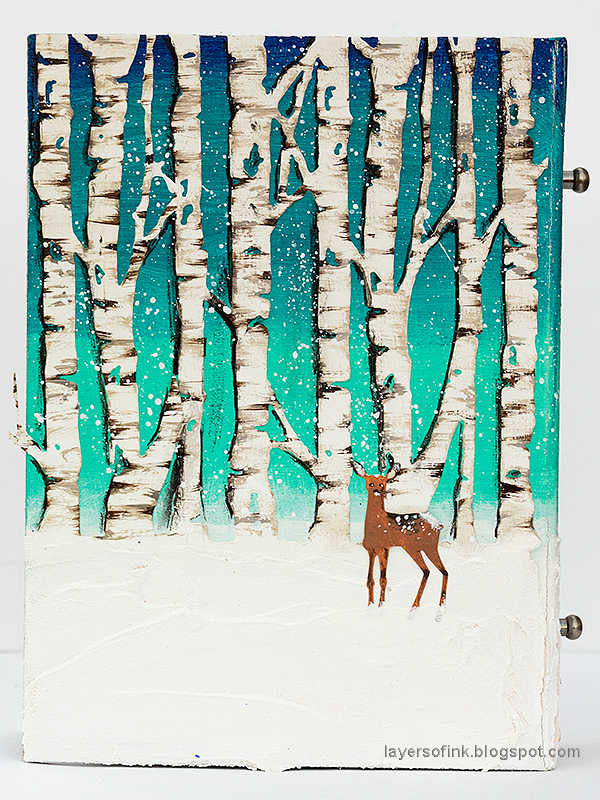
I hope you enjoyed this tutorial and that it inspired you to maybe make your own version. You can find my December Daily Winter Birch Forest tutorial here. For more inspiration:

The original Countdown Calendar tutorial.
Countdown tags 2016, with a video
Advent Calendar with boxes
ATC Advent Calendar

Tomorrow, I am planning to take out our electric chandeliers and stars. They always give such a cozy Christmas feeling.

Have a lovely weekend! Thank you for the visit!

Happy Christmas crafting!

Anna-Karin

* Please note: the links are affiliate links, for which I receive a small percentage of sales generated by the link, at no extra cost to you.


Wednesday, November 28, 2018

Time Machine Art Journal Page

Hello friends! This morning it was really freezing and also very misty. The mist made the trees frosty and white, and it was really beautiful once the sun came out. Sometimes, I do enjoy flower projects also during winter and today I am sharing a tutorial on the Darkroom Door blog for an art journal page.

Layers of ink - Time Machine Art Journal Page Tutorial by Anna-Karin Evaldsson. With stamps by Darkroom Door.

It was made with the new Time Machine Quote Stamp. The beautiful sentiment is surrounded by a field of wildflowers, stamped with the Nature Walk Set. Wildflowers make me think both of visiting my grandmother, where we used to pick a lot of wildflowers, and also of going for walks in nature as an adult. There is something about the beauty and resilience of a wildflower, which makes them special to me.

You can find the steps and close-ups on the Darkroom Door blog.

Happy stamping and thank you for stopping by!!

Anna-Karin

* Please note: the links are affiliate links, for which I receive a small percentage of sales generated by the link, at no extra cost to you.

Tuesday, November 27, 2018

White Layered Winter Card

Hi crafters! Today is a beautiful cold and sunny day, and I have a tutorial on the Sizzix blog.

Layers of ink - White Layered Winter Card tutorial by Anna-Karin Evaldsson.

I made a white and cream card with layered intricate labels. There is foam adhesive between some of the layers, so the card is pretty dimensional. If you want a flat card instead, you can just skip the foam. The card was made with dies and stamps from the versatile Moments & Memories collection.

You can find the steps and close-ups on the Sizzix blog.

Anna-Karin

* Please note: the links are affiliate links, for which I receive a small percentage of sales generated by the link, at no extra cost to you.

Monday, November 26, 2018

Christmas Bird Frame Tutorial

Hi everyone! I hope your weekend was a good one, and if you celebrated Thanksgiving, I hope you had a wonderful time. The cold weather seems to have arrived here now. A couple of degrees below zero is nicer than a couple of degrees above zero, and another plus is that the kids don't get quite as muddy when playing outdoors. This weekend, I went to an art exhibit and took a long walk. We also had a soccer tournament, and playtime with friends.


This week at the Simon Says Stamp Monday Challenge Blog we have a Gift It theme. Don't miss the last project by our wonderful November guest designer, Jo aka Let's Art Journal.

Layers of ink - Christmas Bird Frame Tutorial by Anna-Karin Evaldsson.

I am planning to make quite a few of my gifts this Christmas. Not only are they more special than store bought gifts, but I also want to avoid buying stuff that the recipient might in any case not need. Today, I altered a frame, where the glass had broken. I got a whole bunch of frames a couple of years ago in a sale bin at a local grocery store, for almost nothing. This one had displayed a craft project by Anton, but fell down from a shelf, so that the glass broke. Now his art work is in a new frame and I turned this one into a Christmas gift. The frame was meant for a 6 x 4 in photo.

Layers of ink - Christmas Bird Frame Tutorial by Anna-Karin Evaldsson, with Tim Holtz Festive Overlay stamps.

The bird was stamped with Tim Holtz's Festive Overlay stamp set. I wanted it to be a Great Tit, and colored it with Distress Markers right on the stamp. Mist the stamp with water about four times and stamp on watercolor paper. I stamped a bunch of birds to see which one I would like the best.

Layers of ink - Christmas Bird Frame Tutorial by Anna-Karin Evaldsson. Overstamping technique

I wanted a bit more definition to the bird, so that it wouldn't disappear on my project, and used an overstamping technique for that. Ink the stamp up and wipe off some of the ink with a tissue. Use a stamp positioner, or a stamp platform, to stamp on top of the watercolor image. I used my trust old EK Success Stamp-a-ma-jig. Cut the bird out.

Layers of ink - Christmas Bird Frame Tutorial by Anna-Karin Evaldsson. Die cutting Tim Holtz Sizzix Thinlits.

I die cut a whole lot of shapes from papers I found in my scrap box, using the Funky Festive, Mini Holiday Greens and Funky Floral 3 Sizzix die sets. The papers had been colored with Paper Arty's Infusions and some of them were used for this Geometric Banner Tutorial, if you want to see the original papers.

Layers of ink - Christmas Bird Frame Tutorial by Anna-Karin Evaldsson. Altered frame.

I forgot to photograph the steps for the frame. It was first coated with two layers of gesso and then painted with Tumbled Glass Distress Paint. I dry brushed it with Salty Ocean and a tiny bit of Ground Espresso. Then it was covered with Clear Rock Candy Crackle Paint. The crackles form as the paint dries.

Layers of ink - Christmas Bird Frame Tutorial by Anna-Karin Evaldsson. Distressed DIY frame.

I wanted a metallic shine to the frame and smeared Tarnished Brass Distress Crayon into the cracks.

Layers of ink - Christmas Bird Frame Tutorial by Anna-Karin Evaldsson.

The background papers all came from my scrap box. The one to the left had been embossed in the Dot Matrix folder and used for gel printing (see this Dry Embossing and Gel Printing post). The tag to the right came from a Distress Resist Video tutorial I did quite some time ago. It was stamped with Tim's new Music Background stamp, and so was the inky paper in the middle.

Layers of ink - Christmas Bird Frame Tutorial by Anna-Karin Evaldsson. With Tim Holtz Christmas idea-ology.

My frame had a sturdy wooden back piece and I glued burlap directly onto it, using that as my base. All the edges were distressed and inked. I also used three birch trees which were left-over from my Winter Birch Forest December Daily tutorial, from last week. The metallic piece is a Christmas Adornment, distressed with white paint.

Layers of ink - Christmas Bird Frame Tutorial by Anna-Karin Evaldsson.

There are also a couple of Ephemera Christmas Snippets, and a Christmas Quote Token.

Layers of ink - Christmas Bird Frame Tutorial by Anna-Karin Evaldsson. Stamped Great Tit bird.

Here's a closer look at the bird. Both the watercolor stamping and overstamping techniques are a bit unpredictable, and such fun to play around with. I made a nest with twine.

Layers of ink - Christmas Bird Frame Tutorial by Anna-Karin Evaldsson. Layering Sizzix die cuts.

The bird is placed in two branches die cut from mat board with Tim's Branches die, painted brown and covered with a little Texture Paste snow.

Layers of ink - Christmas Bird Frame Tutorial by Anna-Karin Evaldsson. Tim Holtz Holiday Greens.

All the die cuts were arranged underneath the bird, creating something of an extended nest.

Layers of ink - Christmas Bird Frame Tutorial by Anna-Karin Evaldsson. Tim Holtz idea-ology baubles.

I also used some baubles, to give the project even more of a festive feel.

Layers of ink - Christmas Bird Frame Tutorial by Anna-Karin Evaldsson.

As sentiments, I used Clippings Stickers and a Christmas Quote Chip which was sanded.

Layers of ink - Christmas Bird Frame Tutorial by Anna-Karin Evaldsson. DIY altered old frame.

The frame has a really lovely shine from the metallic Distress Crayon and got a nice distressed look. It is very different from the plain wood finish that it started out as.

Layers of ink - Christmas Bird Frame Tutorial by Anna-Karin Evaldsson.

The project has quite a lot of dimension, which you can maybe see better here. When altering a frame, remember to alter the edges too.

I hope you will join us this week in our Gift It challenge. As always, you have a chance to win a $50 gift voucher to do some fun shopping at Simon Says Stamp. You have until next Monday 8am Ohio time. 1pm UK time, 2 pm CET to join in.


Don't forget to follow Simon Says Stamp on Instagram, they post great stuff daily. 


Do you use Instagram? If so please add #sssmchallenge so we can see your entries there too.


Thank you so much for taking the time to visit my blog today!  

Happy Christmas crafting!

Anna-Karin

Supplies:

* Please note: the links are affiliate links, for which I receive a small percentage of sales generated by the link, at no extra cost to you.


Friday, November 23, 2018

Birch Forest December Daily Tutorial

Hello friends! Today, I am sharing one of my favorite projects each year, my December journal. It's a Sizzix tutorial. I really like Ali Edwards' concept of a December Daily and this will be my seventh year of documenting our month of December in a journal. I do a kind of a mini version, where I focus on the words, and only add a couple of photos here and there. 
 
Layers of ink - Birch Forest December Daily Tutorial by Anna-Karin Evaldsson. With Sizzix dies by Tim Holtz.

I was very happy with last year's Narnia themed journal, and had no plan when I sat down to start with this year's journal. Then my eyes fell on Tim Holtz Sizzix new Branched Birch die, and I knew I wanted to make a winter birch forest. I love birch trees, and even more so when there are many of them in one place. The combination of their interesting bark and snow is also very pretty. This mixed media journal cover is much easier to make than what it might look like.

You can also use the techniques on a canvas, card or journaling page. It would make a great gift as a canvas.

Layers of ink - Birch Forest December Daily Tutorial by Anna-Karin Evaldsson. Painting the worn cover.

Most of my December Journals have been made using Tim Holtz Worn Covers, which make them look really nice together on the shelf in the living room where I keep them. Start by coating the journal with a couple of layers of gesso.

Layers of ink - Birch Forest December Daily Tutorial by Anna-Karin Evaldsson. Painting the journal with Ranger Dina Wakley paint.

When dry, paint with acrylic paints. I used Dina Wakley's paints and felt like having a deep turquoise sky. A more light blue version will also look really nice. My journal didn't come with a ring binder, while the new ones usually have one attached already. If your journal has a ring binder attached, place a book under each side to stabilize it, so that you have an even surface to work on.

Layers of ink - Birch Forest December Daily Tutorial by Anna-Karin Evaldsson, with Tim Holtz Sizzix Branched Birch die.

Die cut the Branched Birch die from watercolor paper and coat them with gesso.

Layers of ink - Birch Forest December Daily Tutorial by Anna-Karin Evaldsson.

Paint them white. You can skip this step if you think your trees are white enough after the gesso, but I wanted mine whiter. 

Layers of ink - Birch Forest December Daily Tutorial by Anna-Karin Evaldsson. Paint the birch trees with Distress Paint.

Dry brush the trees with Pumice Stone to get the characteristic Birch bark. Use a larger brush first, and then add more detailed lines with a smaller brush.

Layers of ink - Birch Forest December Daily Tutorial by Anna-Karin Evaldsson.

I also used Ground Espresso with fine paint brush, to give the trees more definition.

Layers of ink - Birch Forest December Daily Tutorial by Anna-Karin Evaldsson. Adhere the trees to the cover.

Tear the bottom edge of the tree die cuts, and glue them to the background. Make sure that the edge at the top, hangs off the cover, so that it will look like the trees are stretching towards the sky. When dry, cut it off with a craft knife.

Layers of ink - Birch Forest December Daily Tutorial by Anna-Karin Evaldsson. Add shadows to the birch trees.

Decide where the light is coming from and use black paint to add a shadow on one side of the trees. This step adds depth.

Layers of ink - Birch Forest December Daily Tutorial by Anna-Karin Evaldsson. DIY snow with texture paste.

Smear embossing paste at the front as snow. I didn't make it too thick, since the cover will be handled a lot, but tried to create the look of hills of snow.

Layers of ink - Birch Forest December Daily Tutorial by Anna-Karin Evaldsson.

When dry, paint the paste with white paint. This makes the snow even whiter.

Layers of ink - Birch Forest December Daily Tutorial by Anna-Karin Evaldsson.

Finally, splatter some white paint on the background, to create the look of falling snow.


Die cut deer, a sentiment and the year from watercolor paper using the following die sets: Winter Wonderland, Shadow Script ChristmasCutout Script (the numbers) Coat the shapes with gesso. I die cut everything with my new Sizzix Big Shot Foldaway machine.

Layers of ink - Birch Forest December Daily Tutorial by Anna-Karin Evaldsson. Painting the deer with acrylic paint.

Paint with Distress Paint and with Dina's paint. 

Layers of ink - Birch Forest December Daily Tutorial by Anna-Karin Evaldsson. Adding details to Tim Holtz Sizzix deer.

Add details with a fine paint brush. I later used a white gel pen to add more dots and highlights to the eyes.

Layers of ink - Birch Forest December Daily Tutorial by Anna-Karin Evaldsson. Winter birch forest made with Sizzix Tim Holtz dies and acrylic paint.

Glue the deer to the cover, and add the sentiment and year. I also added some paste over the feet of the deer, to make it look like they were standing in, and not on top of, the snow. I wish I could walk right into this forest, and it reminds me of an area in one of my childhood forests.

Layers of ink - Birch Forest December Daily Tutorial by Anna-Karin Evaldsson. Painted birch bark texture.

Here's a closer look at the trunks and their textures.

Layers of ink - Birch Forest December Daily Tutorial by Anna-Karin Evaldsson. Sizzix Tim Holtz deer.

I also added some snow to the antlers and back of the deer. Don't worry about getting the facial features perfect, just a hint of eyes and a nose will be enough.

Layers of ink - Birch Forest December Daily Tutorial by Anna-Karin Evaldsson. Two deer standing in snow.

The small deer as so cute. I placed two on the front cover and one on the back.

Layers of ink - Birch Forest December Daily Tutorial by Anna-Karin Evaldsson.

I added a Small Talk sticker to the title.

Layers of ink - Birch Forest December Daily Tutorial by Anna-Karin Evaldsson. Binding the journal.

I used ring binders to bind my journal. If your worn cover comes with a ring binder attached, you don't need to do anything. All those page pockets are for my journaling tags, which I will share with you next week. 


The binder were attached with Hitch Fasteners. You can also tie it with a ribbon or use brads.

Layers of ink - Birch Forest December Daily Tutorial by Anna-Karin Evaldsson.

The journal has a nice chunky look to it.

Layers of ink - Birch Forest December Daily Tutorial by Anna-Karin Evaldsson.

Here's the back of the journal, which would also make a nice project just on its own.

If you want more inspiration, check out my previous December Daily journals:  


I hope you enjoyed this post! Thank you so much for stopping by today and Happy Thanksgiving to those who celebrate it. 

Happy Christmas crafting!

Anna-Karin

* Please note: the links are affiliate links, for which I receive a small percentage of sales generated by the link, at no extra cost to you.