Monday, May 31, 2021

Nature Art Journal Page

Hi friends! It is a new week and I can hardly believe that May is already over. We had a challenging month and hopefully June will be better.


At the Simon Says Stamp Monday Challenge Blog we have an 'Inspired by an artist' theme this week. Don't miss the last project by our May guest designer Simona Rebecchi aka Ginny and the Sheep

Please note: this post has affiliate links, for which I receive a small percentage of sales generated by the link, at no extra cost to you.

Layers of ink - Nature Sampler Art Journal Page Tutorial by Anna-Karin Evaldsson.

I was inspired by Swedish artist Lars Lerin. I really like his work, with it's focus on nature and with lots of interesting texture and a play of light and dark. My project is in particular inspired by his watercolor nature samplers, which are often a mix of details and whole images. He also has an interesting approach to borders and lines, with multiple borders and lines within a project.

Layers of ink - Nature Sampler Art Journal Page Tutorial by Anna-Karin Evaldsson. Paint background with watercolors.

I started out with a watercolor wash on watercolor paper, using masking tape to attach the paper to a wooden board. I used the one to the left.

Layers of ink - Nature Sampler Art Journal Page Tutorial by Anna-Karin Evaldsson.

Next, I re-attached the paper with masking tape, placing it further in than the original tape. I also created six squares by cutting masking tape, somewhat irregular and creating a grid. Some squares were glazed with a second layer of the same paint. I also used a second shade of brown and added some lines.

Layers of ink - Nature Sampler Art Journal Page Tutorial by Anna-Karin Evaldsson.

Two squares got a blue glace. Let dry.

Layers of ink - Nature Sampler Art Journal Page Tutorial by Anna-Karin Evaldsson.  Stamp with Simon Says Stamp Anna's Flowers.

When dry, I inked stamps with Distress Inks, misted with water and stamped on the squares. I used stamps from Anna's Flowers, Laugh In Flowers, Beautiful Butterflies and All Seasons Tree.

Layers of ink - Nature Sampler Art Journal Page Tutorial by Anna-Karin Evaldsson.  Stamp with Simon Says Stamp Anna's Flowers.

I stamped lines by painting watercolor paint on a ruler and pressing it here and there.

Layers of ink - Nature Sampler Art Journal Page Tutorial by Anna-Karin Evaldsson.  Stamp with Simon Says Stamp Anna's Flowers.

I also scratched out some lines with a craft knife and added highlights by scratching away the top layer of the paper.

Layers of ink - Nature Sampler Art Journal Page Tutorial by Anna-Karin Evaldsson.  Stamp with Simon Says Stamp Anna's Flowers.

In one of his books Lars Lerin uses stenciled letters and I added a word by painting with watercolor paint through Tim's Cargo stencil.

Layers of ink - Nature Sampler Art Journal Page Tutorial by Anna-Karin Evaldsson.  Stamp with Simon Says Stamp Anna's Flowers.

Lars also writes with a pencil on some of his sketches. Instead of writing, I used the Old Letter Background stamp together with Smoke ink. I also stamped additional sentiments with black ink.

Layers of ink - Nature Sampler Art Journal Page Tutorial by Anna-Karin Evaldsson.  Stamp with Simon Says Stamp Anna's Flowers.

I added some shadows here and there, but left most of the stamping without shadows, since I was aiming for a lose and quick sketchbook look.

Layers of ink - Nature Sampler Art Journal Page Tutorial by Anna-Karin Evaldsson.  Stamp with Simon Says Stamp Anna's Flowers.

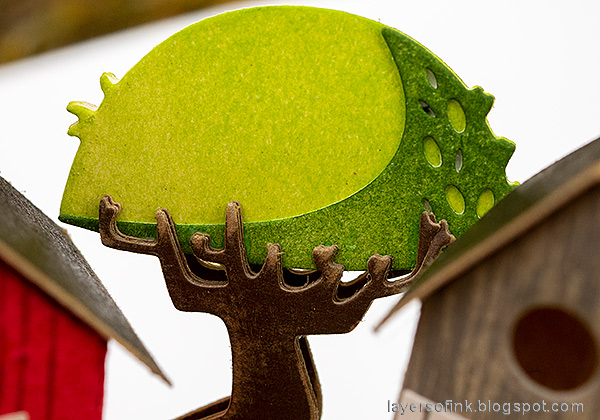
The trees were inked with Forest Moss and a little Ground Espresso. I scratched out highlights on one side of the trunks.

Layers of ink - Nature Sampler Art Journal Page Tutorial by Anna-Karin Evaldsson.  Stamp with Simon Says Stamp Anna's Flowers.

I tested the color combos of all the stamps on a scrap paper first, except for this one, which I ended up not liking as much as the others. The scratched out white highlights made it better. 

Layers of ink - Nature Sampler Art Journal Page Tutorial by Anna-Karin Evaldsson.  Stamp with Simon Says Stamp Anna's Flowers.

The smaller flower from Anna's Flowers was inked with two shades of pink and a little Vintage Photo. I stamped it multiple times to fill up the square.

Layers of ink - Nature Sampler Art Journal Page Tutorial by Anna-Karin Evaldsson.  Stamp with Simon Says Stamp Anna's Flowers.

One of my favorite parts of this page is the sharp line on this square and how it is visible through the butterfly.

Layers of ink - Nature Sampler Art Journal Page Tutorial by Anna-Karin Evaldsson.  Stamp with Simon Says Stamp Anna's Flowers.

Stamping with a ruler and watercolor paint is lots of fun and adds great irregular lines.

Layers of ink - Nature Sampler Art Journal Page Tutorial by Anna-Karin Evaldsson.  Stamp with Simon Says Stamp Anna's Flowers.

Here's a close up showing some of the lines and how they intersect. 

Layers of ink - Nature Sampler Art Journal Page Tutorial by Anna-Karin Evaldsson.  Stamp with Simon Says Stamp Anna's Flowers.

More lines. I really enjoyed this technique and will use it again.

Layers of ink - Nature Sampler Art Journal Page Tutorial by Anna-Karin Evaldsson.  Stamp with Simon Says Stamp Anna's Flowers.

When I removed the tape, I wasn't as careful as I usually am, since I wanted the tape to rip off some of the paper. You can see one of those places here.

Layers of ink - Nature Sampler Art Journal Page Tutorial by Anna-Karin Evaldsson.  Stamp with Simon Says Stamp Anna's Flowers.

The thinner tape pieces were not pressed down hard on the page, since I wanted some of the paint to seep under the edges. I didn't want only sharp edges, but also imperfect and rugged ones. The edges of the page were distressed and I glued it to a cotton-rag watercolor page in my Dina Wakley Media Journal. The cotton-rag paper is whiter than the watercolor paper that I used, adding another border and shade.

I hope you will join us this week in our Inspired by an Artist challenge. You have a chance to win a $25 gift voucher to do some fun shopping at Simon Says Stamp. You have until Monday 8am Ohio time. 1pm UK time, 2 pm CET to join in.


Do you use Instagram? If so please add #sssmchallenge so we can see your entries there too.


Thank you so much for taking the time to stop by here today! 

Happy crafting!

Anna-Karin

Supplies:

* Please note: the links are affiliate links, for which I receive a small percentage of sales generated by the link, at no extra cost to you.

Sunday, May 30, 2021

Spring Village

Hi friends! I hope you are all well. After a rainy and cold week, we had great weather today and my walk was a real joy. Today, I have a fun 3-D tutorial to share with you.

Please note: this post has affiliate links, for which I receive a small percentage of sales generated by the link, at no extra cost to you.

Layers of ink - Spring Village Tutorial by Anna-Karin Evaldsson.

During winter I made a winter village with Tim Holtz Paper Village die set and I thought it was time to do a spring or summer version. I used only two houses this time, to leave more space for a little flower garden. The base is a wood disc, which was meant to be a coaster, but which instead became a perfect base for a project.

Layers of ink - Spring Village Tutorial by Anna-Karin Evaldsson. Die cut with Tim Holtz Village dies.

Die cut houses from heavystock paper and roofs from kraft-stock paper.

Layers of ink - Spring Village Tutorial by Anna-Karin Evaldsson. Ink with Distress Ink.

Ink the red house with Candied Apple.

Layers of ink - Spring Village Tutorial by Anna-Karin Evaldsson. Stamp with Simon Says Stamp Wood Planks background.

Ink the grey house with Pumice Stone and Hickory Smoke. For a wood effect, I stamped the houses with the Simon Says Stamp Wood Planks stamp, using slightly darker inks. 

Layers of ink - Spring Village Tutorial by Anna-Karin Evaldsson.

Fold the houses along the score lines.

Layers of ink - Spring Village Tutorial by Anna-Karin Evaldsson.

For the windows I used pieces of acetate, colored with Latte alcohol ink.

Layers of ink - Spring Village Tutorial by Anna-Karin Evaldsson.

Assemble the houses and glue on the roofs.

Layers of ink - Spring Village Tutorial by Anna-Karin Evaldsson.

I also glued cheese cloth / mummy cloth curtains on the inside of the windows. 

Layers of ink - Spring Village Tutorial by Anna-Karin Evaldsson.

I wanted a tree and picked the toadstool with the thickest stem from Tim's Funky Toadstools set, so that it would have more stability. Die cut it five times from heavystock and five times from neutral kraft-stock paper.

Layers of ink - Spring Village Tutorial by Anna-Karin Evaldsson.

Glue the pieces together. I glued three together and two together. Ink with green Distress Inks.

Layers of ink - Spring Village Tutorial by Anna-Karin Evaldsson.

Glue the two green pieces together and add one trunk piece on each side.

Layers of ink - Spring Village Tutorial by Anna-Karin Evaldsson.

Mix Rustic Wilderness and Twisted Citron paint into texture paste. Don't mix the colors completely. Apply to the base with a palette knife. Press the tree, flowers and houses into the paste. I added the red house later, since I didn't want the red ink to bleed into the paste. The Heirloom Roses were inked with alcohol ink.

Layers of ink - Spring Village Tutorial by Anna-Karin Evaldsson.

I like how the ink colored them partially, making the white look porcelain-like. 

Layers of ink - Spring Village Tutorial by Anna-Karin Evaldsson.

When the paste was basically dry, I added the red house, with the door slightly ajar.

Layers of ink - Spring Village Tutorial by Anna-Karin Evaldsson.

I few Clippings Stickers finished the houses.

Layers of ink - Spring Village Tutorial by Anna-Karin Evaldsson.

And a Mini Flair Button.

Layers of ink - Spring Village Tutorial by Anna-Karin Evaldsson.

The grey house is meant to look like old weathered, unpainted wood planks. 

Layers of ink - Spring Village Tutorial by Anna-Karin Evaldsson.

Although this is a toadstool, it works like a tree too. For another project using this die set, check out my Mushroom Forest tag.

Layers of ink - Spring Village Tutorial by Anna-Karin Evaldsson.

From the back the little village looks like this.

Layers of ink - Spring Village Tutorial by Anna-Karin Evaldsson.

The winter version also uses a wood disc as a base. You can find the Winter Village Tutorial here.


Thank you so much for taking the time to stop by here today! I will see you again tomorrow.

Happy crafting!

Anna-Karin

Supplies:

* Please note: the links are affiliate links, for which I receive a small percentage of sales generated by the link, at no extra cost to you.

Friday, May 28, 2021

Dandelion Fields

Hi friends! Today I have a summery art journal page to share, which could just as well be a card. I created a fun bokeh effect in the background.

Please note: this post has affiliate links, for which I receive a small percentage of sales generated by the link, at no extra cost to you.

Layers of ink - Dandelion Fields Tutorial by Anna-Karin Evaldsson.

I used the pretty Dandelion Messages stamp set from the Simon Says Stamp May Card Kit. The kit is sold out, but luckily you can also get the stamp set on its own. I love dandelions and never quite understood why they were seen as a weed, especially not when they grow at the side of a road or on fields. The yellow flowers against green grass and the seed heads are both so pretty and cheerful.

Layers of ink - Dandelion Fields Tutorial by Anna-Karin Evaldsson.

Working in my small Small Creative Flip Journal I white embossed dandelions on the page.

Layers of ink - Dandelion Fields Tutorial by Anna-Karin Evaldsson. Ink with distress ink.

Tear a printer paper and use as a mask. Ink with green Distress Inks.

Layers of ink - Dandelion Fields Tutorial by Anna-Karin Evaldsson.

Remove the mask and ink the top area. The embossing will resist the ink.

Layers of ink - Dandelion Fields Tutorial by Anna-Karin Evaldsson. Use the Simon Says Stamp Mix and Match Circles stencil.

The bokeh effect was created by sponging water with a slightly moist cloth through the Simon Says Stamp Mix and Match Circles stencil. The water removes some of the ink.

Layers of ink - Dandelion Fields Tutorial by Anna-Karin Evaldsson.

Ink the stems only and stamp a shadow effect. Also stamp a few of the smaller flowers with Mowed Lawn ink.

Layers of ink - Dandelion Fields Tutorial by Anna-Karin Evaldsson.

Add seeds flying in the wind and some grass with a white gel pen.

Layers of ink - Dandelion Fields Tutorial by Anna-Karin Evaldsson.

I wanted even more of a bokeh effect and added drops using a pipette dropper. Dab with a paper towel to remove the water. Don't drag, just dab.

Layers of ink - Dandelion Fields Tutorial by Anna-Karin Evaldsson.

These flowers are so pretty white embossed.

Layers of ink - Dandelion Fields Tutorial by Anna-Karin Evaldsson.

I stamped some sentiments from Laugh In Flowers and Anna's Flowers with green ink.

Layers of ink - Dandelion Fields Tutorial by Anna-Karin Evaldsson.

Two sentiments strips finished the page.

Layers of ink - Dandelion Fields Tutorial by Anna-Karin Evaldsson.

Mist the inky stamp with water if you want more of a watercolor look. I wanted faint, incomplete stamping.

Layers of ink - Dandelion Fields Tutorial by Anna-Karin Evaldsson.

At the bottom of the page, I added some Teal Raspberry Opal Blaze Polish.

Layers of ink - Dandelion Fields Tutorial by Anna-Karin Evaldsson.

This pretty sentiment comes from the Dandelion Messages set.


Thank you so much for taking the time to stop by here today! I will see you again tomorrow.

Happy crafting!

Anna-Karin

Supplies:

* Please note: the links are affiliate links, for which I receive a small percentage of sales generated by the link, at no extra cost to you.