Tuesday, February 28, 2023

Birthday Art Journal Page Tutorial

Hi crafters! The sun is shining and there is spring in the air. I hope the ice on the paths will melt since it makes my walks less pleasant.

Please note: this post has affiliate links, for which I receive a small percentage of sales generated by the link, at no extra cost to you.

Layers of ink - Birthday Art Journal Page Tutorial by Anna-Karin Evaldsson. Resist background technique.

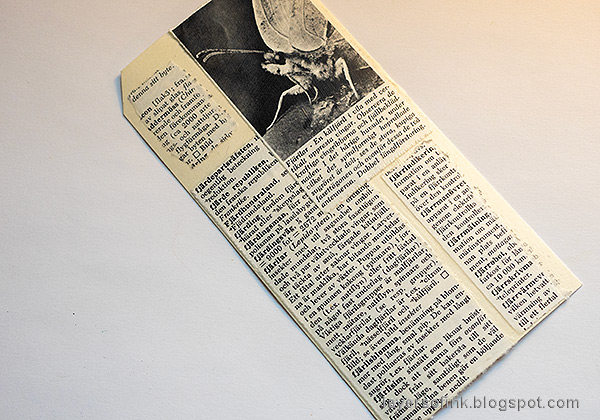
Both my boys have their birthdays in February only about a week a part and I wanted do document that in my art journal. I was inspired by new products from Simon Says Stamp Be Creative release, in particular the sentiments on the Big Old Birthday set. Birthday sentiments aren't only for birthday cards, but are also great for art journaling, scrapbooking and sometimes also for other themes. I worked in my Dylusions Small Creative Journal.

Layers of ink - Birthday Art Journal Page Tutorial by Anna-Karin Evaldsson. Resist background technique.

Start by white embossing the Simon Says Stamp Parallellogram background on the entire page. 

Layers of ink - Birthday Art Journal Page Tutorial by Anna-Karin Evaldsson. Color with Distress Ink.

Apply Distress Ink on a non-stick craft sheet in three horizontal lines, for an ombre effect. Mist with water and press the paper into the ink.

Layers of ink - Birthday Art Journal Page Tutorial by Anna-Karin Evaldsson. Color with Faber-Castell Polychromos.

When dry, color some of the parallellograms with colored pencils. I used Faber-Castell Polychromos.

Layers of ink - Birthday Art Journal Page Tutorial by Anna-Karin Evaldsson. Splatter with Distress Watercolor Pencils.

Finally, splatter the background with Distress Watercolor Pencils. Dip the pencil in water and flick a paint brush against it.

Layers of ink - Birthday Art Journal Page Tutorial by Anna-Karin Evaldsson. Stamp with Stazon Cotton White on Simon Says Stamp Clear Acetate.

I wanted to use the new Simon Says Stamp Clear Acetate from the Be Creative release and stamped the large sentiments with Cotton White StazOn ink. Stamp two sentiments from Big Old Birthday.

Layers of ink - Birthday Art Journal Page Tutorial by Anna-Karin Evaldsson. Resist background technique.

Die cut with the coordinating dies. 

Layers of ink - Birthday Art Journal Page Tutorial by Anna-Karin Evaldsson. Resist background technique.

Turn the acetate around and sponge orange paint through the Simon Says Stamp Brush Strokes stencil. I went over the design a couple of times until I was happy with the coverage. 

Layers of ink - Birthday Art Journal Page Tutorial by Anna-Karin Evaldsson. Ink vellum with Distress Ink.

To make the clear sentiments stand out better, I die cut the mat from Simon Says Stamp vellum and inked it with Mermaid Lagoon.

Layers of ink - Birthday Art Journal Page Tutorial by Anna-Karin Evaldsson. Resist background technique.

Glue the vellum and acetate to the background. I liked that the large sentiments aren't a stark black on this page, but I would have liked the white to have stood out a little more. My Cotton White ink pad is old and stained, even after reinking, and I think I need to get a new one so that the ink will be more white.

Layers of ink - Birthday Art Journal Page Tutorial by Anna-Karin Evaldsson. Resist background technique.

I stamped some of the small sentiments here and there, without reinking in between. 

Layers of ink - Birthday Art Journal Page Tutorial by Anna-Karin Evaldsson. Add stamped sentiments.

The additional white lines that you see here and there were made with a white paint pen. The sequins come from Lucky Charm from the Be Creative release.

Layers of ink - Birthday Art Journal Page Tutorial by Anna-Karin Evaldsson. Resist background technique.

The title has a lot of texture and the vellum helped it stand out from the background without covering the background completely.

Layers of ink - Birthday Art Journal Page Tutorial by Anna-Karin Evaldsson. Resist background technique.

I also used Birthday Wishes Reverse sentiment strips, also from the Be Creative release.

Layers of ink - Birthday Art Journal Page Tutorial by Anna-Karin Evaldsson. Resist background technique.

Their ages were cut from Tim Holtz Label Tape.


Happy stamping!

Anna-Karin


Supplies:

* Please note: the links are affiliate links, for which I receive a small percentage of sales generated by the link, at no extra cost to you.

Monday, February 27, 2023

Clear Butterfly Tag Tutorial

Hello friends! I hope your weekend was good! We celebrated my youngest 8th birthday, which was a lot of fun. 

Please note: this post has affiliate links, for which I receive a small percentage of sales generated by the link, at no extra cost to you.


This week we have a Things With Wings theme at the Simon Says Stamp Monday Challenge Blog. I hope you will join us!! Don't miss the last project by our February guest designer Laura Cassina


Layers of ink - Clear Acetate Butterfly Tag Tutorial by Anna-Karin Evaldsson.

There is just something about butterflies which makes me happy and you can also create butterflies in many different ways. One of my favorite techniques for butterflies is to use acetate and to create them in more than one layer, giving the impression of fluttering wings. I used Simon Says Stamp..

Layers of ink - Clear Acetate Butterfly Tag Tutorial by Anna-Karin Evaldsson.

Start by die cutting the Simon Says Stamp Graceful Butterfly from Simon Says Stamp Clear Acetate Sheets and then emboss in the coordinating embossing folder. The Clear Acetate Sheets are from the new Be Creative release.

Layers of ink - Clear Acetate Butterfly Tag Tutorial by Anna-Karin Evaldsson. Color the butterflies with Ranger alcohol ink.

Color the butterflies with alcohol ink.

Layers of ink - Clear Acetate Butterfly Tag Tutorial by Anna-Karin Evaldsson. Stamp with Simon Says Stamp Stained Glass.

Stamp on the non-colored side with Simon Says Stamp Stained Glass Background. Don't stamp on the entire butterfly, but mainly in the center.

Layers of ink - Clear Acetate Butterfly Tag Tutorial by Anna-Karin Evaldsson.

The background also has a butterfly theme. I used an old Swedish word book and picked the page with the word 'butterfly' ('fjäril'). I also used an image from the book of a cabbage butterfly. Adhere to a tag with matte medium.

Layers of ink - Clear Acetate Butterfly Tag Tutorial by Anna-Karin Evaldsson. Coat with gesso.

Coat with gesso, but only very lightly on the parts that you want to remain visible.

Layers of ink - Clear Acetate Butterfly Tag Tutorial by Anna-Karin Evaldsson. Color with Distress Watercolor Pencils.

Paint with watered-down Distress Paint in beige and brown shades. I forgot to take a photo of that step. When dry, add some color with Distress Watercolor Pencils.

Layers of ink - Clear Acetate Butterfly Tag Tutorial by Anna-Karin Evaldsson.

Stamp here and there with Simon Says Stamp Stained Glass.

Layers of ink - Clear Acetate Butterfly Tag Tutorial by Anna-Karin Evaldsson. Add Ranger Stickles.

Finally, add a little Nebula Stickles Glitter Gel around the edges. The gel has small gold star sequins and glitter of various sizes.

Layers of ink - Clear Acetate Butterfly Tag Tutorial by Anna-Karin Evaldsson.

Layer the butterflies together and add a body. Shape the wings to give them dimension. Staple to the tag.

Layers of ink - Clear Acetate Butterfly Tag Tutorial by Anna-Karin Evaldsson.

The three butterflies look like they are fluttering over the tag.

Layers of ink - Clear Acetate Butterfly Tag Tutorial by Anna-Karin Evaldsson.

The sentiment was die cut from Simon Says Stamp Teal Glitter Cardstock using Tim Holtz Friendship Words Script.

Layers of ink - Clear Acetate Butterfly Tag Tutorial by Anna-Karin Evaldsson.

The black and white image of the butterfly stood out too starkly on the tag, so I gave it a little color with the Distress Watercolor Pencils and added a few scribbles with a black pen to make it blend in better.

Layers of ink - Clear Acetate Butterfly Tag Tutorial by Anna-Karin Evaldsson.

I had already stapled the butterflies once when adding them to the tag, which meant I had to use a second staple. To avoid that, staple them to the background when the parts aren't adhere, or glue them together in the center. 

Layers of ink - Clear Acetate Butterfly Tag Tutorial by Anna-Karin Evaldsson.

The stickles gives a great shine to the background. I also used Studio Katia Iridescent Bubbles. The May Arts Wrinkled Faux Silk Ribbon was dyed with Distress Ink.

Layers of ink - Clear Acetate Butterfly Tag Tutorial by Anna-Karin Evaldsson.

I like how you can see the text through the butterflies, even though they are so dimensional.

Layers of ink - Clear Acetate Butterfly Tag Tutorial by Anna-Karin Evaldsson.

Acetate dry embosses beautifully and here you can see that effect more clearly.

Layers of ink - Clear Acetate Butterfly Tag Tutorial by Anna-Karin Evaldsson.

The stamped sentiment comes from Tim Holtz Tiny Text.

I hope you will join us this week in our Things With Wings challenge. You have a chance to win a $25 gift voucher to do some fun shopping at Simon Says Stamp. You have until Monday 8am Ohio time. 1pm UK time, 2 pm CET to join in.


Do you use Instagram? If so please add #sssmchallenge so we can see your entries there too.


Thank you so much for stopping by here today! 

Happy crafting!

Anna-Karin

Supplies:

* Please note: the links are affiliate links, for which I receive a small percentage of sales generated by the link, at no extra cost to you.


Sunday, February 26, 2023

Easter Altered Tin Tutorial

Hi friends! Today I have an altered tin tutorial to share. I love to create little scenes in tins. They are also great gifts.

Please note: this post has affiliate links, for which I receive a small percentage of sales generated by the link, at no extra cost to you.

Layers of ink - Easter Altered Tin Tutorial by Anna-Karin Evaldsson.

I wanted to create an Easter scene, as the home for a little rabbit and filled with a garden of happy colors, flowers, carrots and eggs. This is the inside of the tin. I used a mix of Tim Holtz idea-ology embellishments and dies by both Tim Holtz and Simon Says Stamp.

Layers of ink - Easter Altered Tin Tutorial by Anna-Karin Evaldsson.

Here's the tin when it is closed. The scene starts on the outside with lots of leaves, glittery eggs, flowers and a carrot.

Layers of ink - Easter Altered Tin Tutorial by Anna-Karin Evaldsson.

I started by painting the idea-ology Salvaged Rabbit with Matte Medium.

Layers of ink - Easter Altered Tin Tutorial by Anna-Karin Evaldsson.

When dry, paint the rabbit with Distress Paints. Don't worry about getting a perfect result.

Layers of ink - Easter Altered Tin Tutorial by Anna-Karin Evaldsson.

Mix water into a little Ground Espresso paint and paint the entire rabbit with it. Remove the paint from some of the areas before it is completely dry.

Layers of ink - Easter Altered Tin Tutorial by Anna-Karin Evaldsson. Emboss in Tim Holtz Mosaic.

The background piece in the scenes is meant to be the sky. I cut cards and rounded the corners. Smear blue Distress Inks on a non-stick craft sheet, mist with water and press the paper into the ink. Immediately emboss in the Tim Holtz Mosaic embossing folder, or in a different embossing folder.

Layers of ink - Easter Altered Tin Tutorial by Anna-Karin Evaldsson. Add Ranger Stickles Gel.

When dry, apply Moon Dust Stickles to the backgrounds.

Layers of ink - Easter Altered Tin Tutorial by Anna-Karin Evaldsson.

The idea-ology Tiny Eggs were colored with alcohol ink. Place the eggs in a plastic bag and add a few drops of ink. Move around to color. 

Layers of ink - Easter Altered Tin Tutorial by Anna-Karin Evaldsson.

Next, I painted the eggs with matte medium and covered them with Clear Rock Candy Glitter.

Layers of ink - Easter Altered Tin Tutorial by Anna-Karin Evaldsson.

For the greenery, I applied green and yellow Distress Inks to a non-stick craft sheet and misted with water. Press watercolor paper into the ink. I made more than I needed since I had run out of green papers to use.

Layers of ink - Easter Altered Tin Tutorial by Anna-Karin Evaldsson. Die cut Simon Says Stamp Tattered Leaves.

Die cut Simon Says Stamp Tattered Leaves and Fine Textured Leaves from the green and yellow paper.

Layers of ink - Easter Altered Tin Tutorial by Anna-Karin Evaldsson. Die cut miniature carrots.

I colored another piece of paper orange in the same way and die cut carrots from Tim Holtz Bunny Stitch.

Layers of ink - Easter Altered Tin Tutorial by Anna-Karin Evaldsson.

The Bouquet Findings Flowers were misted with Distress Spray Stains.

Layers of ink - Easter Altered Tin Tutorial by Anna-Karin Evaldsson. Paint with Distress Paint.

I coated the lid of the tin with gesso and when dry, painted with pink Distress Paint.

Layers of ink - Easter Altered Tin Tutorial by Anna-Karin Evaldsson.

I rubbed some brown paint around the edge of the lid. Add Butterfly Design Tape around the bottom of the tin.

Layers of ink - Easter Altered Tin Tutorial by Anna-Karin Evaldsson.

The leaves were added into the tin first. I stamped various sentiments on scrap paper, which I think had been colored with Pumice Stone Distress Ink. Cut into strips. Some of them were adhered with foam tape. 

Layers of ink - Easter Altered Tin Tutorial by Anna-Karin Evaldsson.

The flowers were disassembled and arranged so that there are different colors everywhere you look.

Layers of ink - Easter Altered Tin Tutorial by Anna-Karin Evaldsson.

The rabbit is sitting in the middle of all the greenery, flowers and eggs. 

Layers of ink - Easter Altered Tin Tutorial by Anna-Karin Evaldsson. Tim Holtz Salvaged Eggs.

At the bottom of the tin there are a whole bunch of glittery pastel eggs.

Layers of ink - Easter Altered Tin Tutorial by Anna-Karin Evaldsson.

Inside the lid, I added a simpler scene. The heart comes from Bunny Stitch.The pretty pink pearls are Studio Katia. the longer sentiment comes from Simon Says Stamp Forest Scenery.

Layers of ink - Easter Altered Tin Tutorial by Anna-Karin Evaldsson.

Two carrots and a bunch of leaves.

Layers of ink - Easter Altered Tin Tutorial by Anna-Karin Evaldsson.

On the front of the tin there are more leaves, flowers and sentiments.
 
Layers of ink - Easter Altered Tin Tutorial by Anna-Karin Evaldsson.

And even more eggs. 

Layers of ink - Easter Altered Tin Tutorial by Anna-Karin Evaldsson.

I hope you enjoyed this tutorial and that it inspired you to alter some tins.


Happy stamping!

Anna-Karin


Supplies:

* Please note: the links are affiliate links, for which I receive a small percentage of sales generated by the link, at no extra cost to you.