Wednesday, November 30, 2022

December Journal

Hi friends! I hope you are well! It is time to share one of my favorite projects each year. My December journal, inspired by Ali Edwards concept of documenting the month of December. I have been doing this since 2012, making this my eleventh December daily journal. 

Please note: this post has affiliate links, for which I receive a small percentage of sales generated by the link, at no extra cost to you.

Layers of ink - December Daily Tutorial by Anna-Karin Evaldsson.

This year I am doing my journal a bit differently and decided to use a Tim Holtz Travel Folio for the journal. My December Countdown Tags will go into this journal, one at a time and some of the stamps are repeated so that they will fit well together. I love Tim Holtz Christmas Backdrops papers (well actually all his backdrops papers) and knew I wanted to use them for my journal.

Layers of ink - December Daily Tutorial by Anna-Karin Evaldsson.

This is what it looks like when you open the journal, lots of interactive parts and a booklet for journaling.


The Travel Folio looks like this and you will see some of the original papers peeking through here and there.


I cut Christmas Backdrops papers to fit the various parts of the folio that I wanted to cover.

Layers of ink - December Daily Tutorial by Anna-Karin Evaldsson. With Tim Holtz Christmas Backdrops

Sand the edges to reveal the white core and then adhere to the journal.

Layers of ink - December Daily Tutorial by Anna-Karin Evaldsson.

Continue on the inside. 

Layers of ink - December Daily Tutorial by Anna-Karin Evaldsson. Stamp with Simon Says Stamp Mixed Labels.

For journaling and for sentiment stamps I stamped a whole bunch of Simon Says Stamp Mixed Labels in different colors. They were stamped on heavystock paper which had been colored with Distress Ink. 

Layers of ink - December Daily Tutorial by Anna-Karin Evaldsson.

Die cut with the coordinating Mixed Labels dies. I hold the die in place with Simon Says Stamp Very Very Low Tack Tape.

Layers of ink - December Daily Tutorial by Anna-Karin Evaldsson.

Stamp the title of the journal and a whole lot of sentiments on the labels.

Layers of ink - December Daily Tutorial by Anna-Karin Evaldsson.

I also used Tim Holtz Journal Cards, File Folders, die cut Framed Tags and Christmas idea-ology ephemera. Most of the papers were stamped with a whole bunch of stamps by Tim Holtz and Simon Says Stamp.

Layers of ink - December Daily Tutorial by Anna-Karin Evaldsson.

These Candy Canes are so cute!

Layers of ink - December Daily Tutorial by Anna-Karin Evaldsson.

The year was stamped with Tim Holtz Worn Text, which was also used for the numbers in my Countdown Calendar. The two smaller labels were stamped with words from Simon Says Stamp Document It.

Layers of ink - December Daily Tutorial by Anna-Karin Evaldsson.

The back of the journal looks like this.

Layers of ink - December Daily Tutorial by Anna-Karin Evaldsson.

Open the book and you'll find a mix of paper sizes.

Layers of ink - December Daily Tutorial by Anna-Karin Evaldsson.

This sweet scene was cut from a Christmas Backdrops paper.

Layers of ink - December Daily Tutorial by Anna-Karin Evaldsson.

The labels were adhered here and there.

Layers of ink - December Daily Tutorial by Anna-Karin Evaldsson.

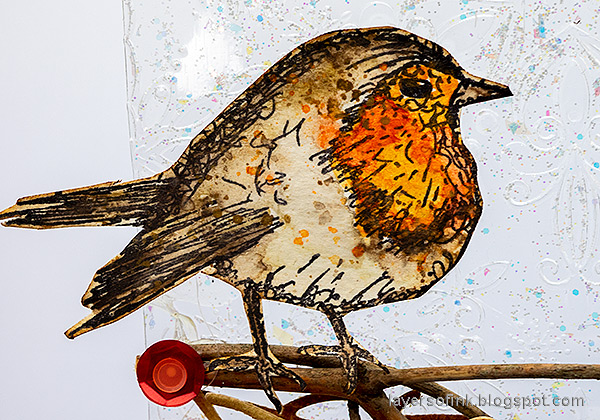
This snowflake stamp from Tim Holtz Mini Holidays was stamped on many of the pages with Simon Says Stamp Pawsitively Saturated Surf ink. I also used it on the Countdown tags.

Layers of ink - December Daily Tutorial by Anna-Karin Evaldsson.

Try to plan the pages so that you get a peek of what comes next.

Layers of ink - December Daily Tutorial by Anna-Karin Evaldsson.

The star border from Tim Holtz Rock Star also appears here and there, stamped in red.

Layers of ink - December Daily Tutorial by Anna-Karin Evaldsson.

Some of the paper from the folio is still visible.

Layers of ink - December Daily Tutorial by Anna-Karin Evaldsson.

I used the same papers on the inside flap as on the cover.

Layers of ink - December Daily Tutorial by Anna-Karin Evaldsson.

The Journal Cards can easily be turned into Christmas Journal cards, with stamps and ephemera. 

Layers of ink - December Daily Tutorial by Anna-Karin Evaldsson.

The Tim Holtz Christmas ephemera that I used comes from a pile of ephemera from this and previous years. You might not find exactly the same pieces in the 2022 version.

Layers of ink - December Daily Tutorial by Anna-Karin Evaldsson.

Cover the white back of papers up with other ephemera pieces.

Layers of ink - December Daily Tutorial by Anna-Karin Evaldsson.

The big tag was die cut from Christmas backdrops paper with Tim's Framed Tags.

Layers of ink - December Daily Tutorial by Anna-Karin Evaldsson.

It is such fun to assemble the book, which can also be made for other themes.

Layers of ink - December Daily Tutorial by Anna-Karin Evaldsson.

Two tags were stacked together back to back, with the flap page in between.

Layers of ink - December Daily Tutorial by Anna-Karin Evaldsson.

One of my favorite sentiments had to make it into the journal too. It's from Simon Says Stamp Document It.

Layers of ink - December Daily Tutorial by Anna-Karin Evaldsson.

Lots of trees, both indoors and outdoors.

Layers of ink - December Daily Tutorial by Anna-Karin Evaldsson.

In the file folders I left space for photos.

Layers of ink - December Daily Tutorial by Anna-Karin Evaldsson.

Mixing stamping with ephemera is always fun.

Layers of ink - December Daily Tutorial by Anna-Karin Evaldsson.

The larger of the two file folders.

Layers of ink - December Daily Tutorial by Anna-Karin Evaldsson.

And finally you will find the booklet, which was also stamped to turn it into a Christmas booklet.

Layers of ink - December Daily Tutorial by Anna-Karin Evaldsson.

There is a bit of stamping on behind the booklet too.

Layers of ink - December Daily Tutorial by Anna-Karin Evaldsson.

The booklet can be removed to make it easier to write in.

Layers of ink - December Daily Tutorial by Anna-Karin Evaldsson.

More stamping. The red labels to the right were printed on the paper.

Layers of ink - December Daily Tutorial by Anna-Karin Evaldsson.

And a small winter scene at the bottom stamped with Simon Says Stamp Forest Scenery.

Layers of ink - December Daily Tutorial by Anna-Karin Evaldsson.

The pages in the booklet are perfect for journaling. I will add the Countdown Tags somewhere on the page to mark the date and as an embellishment.

Layers of ink - December Daily Tutorial by Anna-Karin Evaldsson.

Red wood paper on the flap, which can be folded both over and under the front cover.

Layers of ink - December Daily Tutorial by Anna-Karin Evaldsson.

Along the spine I added Christmas Remnant Rubs.

You can find my previous Christmas Daily journals here:

2021 - Snowy Hills December Journal


Thank you so much for stopping by here today!

Happy stamping!

Anna-Karin


Supplies:

* Please note: the links are affiliate links, for which I receive a small percentage of sales generated by the link, at no extra cost to you.

Monday, November 28, 2022

Winter Robin Tag

Hi friends! I hope you are well! Christmas time is here now and I spent yesterday working at a traditional Christmas market. 

Please note: this post has affiliate links, for which I receive a small percentage of sales generated by the link, at no extra cost to you.


This week we have a Freezing Cold Mood Board challenge at the Simon Says Stamp Monday Challenge Blog and you can see the lovely mood board that team member Zoey created below:


Don't miss the last project by our guest designer Joanne Travis, who has created such beautiful projects for us during November.


Layers of ink - Winter Robin Tag with Clear Background tutorial by Anna-Karin Evaldsson.

I was inspired by the robin on the mood board, as well as by the snow, ice, color combo, and berry branch. It has been a while since I made a project with a transparent background and the mood board inspired me to do a transparent tag with a glittery, frosty snowflake background. I love the look of dry embossed acetate/modeling film.

Layers of ink - Winter Robin Tag with Clear Background tutorial by Anna-Karin Evaldsson.

I just had to photograph the tag on actual snow too, since we still have quite a bit of snow here since last weekend's heavy snowfall.

Layers of ink - Winter Robin Tag with Clear Background tutorial by Anna-Karin Evaldsson. Emboss in Simon Says Stamp Filigree Snowflakes.

Start by cutting a tag from a sheet of acetate of from Clearly For Art Modeling Film. You can also try Simon Says Stamp Clear Acetate Sheets. Different acetate surfaces will give different effects, so experiment on a small piece first. Emboss in the beautiful Simon Says Stamp Filigree Snowflakes folder.

Layers of ink - Winter Robin Tag with Clear Background tutorial by Anna-Karin Evaldsson. Apply Ranger Stickles.

Turn the tag around and apply Moon Dust Stickles Glitter Gel to the back.

Layers of ink - Winter Robin Tag with Clear Background tutorial by Anna-Karin Evaldsson.

Stamp the robin with AALL & Create Robin & Nuthatch on watercolor paper. The stamp set was designed by Tracy Evans.

Layers of ink - Winter Robin Tag with Clear Background tutorial by Anna-Karin Evaldsson. Color with Distress Watercolor Pencils.

Watercolor with Distress Watercolor Pencils, pick the paint up from the pencil with a paint brush.

Layers of ink - Winter Robin Tag with Clear Background tutorial by Anna-Karin Evaldsson.

Splatter some orange and brown on the bird to create a fuzzy look.

Layers of ink - Winter Robin Tag with Clear Background tutorial by Anna-Karin Evaldsson.

Die cut Simon Says Stamp Berry Stems from heavystock paper and ink two of the branches with Distress Ink. I really like this die set and have used it a lot lately.

Layers of ink - Winter Robin Tag with Clear Background tutorial by Anna-Karin Evaldsson.

I cut out the bird and inked the edges, adhere with foam tape.

Layers of ink - Winter Robin Tag with Clear Background tutorial by Anna-Karin Evaldsson.

This sentiment comes from Simon Says Stamp Printmaking Birds and was stamped on a Tim Holtz Journal Card.

Layers of ink - Winter Robin Tag with Clear Background tutorial by Anna-Karin Evaldsson.

The dry embossed, glittery background is a little hard to photograph, but you might get a better idea of how it looks here.

Layers of ink - Winter Robin Tag with Clear Background tutorial by Anna-Karin Evaldsson.

I picked two small branches from the garden and also added Berry Branches. The berries were die cut from Simon Says Stamp Schoolhouse Red cardstock. I also added some sequins. 

Layers of ink - Winter Robin Tag with Clear Background tutorial by Anna-Karin Evaldsson.

I hope you enjoyed this tutorial and that it inspired you to dry emboss some clear surfaces.

I hope you will join us this week in our Freezing Cold mood board challenge. You have a chance to win a $25 gift voucher to do some fun shopping at Simon Says Stamp. You have until Monday 8am Ohio time. 1pm UK time, 2 pm CET to join in.


Do you use Instagram? If so please add #sssmchallenge so we can see your entries there too.


Thank you so much for stopping by here today! 

Happy crafting!

Anna-Karin

Supplies:

* Please note: the links are affiliate links, for which I receive a small percentage of sales generated by the link, at no extra cost to you.