Monday, September 30, 2019

Good Cheer Christmas card


Hello friends! I hope you had a lovely weekend, with at least some creative time. The boys and I went to see Toy Story 4 and everybody loved it. Afterwords, we built some lego.


This week at the Simon Says Stamp Monday Challenge Blog we have a Let's get ready for Christmas theme. I am not ready for Christmas yet, and want to enjoy autumn for a while longer. But Christmas crafting, on the other hand, is always fun, and every year I enjoy digging into (and getting some new) Christmas supplies.

Don't miss the last project by our September guest designer, Anne Redfern. We are so happy that Anne could join us this month and her projects have been amazing.

Layers of ink - Good Cheer Christmas card by Anna-Karin Evaldsson.

I made a cream and white card for today, with some touches of gold, and quite a lot of texture. Now and then, I enjoy using only neutral colors, and it often adds extra focus on the texture, and on the different surfaces used. Here there is a mix of watercolor paper, smooth white paper, torn vellum and the shiny metallic gold.

Layers of ink - Good Cheer Christmas card by Anna-Karin Evaldsson. Made with the SSS Ho Ho Postage set.

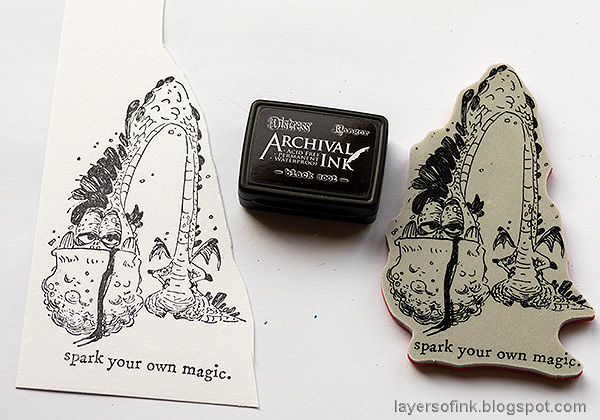
I used the new Ho Ho Postage stamp set with the coordinating dies, from the STAMPtember release. Stamp images on white paper with Khaki ink and die cut with the coordinating dies. Both the dies and the stamps work great on their own too.

Layers of ink - Good Cheer Christmas card by Anna-Karin Evaldsson.

As I was photographing the previous step, I noticed Simon peeking out through the deer stamp. I thought it was pretty funny and had to take a close up.

Layers of ink - Good Cheer Christmas card by Anna-Karin Evaldsson. Apply texture paste through the Lined Circles stencil.

Apply texture paste through the Lined Circles stencil and leave to dry.

Layers of ink - Good Cheer Christmas card by Anna-Karin Evaldsson.

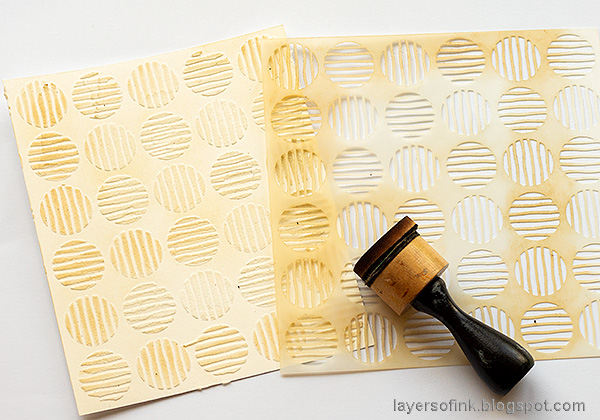
When dry, place the stencil back and ink gently with Vintage Photo Distress Ink. Remove the stencil and add some ink in between the circles too.

Layers of ink - Good Cheer Christmas card by Anna-Karin Evaldsson.

I inked the edges of the postage stamp panels and tore a piece of vellum for each one. Glue to the vellum and then adhere to the background with foam tape.

Layers of ink - Good Cheer Christmas card by Anna-Karin Evaldsson.

Lately, I have reached for gold elements quite often, and here I added branches die cut from gold paper with Tim Holtz's Mini Holiday Greens set.

Layers of ink - Good Cheer Christmas card by Anna-Karin Evaldsson.

The detailed border was die cut with Tim's Crocheted set. I just love the fine details you get with these dies.

Layers of ink - Good Cheer Christmas card by Anna-Karin Evaldsson.

I added some flat-backed pearls here and there.

Layers of ink - Good Cheer Christmas card by Anna-Karin Evaldsson.

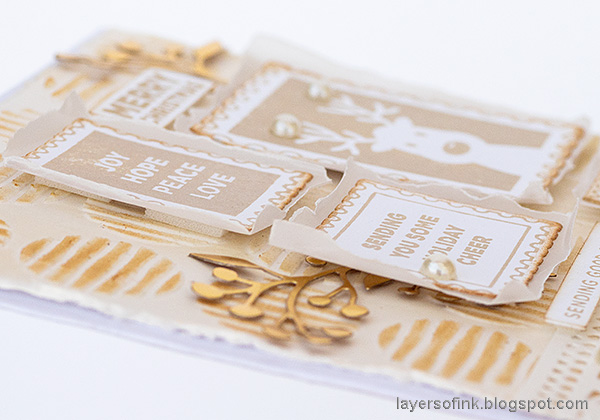
Here you can see the dimension created by using foam tape. It is a simple way to add interest to a card.

I hope you will join us this week in our Let's get ready for Christmas challenge. As always, you have a chance to win a $50 gift voucher to do some fun shopping at Simon Says Stamp. You have until next Monday 8am Ohio time. 1pm UK time, 2 pm CET to join in.


Don't forget to follow Simon Says Stamp on Instagram, they post great stuff daily. 


Do you use Instagram? If so please add #sssmchallenge so we can see your entries there too.


Thank you so much for taking the time to visit my blog today!  

Happy crafting!

Anna-Karin

Supplies:

* Please note: the links are affiliate links, for which I receive a small percentage of sales generated by the link, at no extra cost to you.


Sunday, September 29, 2019

Heart Shaker Cards Tutorial

Hello stampers! We had a very early start this morning with a soccer game, but it went well and the weather was good. The day was finished with a long forest walk. I have two shaker cards to share today, made with the same die, but with different effects.

Layers of ink - Heart Shaker Cards Tutorial by Anna-Karin Evaldsson.

I am continuing my use of Tim Holtz's Abandoned paper stash, since I like the papers so much. These cards were made with just the one sheet of paper. I also used the Simon Says Stamp STAMPtember® Thinking of You Heart, which is perfect for a shaker card, but also for many other techniques. On the card to the left, you can see straight through the card, while that is not the case with the card to the right.

Layers of ink - Heart Shaker Cards Tutorial by Anna-Karin Evaldsson. Die cut the heart windows.

Start by cutting one 8 x 8 in paper into two pieces, and die cut the heart from each one.

Layers of ink - Heart Shaker Cards Tutorial by Anna-Karin Evaldsson. Paper hearts.

Die one heart and sentiment from Shimmery Coal paper, and die cut the sentiment from the heart die cut from the greener side of the paper. I didn't use all of these hearts here, and you can see some of them on my Inky Bird Art Journal page from last week.

Layers of ink - Heart Shaker Cards Tutorial by Anna-Karin Evaldsson. Stamp the sentiment.

Stamp a sentiment from the Buttercup set on acetate.

Layers of ink - Heart Shaker Cards Tutorial by Anna-Karin Evaldsson.

Place it in the window of the greener card, and trim the edges if needed.

Layers of ink - Heart Shaker Cards Tutorial by Anna-Karin Evaldsson. Emboss with Ranger Mint Chip.

Apply embossing ink around the edges and emboss with Ranger's Mint Chip powder. Be very careful when using a heat gun and do not touch the melted powder until it has cooled down completely.

Layers of ink - Heart Shaker Cards Tutorial by Anna-Karin Evaldsson. Fill shaker with sequins, beads and mica.

Use foam strips around the edge of the heart, fill with sequins, micro beads and some mica flakes and adhere a second piece of acetate on top of the adhesive, to close the shaker.

Layers of ink - Heart Shaker Cards Tutorial by Anna-Karin Evaldsson.

Die cut the heart from a folded piece of black cardstock, to create a window.

Layers of ink - Heart Shaker Cards Tutorial by Anna-Karin Evaldsson.

Emboss the edges of the darker paper with Gunmetal powder.

Layers of ink - Heart Shaker Cards Tutorial by Anna-Karin Evaldsson. Die cut the SSS Daisy Stem.

Die cut the SSS Daisy Stem from cardstock and cut off the stem. Apply embossing ink to the flowers and emboss with the Mint Chip powder. Again, be careful and don't touch the melted powder until it is completely cool.

Layers of ink - Heart Shaker Cards Tutorial by Anna-Karin Evaldsson.

I thought they were a little too bright and distressed them with Black Soot paint.

Layers of ink - Heart Shaker Cards Tutorial by Anna-Karin Evaldsson. Emboss the flowers.

Die cut the smaller Peeking Daisy for the second card and emboss with Scarlet Mixed Media powder.

Layers of ink - Heart Shaker Cards Tutorial by Anna-Karin Evaldsson. Fill the shaker with mica flakes.

Make a shaker for the second card too, and fill it with mica flakes. Glue the sentiment heart to the front and mount on Shimmery Coal paper. Adhere the entire panel to the folded cardstock with foam tape.

Layers of ink - Heart Shaker Cards Tutorial by Anna-Karin Evaldsson.

The window shaker effect is pretty cool, and very easy to do. This card was decorated with a sentiment die cut from black and Shimmery Cool paper. Like the other card, the whole panel was adhered to the background with foam tape.

Layers of ink - Heart Shaker Cards Tutorial by Anna-Karin Evaldsson.

I also die cut the daisies from black cardstock, and offset it a little bit to create a shadow effect. 

Layers of ink - Heart Shaker Cards Tutorial by Anna-Karin Evaldsson.

The embossing powder gives a fun, random effect to the edges.

Layers of ink - Heart Shaker Cards Tutorial by Anna-Karin Evaldsson.

I glued the thin edge of the die cut Shimmery Coal heart to the shaker.

Layers of ink - Heart Shaker Cards Tutorial by Anna-Karin Evaldsson.

Here you see the shaker window against a white paper. You can add even more sequins and beads to it, if you want to.

Layers of ink - Heart Shaker Cards Tutorial by Anna-Karin Evaldsson. Embossed flowers.

And another embossed daisy. They would look nice with the red powder too.

Layers of ink - Heart Shaker Cards Tutorial by Anna-Karin Evaldsson.

Adhere two pieces of Design Tape to the background. Die cut the sentiment from Shimmery Coal and black cardstock.

Layers of ink - Heart Shaker Cards Tutorial by Anna-Karin Evaldsson.

I like the shades of red and orange, with a bit of green, on the second card. The background cardstock is very shimmery, which also adds a nice effect.

Layers of ink - Heart Shaker Cards Tutorial by Anna-Karin Evaldsson.

Here I also die cut black flowers to use as mats and to make the flowers more visible against the background.

Layers of ink - Heart Shaker Cards Tutorial by Anna-Karin Evaldsson.

The Tim Holtz Fluted Metal Stars were colored with alcohol ink, and I found them on my desk. I had planned to use them on another project, but never did. You can also use other metal stars, such as Stars Adornments.

It's just one day left of STAMPtember®, September went by way too fast.


Thank you so much for taking the time to visit my blog today!  

Happy crafting!

Anna-Karin

Supplies:

* Please note: the links are affiliate links, for which I receive a small percentage of sales generated by the link, at no extra cost to you.


Wednesday, September 25, 2019

Fantasy Dragon Tag

Hello stampers! STAMPtember® continues at Simon Says Stamp with daily inspiration and surprises. Tim Holtz has created an exclusive set for STAMPtember®, and it is fantastic. I am sharing a project I did with it today.


The stamp set comes with a great star stencil. As all the other exclusive STAMPtember® sets, it's a once off opportunity, so if you want it, you need to order it before it runs out.

Layers of ink - Fantasy Dragon Tag by Anna-Karin Evaldsson. Made with Tim Holtz exclusive STAMPtember set.

The STAMPtember exclusive set is meant to be a Halloween set, but I thought the fun characters had a fantasy / storybook feel to them too. We read a lot of children's books and tell a lot of stories, so the stamp characters immediately made me think of story time. I made a tag about a mischievous dragon who jumped out of a storybook, or was created by a child's fantasy. If you rather want to make a Halloween project, just change the colors and sentiments. 

Layers of ink - Fantasy Dragon Tag by Anna-Karin Evaldsson. Made with Tim Holtz exclusive STAMPtember set.

Here you can see all the stamps and sentiments in the set. Aren't they fun? The exclusive set comes with a gorgeous star spiral stencil, which will also be great for Christmas projects.

Layers of ink - Fantasy Dragon Tag by Anna-Karin Evaldsson. Made with Tim Holtz exclusive STAMPtember set.

Smear texture paste through the stencil with a palette knife.

Layers of ink - Fantasy Dragon Tag by Anna-Karin Evaldsson. Paint the tag.

When the paste is dry, paint with Distress Paints and mist quite heavily with water.

Layers of ink - Fantasy Dragon Tag by Anna-Karin Evaldsson. Made with Tim Holtz exclusive STAMPtember set.

I wanted the stars to be more visible and gave them several coats of white paint, applied through the stencil with a mini round ink blending tool.

Layers of ink - Fantasy Dragon Tag by Anna-Karin Evaldsson. Made with Tim Holtz exclusive STAMPtember set.

Add some silver paint here and there.

Layers of ink - Fantasy Dragon Tag by Anna-Karin Evaldsson. Stamp the dragon.

Stamp the dragon on the smooth back of the Ranger watercolor paper.

Layers of ink - Fantasy Dragon Tag by Anna-Karin Evaldsson. Color the dragon.

Smear green Distress Inks on a craft sheet, mist with water and pick up with a paint brush. Color the dragon.

Layers of ink - Fantasy Dragon Tag by Anna-Karin Evaldsson. Made with Tim Holtz Regions Beyond set.

Die cut the book and the keys from Tim's Regions Beyond set. I love the fine details in this set, and many of the designs work just as well for non-Halloween projects. 

Layers of ink - Fantasy Dragon Tag by Anna-Karin Evaldsson. Made with Tim Holtz exclusive STAMPtember set.

Ink with Distress Inks.

Layers of ink - Fantasy Dragon Tag by Anna-Karin Evaldsson. Made with Tim Holtz exclusive STAMPtember set.

Use an embossing ink and emboss the keys with Gunmetal powder. Be careful not to burn yourself and never touch the powder until it is completely cool.

Layers of ink - Fantasy Dragon Tag by Anna-Karin Evaldsson. Made with Tim Holtz exclusive STAMPtember set.

I glued some cheese cloth under the dragon, as if he or she is floating on a cloud.

Layers of ink - Fantasy Dragon Tag by Anna-Karin Evaldsson. Made with Tim Holtz exclusive STAMPtember set.

Fold a piece of design tape over on itself and use that as a tie for the tag. 

Layers of ink - Fantasy Dragon Tag by Anna-Karin Evaldsson. Made with Tim Holtz exclusive STAMPtember set.

The dragon is using a key to open or close the book, or maybe to turn the pages. I also added a couple of clippings stickers from the Curiosities sticker book.


Thank you so much for taking the time to visit my blog today!  

Happy crafting!

Anna-Karin

Supplies:

* Please note: the links are affiliate links, for which I receive a small percentage of sales generated by the link, at no extra cost to you.