Saturday, August 31, 2019

Daisy Art Journal Page Tutorial

Hello friends! Today, I got a new ergonomic desk chair for my studio, and it is a lovely vintage pink, and more comfortable than my old one. I have a sunshiny art journal page to share with you, made mainly with Simon Says Stamp Exclusive Products.

Layers of ink - Daisy Art Journal Page by Anna-Karin Evaldsson.

In my grandmother's garden some areas were covered with beautiful white and pink little daisies. They were common daisies, or lawn daisies. She thought they were weed. I loved them and couldn't understand how they could ever be weed. I still love them, and made an art journal page about this humble little flower. On our recent visit to the area where my grandmother lived, I saw that they are still growing in the lawn of the house where she used to live. I did a scrapbooking layout about the same theme last year. 

This page was done in my large Dylusions journal.

Layers of ink - Daisy Art Journal Page by Anna-Karin Evaldsson. Textured background.

When I have leftover paint or paste, I often smear it on pages in my art journals, so I had a base to immediately start working on. The background is first a layer of gesso, then texture paste through Tim Holtz's Ornate stencil, and then painting with yellow and gold acrylic paints.

Layers of ink - Daisy Art Journal Page by Anna-Karin Evaldsson. Die cut the daisy flowers.

Die cut Simon Says Stamp Daisy Stem and Peeking Daisy from watercolor paper.

Layers of ink - Daisy Art Journal Page by Anna-Karin Evaldsson. Watercolor the daisies.

I kept my daisies white and yellow, but you can of course also do them in other colors. Smear Distress Inks on a craft sheet, mist with water and pick up with a paint brush.

Layers of ink - Daisy Art Journal Page by Anna-Karin Evaldsson.

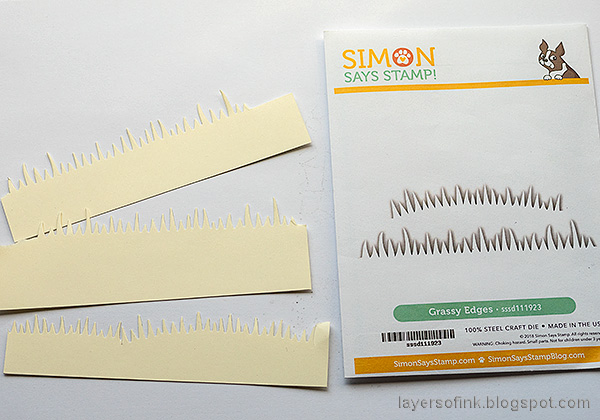
Die cut grass from heavystock paper.

Layers of ink - Daisy Art Journal Page by Anna-Karin Evaldsson. Color the grass with Distress Ink.

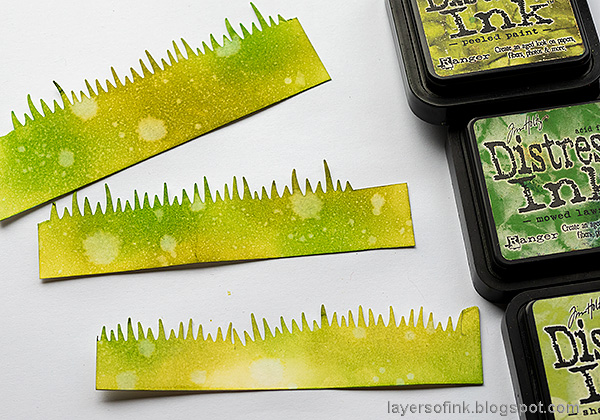
Ink with an ink-blending tool and then mist with water droplets to create texture.

Layers of ink - Daisy Art Journal Page by Anna-Karin Evaldsson.

Adding a bit of metallic shine often gives instant interest to a project, and here I die cut swirls from gold paper, with Tim Holtz's Adorned die set.

Layers of ink - Daisy Art Journal Page by Anna-Karin Evaldsson.

Stamp the background randomly with the script stamp from the Entomology set.

Layers of ink - Daisy Art Journal Page by Anna-Karin Evaldsson.

Die cut the title from yellow glimmery cardstock and the mat from white paper. Write the rest of the sentiment with alphabet stamps.

Layers of ink - Daisy Art Journal Page by Anna-Karin Evaldsson.

Tuck the flowers in among the grass, making them appear to be of different height.

Layers of ink - Daisy Art Journal Page by Anna-Karin Evaldsson.

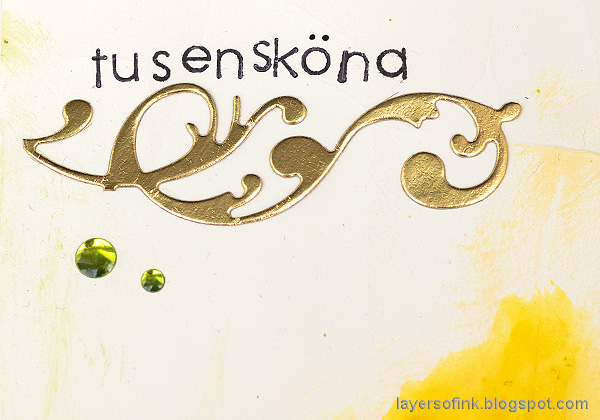
Tusensköna means 'daisy', but literary translate to 'thousand beauty'.

Layers of ink - Daisy Art Journal Page by Anna-Karin Evaldsson.

I don't know if you can see the warm shine from the gold paint. I might even have added some foil to the page earlier.
'Layers of ink - Daisy Art Journal Page by Anna-Karin Evaldsson. Simon Says Stamp Daisy stem.

These sweet flowers would look great on a card, tag, ATC or scrapbooking page too.

Thank you so much for stopping by today! Tomorrow is the start of STAMPtember® at Simon Says Stamp and it will be a whole month filled of stamping fun, and lots of special surprises.


Thank you so much for taking the time to visit my blog today!  

Happy stamping!

Anna-Karin

Supplies:

* Please note: the links are affiliate links, for which I receive a small percentage of sales generated by the link, at no extra cost to you.


Monday, August 26, 2019

Pastel Journal Page Tutorial

Hello stampers! We had a very interesting and fun weekend. The boys and I took the train to a big family gathering, with descendants from my great grandparents, in the small farming community where they lived. 92 people came, and we could have been even more, if the two family branches in the USA had been able to join us. The previous gathering was quite some time ago and it was great to see all old and new faces again. The whole area is also very special to me, since we spent a lot of time there with our grandmother when we grew up. The boys hadn't been there before, so I told them a lot of stories and showed them some of the special places. 

I also have many new photos, and I am planning to do a minialbum soon.


This week at the Simon Says Stamp Monday Challenge Blog we have a 'S is for' theme. Lots of different options! It is the last week for our August guest designer Alison Bomber, and don't miss her wonderful project, with many s-theme ideas.

Layers of ink - Pastel Journal Page Tutorial by Anna-Karin Evaldsson.

I was inspired by a new box of Scribble Sticks, and also used stamps and stencils, on this pastel art journal spread. It was done in Dina Wakley's White Media Journal, which just arrived here. It's a 6x6 in journal, with heavyweight cotton-rag watercolor paper. I love how thick and sturdy the paper is, almost like watercolor chipboard. 

I did a fun watercolor stamping technique here, which happened almost by accident. At first, I stamped with Jet Black ink, but I didn't press hard enough, and the paper is pretty textured, so the impression was terrible, so I decided to start with Distress Ink instead.

Layers of ink - Pastel Journal Page Tutorial by Anna-Karin Evaldsson. Ranger Dina Wakley Scribble Sticks.

There are three sets of Scribble Sticks now (set 1, set 2, and set 3), and I love all of them. They are easy to use and can be used for many techniques.

Layers of ink - Pastel Journal Page Tutorial by Anna-Karin Evaldsson. Stamp in the journal.

Ink up one of Dina's Interesting Faces with Ground Espresso, or another dark brown, Distress Ink. Stamp on the page, and don't worry about how awful it looks.

Layers of ink - Pastel Journal Page Tutorial by Anna-Karin Evaldsson. Watercolor the woman.

Use a paint brush and water to start blurring out the stamped lines. Since Distress Ink reacts with water, the stamping with turn into watercolor. Don't overdo it, you can always add more water later. I used the Scribble Sticks 3 set, which consists of pastel shades and metallic shades. Pick the pigment up with a paint brush from the tip of the crayon and start watercoloring.

Layers of ink - Pastel Journal Page Tutorial by Anna-Karin Evaldsson.

Color directly on the paper for the background and top, and dissolve the crayon with water. Don't worry if it still doesn't look particularly nice, it will change later.

Layers of ink - Pastel Journal Page Tutorial by Anna-Karin Evaldsson. Watercolor the background and add shadows.

Start adding some shadows to the face, such as under her chin. Add darker shades of color at the top and bottom of the background, using crayons from Scribble Sticks 1 and Scribble Sticks 2. I also added some metallic shades here and there, such as in her hair and in the shadow areas.

Layers of ink - Pastel Journal Page Tutorial by Anna-Karin Evaldsson.

When everything is dry, add lines with a black pen. Don't worry about getting it perfect, we are aiming for a sketchy and lose look. I later added some white to the right eye, since it was too dark. 

Layers of ink - Pastel Journal Page Tutorial by Anna-Karin Evaldsson.

I had fun, so I decided to turn the page into a double spread, stamping and coloring a bird with the same technique. 

Layers of ink - Pastel Journal Page Tutorial by Anna-Karin Evaldsson. Stamp texture.

Add some more scribbly lines with the pen and stamp here and there with texture background stamps. These are from Tim Holtz's Tiny Textures set.

Layers of ink - Pastel Journal Page Tutorial by Anna-Karin Evaldsson.

Finally, I sponged white paint through the Gradient Dot stencil here and there, for extra texture.

Layers of ink - Pastel Journal Page Tutorial by Anna-Karin Evaldsson.

I used a mix of stamps, stickers and the new SSS Sentiment Strips 4 for my sentiments.

Layers of ink - Pastel Journal Page Tutorial by Anna-Karin Evaldsson.

Use a white gel pen to fix mistakes, here you can see that I added some light to the right eye.

Layers of ink - Pastel Journal Page Tutorial by Anna-Karin Evaldsson. Stamp pattern to the clothing.

Use a background stamp to add pattern to clothing. You can see some of the shine from the metallic crayons in the upper left corner.

Layers of ink - Pastel Journal Page Tutorial by Anna-Karin Evaldsson. In Dina Wakley White Journal.

The background scene continues into the second page, making it look like the woman and the bird are looking at each other across the landscape.

Layers of ink - Pastel Journal Page Tutorial by Anna-Karin Evaldsson.

Dina's Scribbly Birds are some of my favorite stamps. 

Layers of ink - Pastel Journal Page Tutorial by Anna-Karin Evaldsson.

Here's another look at the metallic effect. It's a little hard to photograph, but adds an interesting touch to the otherwise pastel page.

I hope you will join us this week in our S Is For challenge. As always, you have a chance to win a $50 gift voucher to do some fun shopping at Simon Says Stamp. You have until next Monday 8am Ohio time. 1pm UK time, 2 pm CET to join in.


Don't forget to follow Simon Says Stamp on Instagram, they post great stuff daily. 


Do you use Instagram? If so please add #sssmchallenge so we can see your entries there too.


Thank you so much for taking the time to visit my blog today!  

Happy crafting!

Anna-Karin

Supplies:

* Please note: the links are affiliate links, for which I receive a small percentage of sales generated by the link, at no extra cost to you.


Monday, August 19, 2019

Vintage Flower ATCs

Hello friends! I hope your weekend was a good one. I was busy organising our new place, and things are now starting to look better, although it will take awhile before I get used to where everything is placed and won't have to look for things. Our frying pan is mysteriously missing and must have been thrown away accidentally. I also can't find a bunch of background stamps and my craft hammer, but I think they will turn up eventually.


This week at the Simon Says Stamp Monday Challenge Blog we have an Artist Trading Card challenge. ATCs are 2.5 x 3.5 inches, and if you have never tried out this fun size, I hope you will.

Don't miss the gorgeous ATC by our August guest designer Alison Bomber

Layers of ink - Vintage Flower Artist Trading Cards Tutorial by Anna-Karin Evaldsson.

I love working on the small space of an ATC and I should be doing so more often. This week, I made two vintage flower ATCs with soft colors and lots of texture. They are very easy to make, much easier that what it might look like. 

Layers of ink - Vintage Flower Artist Trading Cards Tutorial by Anna-Karin Evaldsson. Die cut Tim Holtz Mixed Media 5.

Start by cutting four ATCs (2.5 x 3.5 in) from Heavystock paper. Die cut flower designs from two of the cards, using Tim Holtz's Mixed Media 5 set.

Layers of ink - Vintage Flower Artist Trading Cards Tutorial by Anna-Karin Evaldsson. Apply gesso.

Glue the die cut cards on top of the solid ones with Matte Medium. When dry, give them a coating of gesso.

Layers of ink - Vintage Flower Artist Trading Cards Tutorial by Anna-Karin Evaldsson. Paint with acrylic paint.

When the gesso is dry, paint the cards with watered down Distress Paint. Start with Antique Linen, and drop in darker colors. Mist more water on the cards if you want the colors to blend more. The darker paint will collect in the recessed areas.

Layers of ink - Vintage Flower Artist Trading Cards Tutorial by Anna-Karin Evaldsson. Color with Prismacolor pencils.

I had my Prismacolor pencils on my desk, after having worked on another project, and got the idea of coloring the flowers with pencils. It worked really well and gave a soft look. This morning, I finally found the box in which I had placed all my pencil sharpeners.

Layers of ink - Vintage Flower Artist Trading Cards Tutorial by Anna-Karin Evaldsson.

Stamp the cards randomly with the script stamp from Tim's Entomology set.

Layers of ink - Vintage Flower Artist Trading Cards Tutorial by Anna-Karin Evaldsson.

Dry brush some dark brown paint around the edges and here and there on the flowers.

Layers of ink - Vintage Flower Artist Trading Cards Tutorial by Anna-Karin Evaldsson. Rose card.

I used a black pen to draw a rough border and added some Clippings Stickers as sentiments.

Layers of ink - Vintage Flower Artist Trading Cards Tutorial by Anna-Karin Evaldsson.

Here's a closer look at the texture. The roses almost looks embossed, but in fact it is the other way around.

Layers of ink - Vintage Flower Artist Trading Cards Tutorial by Anna-Karin Evaldsson.

Don't forget to write your name and the date you made the card on the back, even if you are not giving it away, it is a good practice and it is fun to look at cards and see when they were made. 

Layers of ink - Vintage Flower Artist Trading Cards Tutorial by Anna-Karin Evaldsson.

You can also cut sentiments from an old book.

Layers of ink - Vintage Flower Artist Trading Cards Tutorial by Anna-Karin Evaldsson.

It almost looks like I used gold on the cards, but I did not. However, if you want to add some metallic paint, that would look great too. I wanted to have added foil, but I couldn't find my foil.

I hope you will join us this week in our Artist Trading Card challenge. As always, you have a chance to win a $50 gift voucher to do some fun shopping at Simon Says Stamp. You have until next Monday 8am Ohio time. 1pm UK time, 2 pm CET to join in.


Don't forget to follow Simon Says Stamp on Instagram, they post great stuff daily. 


Do you use Instagram? If so please add #sssmchallenge so we can see your entries there too.


Thank you so much for taking the time to visit my blog today!  

Happy crafting!

Anna-Karin

Supplies:

* Please note: the links are affiliate links, for which I receive a small percentage of sales generated by the link, at no extra cost to you.