Sunday, December 31, 2023

2024 Art Journal Page

Hello friends! It is the last day of the year and I have a New Year's art journal page to share. I like to make these pages at the end of a year or start of a new year. 

Please note: this post has affiliate links, for which I receive a small percentage of sales generated by the link, at no extra cost to you.


Layers of ink - New Year Art Journal Page Tutorial by Anna-Karin Evaldsson.

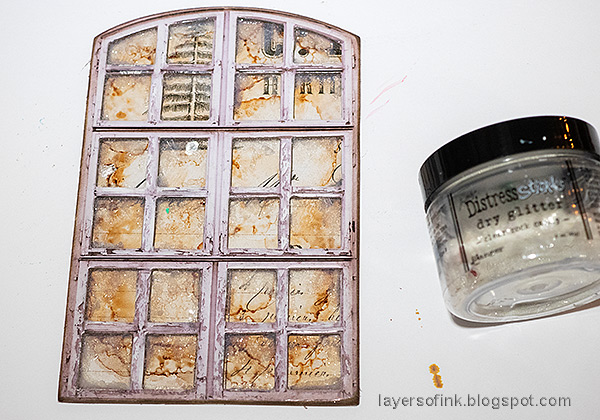
To welcome the new year, I made this page, with lots of glitter and shine. I used some of my favorite shades of blue and turquoise for the background, stamped and stenciled circles and stamped sentiments. The page was done in a Dylusions Journal.

Layers of ink - New Year Art Journal Page Tutorial by Anna-Karin Evaldsson. Coat with gesso and add tape.

Apply gesso with a palette knife and let dry. Make a border with masking tape.

Layers of ink - New Year Art Journal Page Tutorial by Anna-Karin Evaldsson. Paint with Distress Paint.

Paint the background using a palette knife. I started with the lightest shade. Carefully remove the tape.

Layers of ink - New Year Art Journal Page Tutorial by Anna-Karin Evaldsson. Add white paint through Simon Says Stamp Mix and Match Circles stencil.

When the paint is dry, place Simon Says Stamp Mix and Match Circles stencil on the background. Use white Distress Paint together with a mini-round ink applicator. I wanted partly transparent circles, if you want opaque circles, use a thicker type of acrylic paint instead.

Layers of ink - New Year Art Journal Page Tutorial by Anna-Karin Evaldsson. Add dots with a white pen.

Add a dotted border around some of the circles with a white paint pen.

Layers of ink - New Year Art Journal Page Tutorial by Anna-Karin Evaldsson. Stamp circles with Simon Says Stamp Mix and Match Circles stamp set.

Silver and white-emboss circles and shapes from Simon Says Stamp Mix and Match Circles stamp set on the background. Most of mine were silver embossed.

Layers of ink - New Year Art Journal Page Tutorial by Anna-Karin Evaldsson. Die cut numbers with Tim Holtz Alphanumeric Emporium dies.

The year was die cut three times using Tim Holtz Alphanumeric Emporium die set. I die cut the year once from Simon Says Stamp Holographic cardstock and twice from Luxe glitter cardstock

Layers of ink - New Year Art Journal Page Tutorial by Anna-Karin Evaldsson. Stamp sentiments on labels.

Here are the very glittery numbers. The ticket comes from Simon Says Stamp Mixed Labels and was stamped with Cadette Pawsitively Saturated ink. I also stamped a dot border and a dot circle stamp with black ink.

Layers of ink - New Year Art Journal Page Tutorial by Anna-Karin Evaldsson.

This sentiment comes from Simon Says Stamp Document It and fit well with a New Year's theme.

Layers of ink - New Year Art Journal Page Tutorial by Anna-Karin Evaldsson.

The ticket was also stamped with Cadette ink, but without reinking after already having stamped it once, giving a more distressed look.

Layers of ink - New Year Art Journal Page Tutorial by Anna-Karin Evaldsson. Silver and white embossing.

The stars were die cut with Simon Says Stamp Stars die and look almost dimensional because of the Luxe glitter paper

Layers of ink - New Year Art Journal Page Tutorial by Anna-Karin Evaldsson.

The large silver burst made me think of fire works.

Layers of ink - New Year Art Journal Page Tutorial by Anna-Karin Evaldsson.

The background has a lot of layers with the paint, stenciled circles and embossing.


Happy New Year! I hope it will be filled with fun and a lot of stamping and crafting!


Anna-Karin

Supplies:

* Please note: the links are affiliate links, for which I receive a small percentage of sales generated by the link, at no extra cost to you.


Saturday, December 23, 2023

Christmas Tree with Baubles

Hello stampers! I really like to make Christmas tags and have a pretty big collection by now. Here's a new one.

Please note: this post has affiliate links, for which I receive a small percentage of sales generated by the link, at no extra cost to you.

Layers of ink - Christmas Tree with Baubles Tag Tutorial by Anna-Karin Evaldsson.

Making Christmas tags sometimes reminds me of Tim Holtz 12 Tags of Christmas series and how I enjoyed to make all those tags. This tag was made with the Simon Says Stamp December card kit, Making Spirits Bright. The kit is sold out by you can still get the individual products.

Layers of ink - Christmas Tree with Baubles Tag Tutorial by Anna-Karin Evaldsson. Ink with Distress Ink.

Start out by smearing Distress Ink on a non-stick craft sheet, mist with water and press a tag into the ink. Let dry and repeat. I wanted a neutral background, but with some texture.

Layers of ink - Christmas Tree with Baubles Tag Tutorial by Anna-Karin Evaldsson. Stamp with Simon Says Stamp Making Spirits Bright.

Ink the gorgeous tree from Simon Says Stamp Making Spirits Bright with three shades of green Distress Ink. Start with the lighter ink at the top. Mist with water about 4-5 times before stamping.

Layers of ink - Christmas Tree with Baubles Tag Tutorial by Anna-Karin Evaldsson. Stamp with Simon Says Stamp Old Letter.

Stamp the sentiment from Making Spirits Bright twice under the tree and draw around it with a brown pencil to create a stem/pot for the tree. Stamp the background here and there with Simon Says Stamp Old Letter. Gold emboss stars from Making Spirits Bright.

Layers of ink - Christmas Tree with Baubles Tag Tutorial by Anna-Karin Evaldsson. Add baubles.

Use pearls from Craft Consortium Little Robin Redbreast as baubles on the tree.

Layers of ink - Christmas Tree with Baubles Tag Tutorial by Anna-Karin Evaldsson. Ink with Ground Espresso.

Ink the edges with Ground Espresso.

Layers of ink - Christmas Tree with Baubles Tag Tutorial by Anna-Karin Evaldsson.

Dye Faux Silk Ribbon with the three shades of green Distress Ink that were used on the tree.

Layers of ink - Christmas Tree with Baubles Tag Tutorial by Anna-Karin Evaldsson. Gold emboss stars.

The gold embossed stars adds to the festive look.

Christmas Tree With Baubles- Layers of ink

The sentiment also comes from Making Spirits Bright and was stamped on one of the Simple Stories Vintage Dear Santa patterned papers and cut into a strip. Cut a larger strip from another piece of green paper. Add a strip of gold metal kraft stock paper underneath. I used Design Tape Trims to create a wall behind the stem of the tree, so that the tree doesn't look like it is floating.

Layers of ink - Christmas Tree with Baubles Tag Tutorial by Anna-Karin Evaldsson.

Half-pearls are great as baubles and these were such pretty colors.

Layers of ink - Christmas Tree with Baubles Tag Tutorial by Anna-Karin Evaldsson.

I hope you enjoyed this last Christmas tag of the year. 

I also want to wish everyone a very Merry Christmas!!


Thank you for visiting my blog! 

Happy crafting!

Anna-Karin

Supplies:

* Please note: the links are affiliate links, for which I receive a small percentage of sales generated by the link, at no extra cost to you.


Friday, December 22, 2023

Candle in a window

Hi friends! Today I am sharing a project with a candle standing in a frosty window. 

Please note: this post has affiliate links, for which I receive a small percentage of sales generated by the link, at no extra cost to you.

Layers of ink - Candle in a window by Anna-Karin Evaldsson.

When I saw Tim Holtz Candleshop die set I knew I wanted to create a candles inspired by old-times brass candle-holders. There are three candles in the die set and I used the taller of the three. The base is Tim's Etcetera board and therefore very sturdy. I used a combination of pink, gold metal and neutral shades. 

Layers of ink - Candle in a window by Anna-Karin Evaldsson. Ink with Distress Ink.

I smeared various shades of red and pink Distress Ink on a non-stick craft sheet, misted with water and pressed watercolor paper into the ink. Let dry and repeat until you are happy with the colors.

Layers of ink - Candle in a window by Anna-Karin Evaldsson. Die cut Tim Holtz Sizzix candles

Die cut the candle from the pink papers and make similar papers in yellow and orange for the tip. 

Layers of ink - Candle in a window by Anna-Karin Evaldsson. Die cut Tim Holtz Candle Shop.

Die cut the stand from two shades of gold metallic kraft stock, Simon Says Stamp yellow glimmery cardstock and gold deco sheets. 

Layers of ink - Candle in a window by Anna-Karin Evaldsson.

Sand the metallic pieces slightly and ink with brown ink. Ink the edges of the candle pieces. Assemble. 

Layers of ink - Candle in a window by Anna-Karin Evaldsson. Color the window with alcohol ink.

For the window, I colored the back of Simon Says Stamp Acetate sheet with alcohol ink. 

Layers of ink - Candle in a window by Anna-Karin Evaldsson. Tim Holtz baseboards window.

Cut the acetate sheet and a piece of Tim Holtz Christmas Backdrops paper into the shape of the window. The window comes from Tim's Christmas Baseboard and Tranparencies set.

Layers of ink - Candle in a window by Anna-Karin Evaldsson. Add Rock Candy Glitter and Mica Flakes.

Glue together. Add Glossy Accents around the edges of the windows to created the look of frost. Sprinkle with Rock Candy glitter. There are some pieces of mica flakes in this jar of Rock Candy since I use them together often. If you want to, you can add Mica Flakes to the window too. 

Layers of ink - Candle in a window by Anna-Karin Evaldsson.

Cover a piece of Etcetera board (5.25 x 7.25) with Christmas Backdrops paper using matte medium. Place under a heavy book until dry. Sand the edges.

Layers of ink - Candle in a window by Anna-Karin Evaldsson. Die cut Tim Holtz Festive Gatherings.

I die cut branches from both shades of gold metallic paper, using Tim's Festive Gatherings die. Add pearls as berries.

Layers of ink - Candle in a window by Anna-Karin Evaldsson.

I really like the design of the Candleshop candles and candles aren't only for Christmas projects. 

Layers of ink - Candle in a window by Anna-Karin Evaldsson.

This shape of candle holder is very nostalgic to me, especially the brass version. 

Layers of ink - Candle in a window by Anna-Karin Evaldsson. Frosted windows.

The combination of Glossy Accents and Rock Candy glitter makes for a fun frosty effect, especially together with the small pieces of mica flakes. 

Layers of ink - Candle in a window by Anna-Karin Evaldsson.

The sentiment is from Tim's Christmas Baseboards and Transparencies. I also used a ribbon and a piece of lace, to form a table cloth for the candle to stand on.


Thank you for visiting my blog! 

Happy crafting!

Anna-Karin

Supplies:

* Please note: the links are affiliate links, for which I receive a small percentage of sales generated by the link, at no extra cost to you.


Thursday, December 21, 2023

Sparkly Winter Forest Mixed Media Project

Hi friends! Today I am happy to have a tutorial on the Simon Says Stamp store blog. I created a magical winter wonderland.

Layers of ink - Sparkly Winter Forest Mixed Media Project by Anna-Karin Evaldsson.

Here is a sneak peek of the project. Creating snow is one of my favorite things to do and for this project, the snow is very sparkly. To see all the steps and details, you'll have to head over to the Simon Says Stamp Store Blog. 

Thank you for visiting my blog! 

Happy crafting!

Anna-Karin


Tuesday, December 19, 2023

Vintage Christmas Gift Tags

Hello crafters! Today I am sharing some vintage gift tags, which are fun and quick to make, and great for using up bits and pieces.

Please note: this post has affiliate links, for which I receive a small percentage of sales generated by the link, at no extra cost to you.

Layers of ink - Vintage Christmas Gift Tags Tutorial by Anna-Karin Evaldsson.

I used Tim Holtz idea-ology ephemera, paper and stickers for these and had fun combining the various images, words and patterns. The Christmas Layer Frames gave me the idea. The back of the tags is covered with double-sided backdrops paper.

Layers of ink - Vintage Christmas Gift Tags Tutorial by Anna-Karin Evaldsson.

Start by picking a bunch of frames, paper dolls, ephemera, labels, photos and Christmas Backdrops papers for the back. 

Layers of ink - Vintage Christmas Gift Tags Tutorial by Anna-Karin Evaldsson.

Stamp sentiment using Simon Says Stamp Season's Greetings. Add stickers from Tim Holtz Christmas Sticker Book and ink the edges of the tags.

Layers of ink - Vintage Christmas Gift Tags Tutorial by Anna-Karin Evaldsson. Punch holes.

Punch holes with a Crop-a-Dile and tie string through the holes. 

Layers of ink - Vintage Christmas Gift Tags Tutorial by Anna-Karin Evaldsson. Add sentiment labels.

This tag is made from the largest of the three sizes Christmas Layer Frames. The children were adhered with foam tape. The Poinsettia image comes from the Christmas Layers and Paper Dolls set and the label, star and green sentiment are from the Christmas Sticker Book.

Layers of ink - Vintage Christmas Gift Tags Tutorial by Anna-Karin Evaldsson. Tim Holtz Christmas Ephemera idea-ology 2023.

I am very fond of small sentiment stamps and one of the reasons is that they fit in small spaces, such as these labels.

Layers of ink - Vintage Christmas Gift Tags Tutorial by Anna-Karin Evaldsson.

The next tag has a Christmas Ephemera image behind the frame. The poinsettia was adhered with Simon Says Stamp Pawsitively Perfect Foam Tape. I like the loose threads at the one corner of all the Christmas Layer Frames.

Layers of ink - Vintage Christmas Gift Tags Tutorial by Anna-Karin Evaldsson.

I sanded some of the edges too, such as the poinsettia here.

Layers of ink - Vintage Christmas Gift Tags Tutorial by Anna-Karin Evaldsson. Tim Holtz idea-ology Christmas frames.

The next tag features an old photo of a girl and a snowman. I paired it up with an old calendar ephemera piece. The back is covered with the same poinsettia pattern that you see on the right-hand side of the tag.

Layers of ink - Vintage Christmas Gift Tags Tutorial by Anna-Karin Evaldsson.

The frames have such interesting combination of patterns, text, music notes and more.

Layers of ink - Vintage Christmas Gift Tags Tutorial by Anna-Karin Evaldsson.

The following tag is square and features a large brass bell. The bell was shaped a little and adhered with a foam strip down the center. 

Layers of ink - Vintage Christmas Gift Tags Tutorial by Anna-Karin Evaldsson.

The holly was also adhered with a foam strip. My mom has a similar bell from her grandmother which always hangs in the hallway during Christmas.

Layers of ink - Vintage Christmas Gift Tags Tutorial by Anna-Karin Evaldsson. Tim Holtz idea-ology Christmas sticker book 2023.

This tag has another vintage photo in the frame, combined with a sticker label and two different sentiment tags and labels.

Layers of ink - Vintage Christmas Gift Tags Tutorial by Anna-Karin Evaldsson. Tim Holtz Christmas Baseboards.

Another square tag. The children are adhered with foam tape and there is a music ephemera piece in the frame and more music paper at the back of the tag.

Layers of ink - Vintage Christmas Gift Tags Tutorial by Anna-Karin Evaldsson.

Here are the backs of the tag. Some of them have space for a message at the back. The paper comes from the Christmas Backdrops pack.


Thank you for visiting my blog! 

Happy crafting!

Anna-Karin

Supplies:

* Please note: the links are affiliate links, for which I receive a small percentage of sales generated by the link, at no extra cost to you.