Friday, October 30, 2020

Crackling Campfire Tag Tutorial

Hi everyone! Today we had mist the entire day, which gave a spooky and eerie feeling. During my walk, I couldn't see far ahead at all. I have a vibrant orange tag to share with you today.

Layers of ink - Crackling Campfire Tag Tutorial by Anna-Karin Evaldsson.

I just got my order containing the new Distress color, Crackling Campfire (international mail is so slow at the moment). We have a saying here which goes: 'the one who waits for something good, never waits too long'. I am not sure I always agree with that though. When I got Speckled Egg some months ago, I made a tag using most of the products, so I thought I would do the same with Crackling Campfire. You can find the Speckled Egg Vintage Tag Tutorial here.

Layers of ink - Crackling Campfire Tag Tutorial by Anna-Karin Evaldsson.

Start by inking a tag with Crackling Campfire and Pumice Stone Distress Ink.

Layers of ink - Crackling Campfire Tag Tutorial by Anna-Karin Evaldsson.

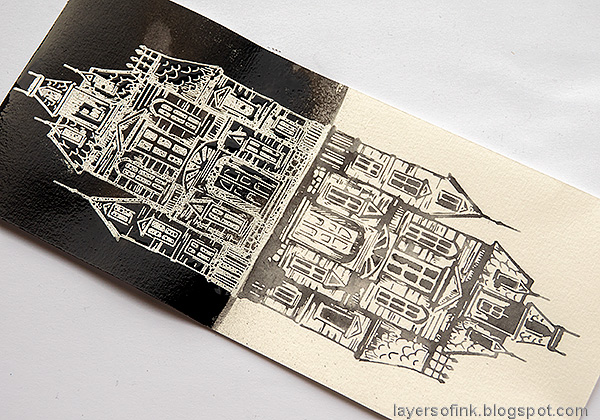
Stamp with two stamps from Tim Holtz Fragments, with Crackling Campfire Distress Oxide ink. Note that I placed the wrong ink pad on the photo, I just realised it. It is supposed to be the Oxide ink.

Layers of ink - Crackling Campfire Tag Tutorial by Anna-Karin Evaldsson.

I actually didn't love the look of the tag and misted it with water and then added some more Distress Ink, including a little brown. I wanted more texture.

Layers of ink - Crackling Campfire Tag Tutorial by Anna-Karin Evaldsson.

And then a little Oxide Ink, smeared on my craft sheet and the tag was pressed lightly into the ink.

Layers of ink - Crackling Campfire Tag Tutorial by Anna-Karin Evaldsson. Simon Says Stamp Old Letter background stamp.

When dry, I stamped it with the SSS Old Letter background stamp. I love the look of script in the background of tag and the texture it adds.

Layers of ink - Crackling Campfire Tag Tutorial by Anna-Karin Evaldsson.


Layers of ink - Crackling Campfire Tag Tutorial by Anna-Karin Evaldsson.

Emboss a Theories Quote Chip with Crackling Campfire Embossing Glaze. I like that the glaze adds shine, color and dimension, but doesn't cover up the words.

Layers of ink - Crackling Campfire Tag Tutorial by Anna-Karin Evaldsson. Tim Holtz Specimen stamp set.


Layers of ink - Crackling Campfire Tag Tutorial by Anna-Karin Evaldsson.

Color it on the back with alcohol ink and cut out.

Layers of ink - Crackling Campfire Tag Tutorial by Anna-Karin Evaldsson.

The Modeling Film can be heated and then shaped. It will keep its shape perfectly. Carefully heat one side at a time. Be careful not to burn yourself. Shape the wing and then do the second side. If you are not happy with the look, reheat and shape it again.

Layers of ink - Crackling Campfire Tag Tutorial by Anna-Karin Evaldsson.

For even more bling, I smeared some of the glitter to the back of the butterfly.

Layers of ink - Crackling Campfire Tag Tutorial by Anna-Karin Evaldsson.

The mummy cloth was dyed with Crackling Campfire Distress Spray Stain and I used the Distress Paint to add color to the Thought Token.

Layers of ink - Crackling Campfire Tag Tutorial by Anna-Karin Evaldsson.

Adhere the butterfly with a staple and glue the other items to the tag. The sequins are Aztec Gold by SSS.

Layers of ink - Crackling Campfire Tag Tutorial by Anna-Karin Evaldsson.

Layer the mummy cloth under the chip, also adding a small piece of Halloween Trim Tape.

Layers of ink - Crackling Campfire Tag Tutorial by Anna-Karin Evaldsson.

Even though I inked over the Fragments stamping, traces of it can still be seen, such as here above the token. This is one of my favorite details of the tag, those traces of the stamping.

Layers of ink - Crackling Campfire Tag Tutorial by Anna-Karin Evaldsson.

There are glitter chunks and gold stars in this jar of Solar Flare Stickles, which gives lots of shine to the tag.

Layers of ink - Crackling Campfire Tag Tutorial by Anna-Karin Evaldsson.

Here you can see the colors of the butterfly better, with the glitter shining through.

Layers of ink - Crackling Campfire Tag Tutorial by Anna-Karin Evaldsson.

I hope you enjoyed this tutorial. Today I did a mini ghost trail in the forest for my youngest, with the bigger trail waiting tomorrow. A friendly ghost has hidden sweets here and there in the forest. In fact, the friendly ghost didn't even remember where all the sweets were, so it took some time to find the last golden chocolate coin. The mist made it extra fun today and all the spider webs were white. We pretended that they were trails from the ghost.


Thank you so much for taking the time to visit my blog today!  

Happy crafting!

Anna-Karin

Supplies:

* Please note: the links are affiliate links, for which I receive a small percentage of sales generated by the link, at no extra cost to you.

Thursday, October 29, 2020

Halloween Shadow Box

Hi crafters! I have a Halloween project to share today, a fun shadow box, which would also be a fun kids craft project for Halloween.

Layers of ink - Halloween Shadow Box Tutorial by Anna-Karin Evaldsson.

We are not going to go trick and treating this year, because of Covid. Instead, I am going to do a little ghost trail in the forest for the boys, where a friendly ghost has hidden sweets which they will have to go and look for. It will be a friendlier ghost than this one, since little brother will be scared otherwise, and I promised him that there will be no trolls. I used mainly ephemera and embellishments by Tim Holtz for this project.

Layers of ink - Halloween Shadow Box Tutorial by Anna-Karin Evaldsson.

I started out with a piece of cardboard from a parcel. It already had a natural shelf. Cut a corresponding piece of Tim Holtz Departed patterned paper.

Layers of ink - Halloween Shadow Box Tutorial by Anna-Karin Evaldsson. Stamp with Simon Says Stamp Crackle Background.

Stamp the paper here and there with the SSS Crackle Background stamp.

Layers of ink - Halloween Shadow Box Tutorial by Anna-Karin Evaldsson.

I added Halloween Trim Tape along the shelf part.

Layers of ink - Halloween Shadow Box Tutorial by Anna-Karin Evaldsson.

And then used two other pieces to create the sides of the box, also adding design tape. If you don't have a similar piece of packaging, you can score and fold your own shelf and sides.

Layers of ink - Halloween Shadow Box Tutorial by Anna-Karin Evaldsson. Apply Ranger's Stickles.

Smear Asteroid Stickles here and there on the background. These Stickles jars have larger pieces inside and I really like the effect that you get. And no glitter mess.

Layers of ink - Halloween Shadow Box Tutorial by Anna-Karin Evaldsson.

Sand and ink the edges of the ephemera from the Halloween Layers set. Glue the ephemera and other pieces inside the box.

Layers of ink - Halloween Shadow Box Tutorial by Anna-Karin Evaldsson. Tim Holtz idea-ology ephemera.

The number also comes from Tim's Halloween Layers and the sentiment was stamped with the Halloween Tiny Text stamp set. I love the Tiny Text sets, with all the great sentiments. Small sentiments are my favorites.

Layers of ink - Halloween Shadow Box Tutorial by Anna-Karin Evaldsson.

Pieces of mummy cloth were dyed with Hickory Smoke and Pumice Stone and glued to the base. Glue pumpkins and skulls and add some glitter to them too. I also used some Dark Matter Stickles.

Layers of ink - Halloween Shadow Box Tutorial by Anna-Karin Evaldsson.

I added a piece of foam under the curtains, for stability, and glued them to the edges of the shadow box. The sentiments were stamped with Halloween Tiny Text on left-over strips from my Dr. Jekyll and Mr. Hyde project.

Layers of ink - Halloween Shadow Box Tutorial by Anna-Karin Evaldsson.

More spider-web. I used a red version of these curtains on a Halloween shadow box project from last year, you can find that tutorial here.

Layers of ink - Halloween Shadow Box Tutorial by Anna-Karin Evaldsson.

I also added a few Clippings Stickers from the Curiosities book. The paper with the crackle stamping looks like an old wall paper.

Layers of ink - Halloween Shadow Box Tutorial by Anna-Karin Evaldsson.

Design Tape is perfect for quickly covering up edges.

Layers of ink - Halloween Shadow Box Tutorial by Anna-Karin Evaldsson.

My youngest have counted all the pumpkins from all our Halloween decorations. It is quite a many!

Layers of ink - Halloween Shadow Box Tutorial by Anna-Karin Evaldsson.

I hope you enjoyed this post and that you will have a fun Halloween, even though it might not be as usual.


Thank you so much for taking the time to visit my blog today!  

Happy crafting!

Anna-Karin

Supplies:

* Please note: the links are affiliate links, for which I receive a small percentage of sales generated by the link, at no extra cost to you.

Monday, October 26, 2020

Dr. Jekyll and Mr. Hyde

Hello crafters! I hope you had a good weekend and that you are all well. Today I have a layered project to share, made with left-overs and lots of bits and pieces.


Our theme at the Simon Says Stamp Monday Challenge Blog this week is Movie InspirationDon't miss the last project by our October guest designer Alison Bomber and her blog Words and Pictures.

Layers of ink - Dr. Jekyll and Mr. Hyde Tutorial by Anna-Karin Evaldsson.

I was actually inspired by a book, but it is a book that has been made into a movie quite a few times, namely Dr. Jekyll and Mr. Hyde by Robert Louis Stevenson. Yesterday, I completed an assignment for a story book design for this book, which meant that not only was it on my mind, but I also had a lot of bits and pieces, from printing, testing typefaces, color samples, and pieces I did for my mood board. I had such fun layering some of them together on this piece. Working with bits and pieces and left-over papers is one of my favorite things to do. I also used Tim Holtz ephemera and stamps.

The background is a piece of cardboard sized 8.2 x 10.3 in.

Layers of ink - Dr. Jekyll and Mr. Hyde Tutorial by Anna-Karin Evaldsson.

There are no step photos for this project, since most of the items were already done. Duality is a strong theme in the story and one of the dual things has to do with houses. So here I white embossed the house from Tim Holtz Sketch Manor on one side. And watercolor stamped it with Black Soot Distress Ink, on the other side. It is not an exact mirror image, but I didn't care about that. The white image was first inked with Black Soot, but I wanted a stronger black and misted it with Black Soot Distress Stain Spray instead.

Layers of ink - Dr. Jekyll and Mr. Hyde Tutorial by Anna-Karin Evaldsson.

I used some of the sentiments from Tim's Tiny Text Halloween and stamped them on left-over strips from my book project. The black splatters were done with a Scribble Stick.

Layers of ink - Dr. Jekyll and Mr. Hyde Tutorial by Anna-Karin Evaldsson.

I used some vellum in my project, which meant that there were pieces of vellum that I had tested printing on. There is a Halloween Baseboard piece above and below the vellum, creating dimension. The orange shade in the background is Rusty Hinge.

Layers of ink - Dr. Jekyll and Mr. Hyde Tutorial by Anna-Karin Evaldsson.

I also used Clippings Stickers from the Curiosities sticker book, mini staples and SSS gold sequins. 

Layers of ink - Dr. Jekyll and Mr. Hyde Tutorial by Anna-Karin Evaldsson.

The dual house effect is pretty cool. Since Mr. Hyde is actually not uninvited, but repeatedly invited by Dr. Jekyll (when he takes the potion repeatedly), I inked out the 'un' in the sentiment strip from Halloween Baseboards.

Layers of ink - Dr. Jekyll and Mr. Hyde Tutorial by Anna-Karin Evaldsson.

Lots of shades of orange here.

Layers of ink - Dr. Jekyll and Mr. Hyde Tutorial by Anna-Karin Evaldsson.

More printed vellum and a whole printed watercolor page showing through in the background. The orange title was printed on glossy paper.

Layers of ink - Dr. Jekyll and Mr. Hyde Tutorial by Anna-Karin Evaldsson.

I took care to let some of the words show.

Layers of ink - Dr. Jekyll and Mr. Hyde Tutorial by Anna-Karin Evaldsson.

The old photo also comes from Tim's Curiosities book

I hope you will join us this week in our Movie Inspiration challenge. You have a chance to win a $25 gift voucher to do some fun shopping at Simon Says Stamp. You have until next Monday 8am Ohio time. 1pm UK time, 2 pm CET to join in.

Don't forget to follow Simon Says Stamp on Instagram, they post great stuff daily. 


Do you use Instagram? If so please add #sssmchallenge so we can see your entries there too.


Thank you so much for stopping by here today! 

Happy crafting!

Anna-Karin

Supplies:

* Please note: the links are affiliate links, for which I receive a small percentage of sales generated by the link, at no extra cost to you.