
Hello friends! Today I have a quick and easy notebook/sketchbook tutorial to share with you. I made three sketchbooks with a nature theme and a vintage look, but you can make these in any theme or colors you can think of.

I was looking through Tim Holtz Field Notes Ephemera pack and came up on these three miniature educational posters. They are so pretty that you don't really want to cover them up too much, which makes them perfect for journal covers. I always take a sketchbook with me when I am out in nature and these are small enough and filled with my favorite paper.

The base for the books is mat board. I love mat board, it is sturdy, but also easy to cut, and it takes ink and paint beautifully. I used Little Sizzles Matboard by Sizzix. Cut the covers into about 4.3 x 6 in (11x15 cm), depending on how large you want them.

For a quick background I decided to use stamps, and in particular the large SSS background stamps. This is the Wood Planks stamp, stamped with Vintage Photo Archival ink. As you can see, the stamp didn't got all the way down. You can stamp it a second time, but I cut that part off instead.

The flower book uses the Old Letter 1878 stamp, stamped with Ground Espresso ink. Here I repeat-stamped one of the lines at the bottom of the mat board, so I didn't need to trim the covers.

The butterfly book uses the Reverse Crackle Background together with Garden Patina ink. This is a super quick way of covering an entire background with color, while still getting an interesting texture.

For a finished look, round the outside corners of all the covers with the Corner Chomper tool.

The wood plank covers were inked with Antique Linen and Vintage Photo.
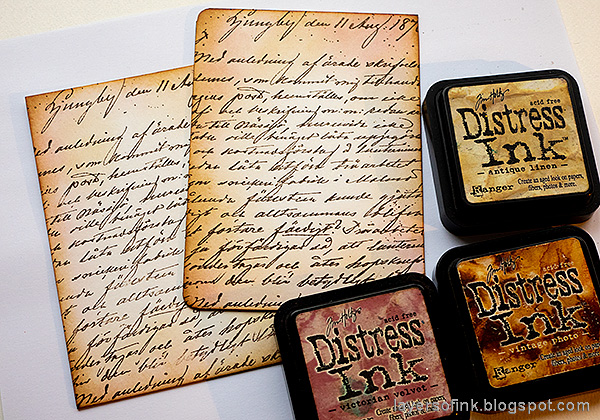
The flower cover was inked with pink, antique linen and brown.

The crackle cover was only inked around the edges.

I inked the edges of the three miniature posters.

Sentiments were stamped on cream paper. The sentiments come from the SSS Laugh in Flowers and Beautiful Butterflies sets. One of them was die cut into a circle with the Repeating Circles die. Ink the edges.

I also used a few extra pieces of ephemera from Field Notes and Field Notes Snippets, also inking the edges first. Apply a layer of Distress Matte Medium over the entire covers. Let dry and repeat. This gives a coating to the covers that makes them durable and all the items are completely stuck. It also moves some of the Distress Ink around which gives a great vintage look. I like to use Tim's Collage Brushes together with the matte medium.

Use a Crop-a-dile to punch holes in the covers and the inside pages. I cut the inside pages just slightly smaller than the covers and rounded the outer corners. The best thing with making your own notebooks/sketchbooks/journals is that you can use your favorite paper for the inside. I used sketching paper in two of the journals and watercolor paper in the third.

For the flower sketchbook I used the flower quote from Laugh In Flowers, together with two additional floral ephemera pieces. The journals were bound with Tim Holtz Mini Book Rings.

If you look closely, you can see brush marks from the matte medium, which are caused by the medium moving the Distress Ink around slightly.
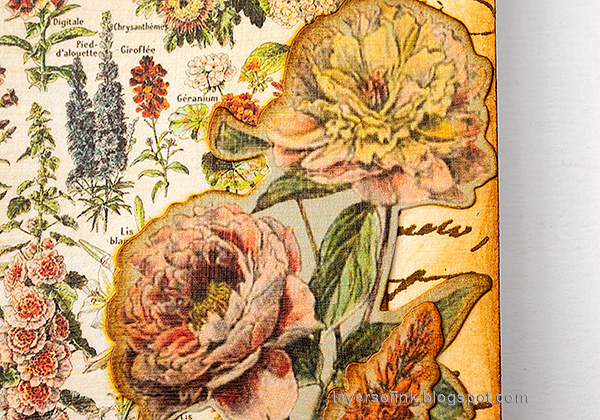
These floral ephemera designs are so pretty.

I also added a little field notes ephemera.

The back cover was left with just the stamped and inked background, but also with two coats of matte medium. You can embellish the back too if you want to. The handwriting in Old Letter 1878 is lovely.

At the moment, the forest is filled with mushrooms and I love the mushroom ephemera included in the Field Notes and Field Notes Snippets packs. You can see another example on the Mushroom Tag that I posted earlier this week.

The mushrooms look great layered together and I like how the largest one follows the line of the circle sentiment.

And a collection of specimens label.

The Wood Plank background is a new favorite stamp for me, from the STAMPtember release.

The butterfly book is the most colorful one and the background ink color was inspired by the butterfly in the vintage poster.

The sentiment comes from the Beautiful Butterflies set.

Here you can also see the brush marks from the medium. I don't always like visible brush marks, but sometimes I do.
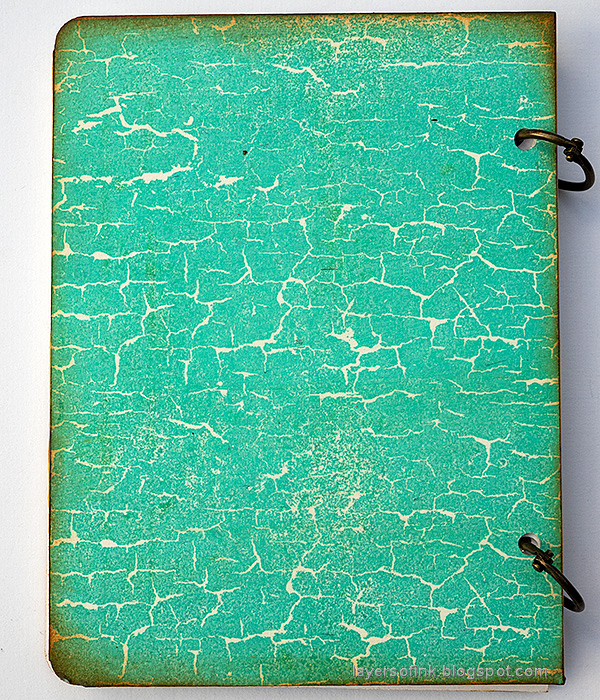
The Reverse Crackle Background stamp is perfect for quickly covering an entire background. You can find another example in the Outdoor Sketchbook that I posted recently.


Thank you so much for taking the time to visit my blog today! Have a good weekend!
Happy crafting!
Anna-Karin
Supplies:
* Please note: the links are affiliate links, for which I receive a small percentage of sales generated by the link, at no extra cost to you.
* Please note: the links are affiliate links, for which I receive a small percentage of sales generated by the link, at no extra cost to you.

I completely agree about not wanting to cover them up... I've pulled them out and put them back a number of times. The little versions from the Snippets pack will definitely be going in dollshouses soon! Love these journals - absolutely perfect way to showcase the fabulous ephemera and the crackle stamp is so good - I was fooled (on my tiny phone pictures at least!).
ReplyDeleteAlison x