Monday, July 30, 2012

What do you say?

Hi everyone! This week the focus is on the words at Simon Says Stamp and Show, so let the sentiments and words take centre stage on your project. Don't forget to stop by the blog to see the inspiration from the rest of the design team. I am amazed every week at the gorgeous and varied projects.

I rarely make the sentiment the focus of a card, so this was a fun challenge for me, and I literary made the sentiment the center of the world on this card.

After deciding to use this great sentiment from Artistic Outpost, I thought it would go well together with the Sizzix Vintage Globe die. The globe was die-cut from grungeboard and watercolour paper, and the circle part was watercoloured with Distress Inks (Salty Ocean and Mowed Lawn), love these new colours. However, the result was a bit too bright for what I was planning with the card, so after the piece dried completely, I swept Antique Linen Distress Stain over the whole thing, as a glaze. This is a great way to tone down and age a watercolour piece that turned out a bit bright. It is very important to make sure the paper is completely dry first. The edges were inked a bit with Frayed Burlap.

The grungeboard was painted with gold dabber, sanded and scratched, and then inked with Walnut Stain, to create the look of an old and worn globe. Then the watercolour piece was glued on top.

To really showcase the sentiment I stamped it on one of my favorite products, clear modeling film. I die-cut a piece of film into a circle slightly bigger than the globe, stamped on top and when dry, heated the film with my heat gun and shaped it into a rough globe shape. It was attached with tiny staples. I loved the result. It was hard to photograph, but the dimensional globe looks great over the die-cut globe and the sentiment gives a fun shadow onto the land and sea.

Perhaps you can see the globe shape better on this photo. This card is pretty dimensional, not something to be sent in an ordinary envelope. The sentiment stamp even had a vintage globe included in the stamp. I also glued a little wood veneer bird to the globe. I love those little birds.

Since the sentiment is about turning the world around, I added some gears which help turn the globe around and also symbolize the thinking process. They were die-cut from grungeboard, painted silver and copper and distressed. I also added some game spinners as arrows and a piece of map from an old atlas.

The background is kraft resist paper which was inked first with Picket Fence Distress Stain and then with Broken China Distress Ink. It was misted heavily with Blue Patina Perfect Pearls, and is more shiny than you can see in the photo. Some tissue tape, twine and handstitching finished the card.

I hope you will play along with us this week! A random participant will win a $50 gift voucher from Simon Says Stamps, and can do some fun shopping.


Thank you for stopping by! Have a great week!

Anna-Karin

Supplies:
Dies: Sizzix: Vintage Globe Bigz die, Mini Gears Movers & Shapers, Circle Framelits
Stamps: Artistic Outpost Typography
Inks, paints, etc: Distress Stain Picket Fence, Antique Linen; Distress Ink: Broken China, Mowed Lawn, Salty Oceans, Frayed Burlap, Walnut Stain; Perfect Pearls mist Blue Patina; Stazon Jet Black; Adirondack GoldSilver and Copper paint dabber;
Other: Stamper's Anonymous Wendy Vecchi Modeling Film Clear; Tim Holtz Idea-ology grungeboard, Kraft Resist paper, Symphony tissue tape, game spinners, tiny attacher; Studio Calico Wood Veneer BirdsHemtique twine; watercolour paper; old map paper.

Saturday, July 28, 2012

Yellow Brick 3D house tutorial

Hi everyone! This weekend there is a Eileen Hull event and giveaway on the Sizzix blog, where the DT members have done many fabulous projects using Eileen's awesome dies. Be sure to check it out, you can also win some great prizes.

I particularly love all the 3D and dimensional projects you can make with the Scoreboards dies and for today's tutorial I used three of Eileen's dies, the 3D house Pro die, the Scoreboards Bird and the flowers from the Caddy Bag die.

For my house, I decided to use a happiness theme:

These houses are so much fun to build and decorate, I think I am going to make a whole little village. You can find a tutorial for another version of the house that I made here. I used a bunch of different techniques on the house, which can all be adapted to also fit other projects.

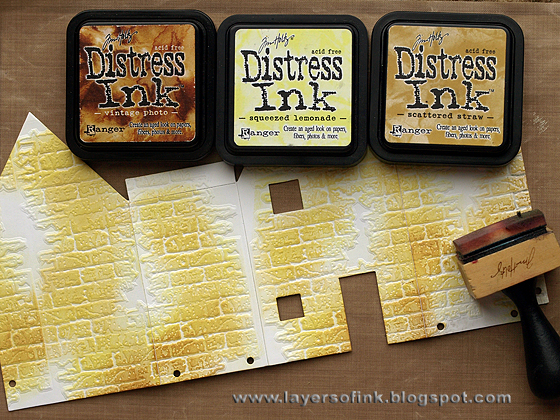
You need a BigShot Pro to die-cut this house. Die-cut the house from white mat board (I forgot to add the floor piece on this photo). I embossed the main body of the house with the brick texture fade.

Emboss the smaller part of the house with the Notebook embossing folder, which looks great as wooden planks.

Ink the main body of the house with shades of yellow and brown distress inks. Mat board inks beautifully. I took care not to get too much ink into the debossed sections, wanting the 'grout' to remain white.

Ink the smaller piece with grey shades of distress ink, but first mask off the door and the upper part with eclipse tape (or a sticky note). Coat the door with Crackle Accents.

Coat the fence, door frame and the two window frames with Crackle Accents too. Let the pieces dry, this it what they looks like when they are dry. Cool texture.

White emboss sentiment stamps on both the big and the small roof.

Ink the roofs with Pumice Stone and Black Soot. The embossing resists the ink. Wipe off the left over ink from the embossed parts.

Stamp the roofs with a texture stamp using Pumice Stone ink.

Glue a little piece of mica and a little bit of lace to the inside of the windows, as windows and a curtain. You could also use a piece of acetate or vellum.

I wanted a little bird on the house, but the Bird Scoreboards die that I wanted to use makes a pretty large bird, so I turned to one of my favourite solutions, shrink plastic. Die-cut the Scoreboards bird from shrink plastic and cut off the little flap on the wing since we won't need it.

Stamp both bird pieces with Stazon Platinum ink.

Shrink the pieces. I used my heat gun, you can also do it in the oven. Be careful, they get hot! Here you can see how much the bird has shrunk compared to the wing.

In the bird pieces on the back (not on the stamped side) with alcohol inks.

To make the bird a bit opague, I painted the pieces white on the back, but you don't need to do this step. Here's the finished bird, glued together with Glossy Accents. With the use of shrink plastic, you can make small embellishments out of pretty large dies.

Die-cut the sweet flowers and leaves from the Caddy Bag die from natural sticky-back canvas.

Ink the pieces with distress inks.

Embellish the house before assembling it, it is much easier then. Assemble the house according to the instructions (you can find them here). Use a strong adhesive, I used wonder tape. I added some lace trim as eaves on the large roof.

The number was die-cut from mat board using the Cargo Stencil Numbers die, painted silver and coated with Glossy Accents.


I found a teenage photo of me that I had printed on cardstock and used that inside an idea-ology bookplate which was first aged with a bit of white paint.

I also found a little chipboard bike in my scrap box which was painted silver and black and coated with Glossy Accents. The canvas flowers were placed here and there on the house.

The fence was adhered with foam dots at the side of the house and flowers and leaves tucked behind it. The key was attached to the roof with a wire.

I hope you enjoyed the tutorial! Don't forget to check out the Sizzix blog today and tomorrow to see the work of the rest of the DT and for a chance to win some great prizes.

A few days ago, I posted a tutorial using Eileen's Suitcase die, which is another super fun die. You can find it here if you want to have a look.

Thank you so much for visiting!

Anna-Karin

Supplies:
Dies and embossing folders: Sizzix: 3D house Scoreboards Pro die, Bird Scoreboards die, Caddy Bag Scoreboards die, Cargo Stencil Number Set; Notebook texture fade, Bricked texture fade
Stamps: Stamper’s Anonymous: Mixed Media, Tiny Textures, Words for Thought; Hero Arts: Find Joy CL496; Artistic Outpost: Windows and Doors, Typography.
Inks etc: Distress Ink: Mowed Lawn, Salty Ocean, Squeezed Lemonade, Scattered Straw, Vintage Photo, Pumice Stone, Iced Spruce, Black Soot; Alcohol Ink: Sunshine Yellow, Butterscotch, Sailboat Blue; Stazon ink Platinum; Ranger Seafoam White embossing powder
Paint: Adirondack Silver, Snow Cap dabbers
Other: Tim Holtz Idea-ology: Locket Keys, Ornate Plates, Trinket Pins, Word Sticks; Ranger shrink plastic, natural sticky-back canvas, Crackle Accents, Glossy Accents, Wonder tape; Kaisercraft rhinestones; chipboard bike; US ArtQuest mica; lace trim; brads

Roots: CSI case file #30

Happy Weekend and time for another CSI case file. You can find all the layouts by the DT and awesome guests here. As always, I loved this week’s case file.

From the evidence items I used: metal, sprinkles (paint splatters), hinges and bricks. From the testimony items: childhood story, journaling about different people in a photo.

This sweet photo is if my dad and his siblings. They had a general dealer shop and a post office, and lots of the items on the page relates to that – especially the stamps. The background is stamped with lots of different stamps using Versafine Onyx Black, Archival Coffee and Versafine Smokey Grey. I coloured a few of the images with coloured pencils, inspired by the colours in the inspiration photo. I also used stamps which are probably close to 100 years old, from when my great grandfather started the shop. They still stamp beautifully.

The Stamper’s Anonymous Folded Paper Background stamp, which is large, was stamped on grey patterned paper with Archival Coffee ink, to form the photo mat. Then the post card stamp was stamped on top.

 I was inspired to imitate the metallic doors on the inspiration photo and used one of my favourite techniques. Glossy cardstock was covered with aluminium tape and embossed with the Riveted Metal embossing folder. Then I painted them randomly with Juniper and pink dabber. Quite a lot of the paint was sanded and wiped off when dry. Then the pieces were inked with Frayed Burlap and Walnut Stain, and everything was embossed with clear embossing powder. Love the final result, but a bit hard to photograph. I attached them to the page with hinges, which I had in my stash since the early days of my scrapbooking.

I wrote a really long piece of journaling about my memories from the area on the country-side where my dad grew up, thoughts about him and his siblings and their life, similarities between them and me and my son (who looks a lot like my dad as this age). It was placed behind the doors.

I splattered some watered-down black paint on the layout, inked the edges and stamped the title letters.

Thank you for looking! I hope you can play along with us this week!

Anna-Karin

Supplies: Stamps: Stamper’s Anonymous: Folded Paper Background, PHLAX alphabet stamp, School Desk, Ultimate Grunge, Curiosities, Homemade Art, Letter to Santa; Artistic Outpost: Secretary Pool, Ephemera Backgrounds, Home; Inky wings vintage postcard and postage stamps; Stampelboden milk can; Sizzix: Riveted Metal texture fade, Tiny Tabs & Tags Bigz die; Archival Ink Coffee, green; Versafine Onyx Black and Smokey Grey; pink Versamagic; Distress Ink: Faded Burlap, Walnut Stain; Adirondack Juniper, Pitch Black and Pink Sherbet dabber; aluminium tape; metal hinges; brads; natural sticky-back canvas; BasicGrey Basics ledger paper; Scenic Route grid paper; Derwent coloured pencils.

Thursday, July 26, 2012

Suitcase Mini-Book Tutorial

Hi everyone! Today I have a tutorial to share using the awesome Suitcase Scoreboards die by Eileen Hull. This is such a fun die, I am going to use it a lot. On Saturday we are having an Eileen Hull event on the Sizzix blog, don't miss it, there is going to be tons of inspiration. I'll be posting another tutorial then too.

This is the finished suitcase:

You can pack the suitcase with all kinds of different little things. When I saw this die, I immediately thought it would make a great home for a little travel mini-book, so inside my suitcase there is a mini-book with photos from an outing on an old steam train. I wanted the suitcase to look old and worn and added train related stuff on the front, back and on the inside.

Glue brown kraft core cardstock to cream mat board using multimedium. When the adhesive is dry, die-cut all the pieces. The Scoreboards dies both cuts and scores, making 3D projects very easy to do. I cut the handle from plain cream mat board, since I didn't want it to be the same brown as the rest of the suitcase.

Sand the pieces pretty heavily, this brings out the kraft core of the paper and makes the suitcase look as if it has travelled on many trains and been through a lot.

Stamp the two big pieces with train-related stamps using Archival Jet Black ink. Take care to place the stamps in the right direction on the front piece (to the left), the flap should be at the bottom. And decide which of the two long sides you want facing upwards on the right hand piece which will form the body of the suitcase.

One of my photos in the minialbum was of the clock on the old train station, so I wanted to include a little clock, but I didn't want it to look like an alarm clock. The Vintage Alarm clock was die-cut from grungeboard, and I cut off some of the parts to make it look like an ordinary clock. It was painted gold and sanded a bit.

After sanding it, I inked the clock with Black Soot Distress Ink. The small clocks on the idea-ology Lost & Found papers fit perfectly for this clock. Pick a clock that fits your project and cut it out. (You could also stamp the clock using the clock stamp in the Stamper's Anonymous Tim Holtz Curiosities set).

Glue the golden clock to the patterned paper with Glossy Accents, then mat it with Black Soot Core'dinations cardstock and sand the edges. I placed the clock so that it showed the same time as the clock in my photo. Then I filled the shape with Glossy Accents. Put aside to dry (it dries completely clear).

Smear Pumice Stone and Antique Linen Distress Ink on a craft sheet, mist with water, then drag a piece of manila cardstock through it. Let dry (or dry with a heat gun). Stamp a train and a ticket with Archival Jet Black ink. Die-cut title letters from a scrap piece of paper using the Typeset Sizzlits die. I used a left over piece of blue watercolour paper. Cut out the ticket and the train and ink the edges with Frayed Burlap.

Stamp the insides of the suitcase with train stamps, using Archival Ink Coffee. I made a mistake here when I stamped the man on the left hand side, because I didn't think of the closure flap which would literary make him headless. You'll see how I fixed it a bit later. So remember not to stamp anything on the top part of the front cover. Now it is time to put everything together.

Adhere all the embellishments to the covers before you assemble the suitcase. I layered a gear piece and two game spinners on the clock, placing the spinners so they showed the correct time (same as on my photo of the clock at the station).

Here's the back of the finished suitcase. I added some gears which were die-cut from grungeboard, painted gold and silver, distressed and then inked with Black Soot. On the ticket, I circled the date when the photos were taken. I also added a tiny tag hanging from the handles. The handles were inked with Frayed Burlap before attaching them to the suitcase.

It is very easy to assemble the suitcase, you can find instructions here. Just add brads to hold the main body of the suitcase together and then use strong tape (I used Wonder Tape) to attach the bottom flap of the front cover to the base of the main body.

Don't fold the top flap all the way, just fold it a little bit, then it will press up against the roof of the suitcase and keep it close. Adhere it with strong tape to the top of the front flap, leaving a space above it which is about the twice the thickness of the material you use. I covered the stamped man with a piece of kraft resist paper. It just didn't look nice to have a man without a head there.

To make the mini-album, I cut quite a lot of pages from double-sided paper, adhered all my photos, and added journaling. The suitcase can hold quite a chunky little album. I kept the mini-album pretty simple and tied it together with a string.

I usually take a lot of photos on any occasion and this little mini-album was a perfect way to display all my train photos from this outing. The suitcase has a really nice heavy feel to it with the album inside.

I hope you enjoyed this tutorial! I have another suitcase under production on my desk already. Let me know if you have any questions.

Thank you for stopping by!!

Anna-Karin

Supplies:
Stamps: Stamper's Anonymous Tim Holtz On the Railroad; Hero Arts: Past Times AC007, Wonderful World 331068; Artistic Outpost Steampunk
Inks and paint: Ranger Archival Ink Jet Black and Coffee; Distress Ink: Pumice Stone, Antique Linen, Frayed Burlap, Pitch Black; Adirondack Gold and Silver paint dabbers.
Papers etc: Sizzix cream mat board; Core'dinations brown kraft core cardstock; Ranger manila cardstock; Tim Holtz idea-ology Lost and Found, Vintage Shabby, Kraft Resist patterned papers, grungeboard
Other: Tim Holtz idea-ology Game Spinners, Mini Gears; Glossy Accents; Ranger Wonder Tape; Ranger multi-medium

Wednesday, July 25, 2012

12 tags of 2012 July


Today I am sharing my version of Tim’s July 12 tags of 2012. I didn’t have any canned air, so I used a straw instead. I think it gives a bit less control and you have to be really fast since the alcohol ink dries fast.
I used three colours of alcohol ink on glossy cardstock (Sunshine Yellow, Orange, Citrus). Tim also used a metallic mixative, which I tried too, but I wanted to use a flower stamp, and liked it better without the metal. The flowers were stamped with Archival Jet Black and I stamped only the first part of a sentiment, masking out the rest when inking the stamp.

I found two little charms on my desk which fit with the summery feeling of the tag. They were stitched to the tag. The focal panel was layered on two kraft core papers which were first sanded and distressed. The tag was die-cut from kraft paper and swept with Picket Fence Distress Stain.

The crinkle ribbon was dyed with Mustard Seed and Peeled Paint Distress Stains.

Thank you for looking!

Anna-Karin

Supplies: Stamper’s Anonymous Tim Holtz: Nature’s Moments; Sizzix Tag & Bookplates die; Alcohol inks: Sunshine Yellow, Orange, Citrus; Archival Ink Jet Black; Distress Stain Picket Fence, Mustard Seed, Peeled Paint; Core’dinations kraft core  orange and green; idea-ology ribbon; charms; Kaisercraft rhinestones; Ranger glossy cardstock.

Monday, July 23, 2012

Grandmother Canvas: Hey Girl

Hi everyone! Monday and time for another Simon Says Stamp & Show challenge. The theme for this week is ‘Hey Girl’, such a fun theme with lots of possibilities. I hope you will play along with us and don’t forget to check the site to see the gorgeous projects of the design team members.

I wanted to do a really meaningful project and decided to do a canvas about my grandmother. This turned out to be one of my all-time favorite projects, especially since it represents my memories of my grandmother very well. Among other things, she wore stylish clothing, created artsy ceramic pieces and loved dogs and birds. According to my mom, her favourite colours were turquoise and blue. I also decided to add a bit of gold. All the stamps, papers and details I used relates to memories of my grandmother.

Here's how I did the background:

The canvas was painted with Speckled Egg and then I added some Pool for variety.

I did a bit of stamping with Stazon ink and gold embossed a Lattice and a swirl stamp here and there.

After that the canvas was splattered with watered-down black paint and misted with Perfect Pearls and water. Finally, the edges were swept with gold paint.

The frame was die-cut from patterned paper.
I used fragments as the main embellishments. They were coloured a bit with alcohol inks (Stream and gold) and  glued to patterned papers and stamped images which fitted with the theme. I also placed one on top of a photo of my mom and grandmother.

The mini dress form was die-cut from grungeboard, and the dress part was coated with layers of clear UTEE (at least four), and finishing off with one layer of Stream embossing powder, and then a little bit of gold. It was meant to look a bit like faux-ceramics since my grandmother did ceramic pieces and I remember some of them to look a bit like this. I glued a paper with a dress pattern to grungeboard and cut the dress form one more time, layering the pieces together. A pearl necklace, wire belt and a little wooden bird finished the dress form.

The trimmings flower ribbon was dyed with Antique Linen Distress Stain.

The title letters were die-cut from natural sticky-back canvas using the Vintage Market die, and inked with Antique Linen. I have lots of memories from my grandmother sitting in her chair in the living room, so the chair stamp was perfect. All the stamping was done on patterned paper with Archival Ink Coffee.

When I thought the canvas was finished I stumbled upon a Swarovski crystal heart in a box, which I meant to use on a piece of jewelry. Instead, it found its perfect home on this canvas. It was just the right colour and a heart on top of that, so I simply had to use it.

The canvas is pretty deep, so I stamped all the edges too, with stamps that fit with the theme.

The other side.

From the top.

And the base.

I hope you will play along with us this week! You can win a $50 gift voucher from Simon Says Stamps, and three projects are picked by the design team to be featured every week. 


Thank you so much for looking at this long post!

Anna-Karin

Supplies:
Stamps: Stamper’s Anonymous: Mini Muse, At the Movies, CuriositiesAttic Treasures, Tiny Textures; Hero Arts: Painted People CG402, Variety and Quality CG190, Lattice Background, Untitled Love AC004; Artistic Outpost: Quotes & Quotables, Typography; Prima: Songbirds
Dies: Sizzix: Vintage Market Sizzlits, Mini Sewing Room Movers & Shapers, Fancy Square Frames Framelits, Hearts set Movers & Shapers, On the edge Mini Scallops.
Paint and ink: Adirondack paint dabber Pool, Pitch Black, Gold; Jenni Bowlin paint dabber Speckled Egg; Alcohol Ink: gold mixative, Stream; Distress Ink: Antique Linen; Distress Stain: Antique Linen; Archival Ink Coffee; Stazon Jet Black; Versamark
Embossing powder: Ranger clear UTEE, Adirondack Stream; gold
Paper: Tim Holtz idea-ology: Lost and Found, Crowded Attic
Embellishments: Tim Holtz idea-ology: square fragments, Hanger Clips, Film Strip ribbon, Trimmings, Pen Nibs, Adornments; Studio Calico wood veneer birds; lace trim; pearls; Swarovski crystal
Other: idea-ology grungeboard; Ranger natural sticky-back canvas; Perfect Pearls; Glossy Accents; wire