Thursday, June 30, 2022

Ephemera Notebook Tutorial

Hi crafters! Making my own notebooks, sketchbooks and journals is one of my favorite things and here I made one using small pieces of ephemera. You can also use the technique for cardmaking or art journaling.

Please note: this post has affiliate links, for which I receive a small percentage of sales generated by the link, at no extra cost to you.

Layers of ink - Ephemera Notebook Tutorial by Anna-Karin Evaldsson.

I really like Tim Holtz various ephemera packs and the small labels in the Snippets Ephemera looks so happy and colorful. I was thinking of way to incorporate them in a project where they would get center stage and thought it would be fun to use them to cover an entire background.

Layers of ink - Ephemera Notebook Tutorial by Anna-Karin Evaldsson.

Start by cutting two covers. I used Sizzix Little Sizzles Matboard which would great for journal covers, but you can also use chipboard. My covers are about 4x6 in.

Layers of ink - Ephemera Notebook Tutorial by Anna-Karin Evaldsson.  Cover with Tim Holtz Memoir ephemera.

I used pieces from Tim's Collage Tiles and Snippets Ephemera. Pick labels, ink the edges and arrange them on the background.

Layers of ink - Ephemera Notebook Tutorial by Anna-Karin Evaldsson.

Glue the pieces down with Distress Matte Medium, letting some of them overlap. Add a second layer of matte medium over the labels. I used a piece of Tim's Backdrops Vol. 2 papers for the back cover. Inked the edges and again cover with matte medium. The medium protects the covers from wear and tear.

Layers of ink - Ephemera Notebook Tutorial by Anna-Karin Evaldsson.

Rub a little Distress Crayon here and there.

Layers of ink - Ephemera Notebook Tutorial by Anna-Karin Evaldsson.

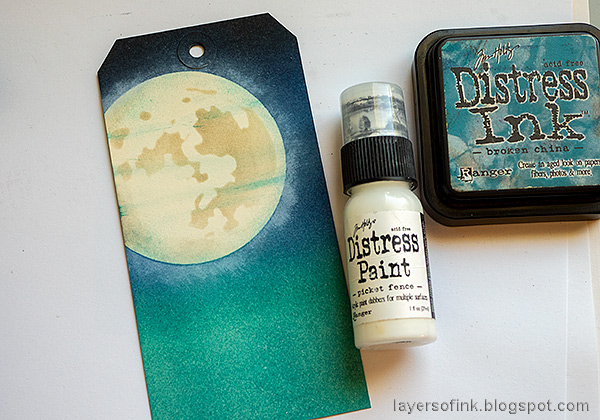
As embellishments, I used some idea-ology pieces: Game Spinners, a Sprocket Gear and a Timepiece. Distress the Distress Paint. Rub most of the paint off before it has dried completely. 

Layers of ink - Ephemera Notebook Tutorial by Anna-Karin Evaldsson.

These pieces are so interesting and I like the mix of colors, shapes and typefaces. Round the corners of the cover.

Layers of ink - Ephemera Notebook Tutorial by Anna-Karin Evaldsson.

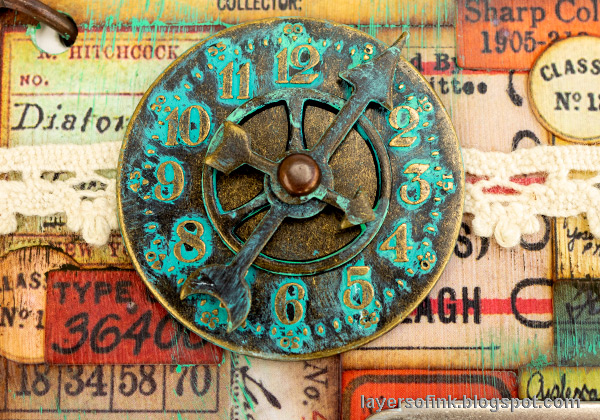
Layer the ephemera pieces and attach with a Long Fastener. 

Layers of ink - Ephemera Notebook Tutorial by Anna-Karin Evaldsson.

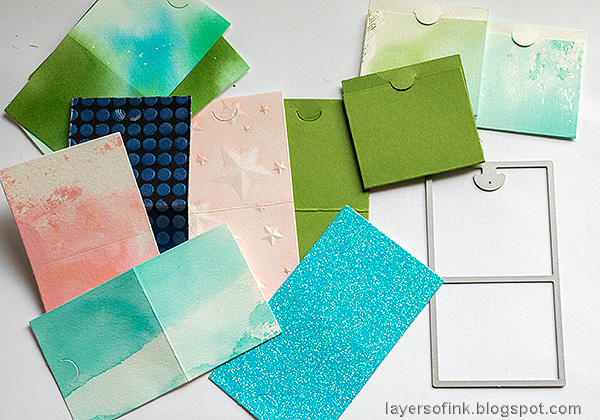
Fill the journal with your favorite papers. I used sketching paper for this one. But you can also use watercolor paper, patterned paper or any other paper that you like. Using your favorite papers is one of the best things with making your own journals/notebooks/sketchbooks. I punched holes with my Crop-a-Dile and bound with Tim Holtz Mini Book Rings


Thank you so much for stopping by here today!

Happy crafting!

Anna-Karin

Supplies:

* Please note: the links are affiliate links, for which I receive a small percentage of sales generated by the link, at no extra cost to you.

Wednesday, June 29, 2022

Peach Card Tutorial

Hi friends! I hope you are well! Today I have a card to share with shades of peach and orangey peach. 

Please note: this post has affiliate links, for which I receive a small percentage of sales generated by the link, at no extra cost to you.

Layers of ink - Peach Card Tutorial by Anna-Karin Evaldsson.

Lately, I have been drawn to peach and coral shades of pink/orange and I decided to do a project with almost only those colors, with the exception of some green.

Layers of ink - Peach Card Tutorial by Anna-Karin Evaldsson. Stamp with Simon Says Stamp Old Letter.


Layers of ink - Peach Card Tutorial by Anna-Karin Evaldsson.

Ink with Melon and Guava Pawsitivily Saturated Ink, using Simon Says Stamp ink-blending brushes. The embossing will resist the ink.

Layers of ink - Peach Card Tutorial by Anna-Karin Evaldsson. Die cut and ink Simon Says Stamp Chinese Lantern.

Die cut the Chinese Lantern Stem from white heavystock cardstock and ink with Sherbet and Melon ink. I used Distress Ink for the green parts. The lantern was inked with Simon Says Stamp Detail Blending Brushes which work great for small areas.

Layers of ink - Peach Card Tutorial by Anna-Karin Evaldsson.

Die cut a Tim Holtz Crochet Border and ink with Dried Marigold Distress Ink and Saltwater Taffy Distress Oxide Ink.

Layers of ink - Peach Card Tutorial by Anna-Karin Evaldsson.

Round the corners for a soft look and mat on peach and peach/orange cardstock. I love the look of dye ink on glossy cardstock and the white letters add just enough interest and texture.

Layers of ink - Peach Card Tutorial by Anna-Karin Evaldsson.

The Chinese Lantern Stem is such a lovely die and I like that it also die cuts the back pieces for the flowers. Add a few sequins in matching colors.

Layers of ink - Peach Card Tutorial by Anna-Karin Evaldsson.

I also dyed a piece of lace trim with some of the inks.

Layers of ink - Peach Card Tutorial by Anna-Karin Evaldsson.

Simon Says Stamp Scripty Big Hugs was die cut from glossy paper and inked with the same shades as the background. I also die cut it from white paper an additional four or five times and glued together. I used the new Simon Says Stamp Micro Dot Sheet Adhesive sheets, which were perfect for this.

Layers of ink - Peach Card Tutorial by Anna-Karin Evaldsson.

Here you can see the dimension a little better.


Thank you so much for stopping by here today!

Happy crafting!

Anna-Karin

Supplies:

* Please note: the links are affiliate links, for which I receive a small percentage of sales generated by the link, at no extra cost to you.

Monday, June 27, 2022

Dinosaur Times Tag

Hi friends! I hope you are well and enjoying the last days of June.

Please note: this post has affiliate links, for which I receive a small percentage of sales generated by the link, at no extra cost to you.


We have an 'Inspired by a movie' theme at the Simon Says Stamp Monday Challenge Blog today. I hope you will join us and don't miss the last project by our June guest designer guest designer Alison Bomber.


Layers of ink - Dinosaur and Moon Tag Tutorial by Anna-Karin Evaldsson.

We recently saw Jurassic World Dominion and I was inspired to do a dinosaur project, featuring a cute and friendly Brontosaurus. She is walking through a moonlit night.

Layers of ink - Dinosaur and Moon Tag Tutorial by Anna-Karin Evaldsson.

Place the medium mask from Tim Holtz Moon Mask and Stencil on a tag and ink the tag.

Layers of ink - Dinosaur and Moon Tag Tutorial by Anna-Karin Evaldsson.

Remove the mask and place the coordinating stencil on top. Ink with Pumice Stone and a little Salvaged Patina.

Layers of ink - Dinosaur and Moon Tag Tutorial by Anna-Karin Evaldsson.

Dry brush white paint to create shine. 

Layers of ink - Dinosaur and Moon Tag Tutorial by Anna-Karin Evaldsson.

Add stars with a white gel pen and add dots of white paint on some of the stars.

Layers of ink - Dinosaur and Moon Tag Tutorial by Anna-Karin Evaldsson.

Stamp Simon Says Stamp Crackle Background repeatedly on the ground area, for texture.

Layers of ink - Dinosaur and Moon Tag Tutorial by Anna-Karin Evaldsson.

The Simon Says Stamp Picture Book Brontosaurus was die cut from heavystock paper and inked with Distress Ink. Die cut a second one from black cardstock.

Layers of ink - Dinosaur and Moon Tag Tutorial by Anna-Karin Evaldsson.

The spots were die cut from Simon Says Stamp black glitter paper. Adhere the Brontosaurus with foam tape.

Layers of ink - Dinosaur and Moon Tag Tutorial by Anna-Karin Evaldsson.

I also added three Tim Holtz Design Tape Trims as a border.

Layers of ink - Dinosaur and Moon Tag Tutorial by Anna-Karin Evaldsson.

The sentiments come from Clippings Stickers. Adding white paint for shine makes a big difference to the final look.

I hope you will join us this week in our 'Inspired by a Movie' challenge. You have a chance to win a $25 gift voucher to do some fun shopping at Simon Says Stamp. You have until Monday 8am Ohio time. 1pm UK time, 2 pm CET to join in.


Do you use Instagram? If so please add #sssmchallenge so we can see your entries there too.


Thank you so much for visiting my blog today! 

Happy crafting!

Anna-Karin

Supplies:

* Please note: the links are affiliate links, for which I receive a small percentage of sales generated by the link, at no extra cost to you.

Friday, June 24, 2022

Mini Pocket Notes

Hi friends! Today I have a sweet little project to share, which is perfect for using up some scrap papers.

Please note: this post has affiliate links, for which I receive a small percentage of sales generated by the link, at no extra cost to you.


Layers of ink - Cute Mini Pocket Notes Tutorial by Anna-Karin Evaldsson.

I often need little cards to put on a gift for a kid's party or something similar, almost like a more elaborate form of a gift label. When I saw the sweet Paper Rose Sunny Days images on one of the patterned papers in the Simon Says Stamp Happiest Wishes June card kit, I thought they would be perfect for such little cards. If the card kit is sold out, you can also get the products individually.

Layers of ink - Cute Mini Pocket Notes Tutorial by Anna-Karin Evaldsson. Die cut with Simon Says Stamp Small Pocket Note.

I started out by die cutting cards from various scrap papers, using Simon Says Stamp Small Pocket Note die.

Layers of ink - Cute Mini Pocket Notes Tutorial by Anna-Karin Evaldsson.

Cut out the various scenes from Paper Rose Sunny Days and round the corners. 

Layers of ink - Cute Mini Pocket Notes Tutorial by Anna-Karin Evaldsson.

Pair up the patterned paper scenes with die cut cards, looking for instance at the colors.

Layers of ink - Cute Mini Pocket Notes Tutorial by Anna-Karin Evaldsson. Stamp with Simon Says Stamp inks.

Stamp sentiments on the inside with Simon Says Stamp Pawsitivily Saturated Inks. I also stamped some sentiments on the fronts as well as a bunch of stars. The stamp sets are from the June and May card kits: Happiest Wishes and Brushed Flowers.

Layers of ink - Cute Mini Pocket Notes Tutorial by Anna-Karin Evaldsson.

I added sequins to the little cards and Trinity Stamps Lily Pad Leaps embellishments.

Layers of ink - Cute Mini Pocket Notes Tutorial by Anna-Karin Evaldsson.

Since these were scrap papers, some of the insides are a little messy. 

Layers of ink - Cute Mini Pocket Notes Tutorial by Anna-Karin Evaldsson.

The glitter card is my youngest's favorite of these. Die cut from Aqua Glitter paper.

Layers of ink - Cute Mini Pocket Notes Tutorial by Anna-Karin Evaldsson. Add sequins.

These small images are so cute, but since they are so small, they would easily disappear on a large project.

Layers of ink - Cute Mini Pocket Notes Tutorial by Anna-Karin Evaldsson.

The little cards will fit for many occasions. 

Layers of ink - Cute Mini Pocket Notes Tutorial by Anna-Karin Evaldsson.

And more sentiments. 

Layers of ink - Cute Mini Pocket Notes Tutorial by Anna-Karin Evaldsson.

If you want a larger card, you can glue the little card to a normal-sized card. On this art journal page I did something similar, also with the Small Pocket Note die.

Layers of ink - Cute Mini Pocket Notes Tutorial by Anna-Karin Evaldsson.


I hope you enjoyed this project! Thank you so much for taking the time to stop by here today!


Happy crafting!

Anna-Karin

Supplies:

* Please note: the links are affiliate links, for which I receive a small percentage of sales generated by the link, at no extra cost to you.