Friday, March 31, 2023

Seek Adventure Tag

Hi friends! Today I have a sweet and simple tag to share featuring Winnie-the-Pooh.  

Please note: this post has affiliate links, for which I receive a small percentage of sales generated by the link, at no extra cost to you.

Layers of ink - Seek Adventure Winnie-the-Pooh tag tutorial by Anna-Karin Evaldsson.

I love the Winnie-the-Pooh stories and have read them many times to the boys, so I was happy to find this lovely Pooh Easter Joy stamp set by Impression Obsession. I went with a light and airy tag and didn't add as much texture or as many details as usually. You can of course make a card instead. 

Layers of ink - Seek Adventure Winnie-the-Pooh tag tutorial by Anna-Karin Evaldsson. Color with Distress Watercolor Pencils.

Stamp Pooh, two butterflies and a sentiment on a tag and draw a pencil line for the horizon. Color with Distress Watercolor Pencils, by picking up the pigment from the pencil with a paint brush.

Layers of ink - Seek Adventure Winnie-the-Pooh tag tutorial by Anna-Karin Evaldsson.

Continue coloring the sky and the grass. Add a shadow under Pooh and under the basket.

Layers of ink - Seek Adventure Winnie-the-Pooh tag tutorial by Anna-Karin Evaldsson.

Die cut flowers using Tim Holtz Mini Brushstroke Flowers from scrap papers and shape with Tim's Shaping Kit.

Layers of ink - Seek Adventure Winnie-the-Pooh tag tutorial by Anna-Karin Evaldsson.

Add Glossy Accents to the two butterflies.

Layers of ink - Seek Adventure Winnie-the-Pooh tag tutorial by Anna-Karin Evaldsson.

Add highlights and flowers with Crafter's Companion Bold Basics paint pens.

Layers of ink - Seek Adventure Winnie-the-Pooh tag tutorial by Anna-Karin Evaldsson.

Here you can see the effect of the white dots and that I colored the bear loosely.

Layers of ink - Seek Adventure Winnie-the-Pooh tag tutorial by Anna-Karin Evaldsson.

Add tiny pearls to the flowers. 

Layers of ink - Seek Adventure Winnie-the-Pooh tag tutorial by Anna-Karin Evaldsson.

I also added a few crystals to the grass area.

Layers of ink - Seek Adventure Winnie-the-Pooh tag tutorial by Anna-Karin Evaldsson.

This is such a lovely sentiment and works for many themes.

Layers of ink - Seek Adventure Winnie-the-Pooh tag tutorial by Anna-Karin Evaldsson.

Glue Clear Drops as a trail after the butterflies.

Layers of ink - Seek Adventure Winnie-the-Pooh tag tutorial by Anna-Karin Evaldsson.

You can see the effect of the Glossy Accents better here.


Thank you for taking the time to visit my blog today!

Happy stamping!

Anna-Karin


Supplies:

* Please note: the links are affiliate links, for which I receive a small percentage of sales generated by the link, at no extra cost to you.

Tuesday, March 28, 2023

Message in a Bottle

Hi crafters! When I am at second hand stores I often look for interesting little bottles to alter. They usually cost next to nothing and are such a joy to work with. Today I am sharing an altered bottle, inspired by messages sent out into the sea inside bottles.

Please note: this post has affiliate links, for which I receive a small percentage of sales generated by the link, at no extra cost to you.


Layers of ink - Altered Bottle Message in a bottle tutorial by Anna-Karin Evaldsson.

This bottle is about 4.5 in tall and had an interesting shape and closure mechanism. I was inspired by sending messages out to sea in bottles, which always fascinated me. There is a message inside this bottle and the bottle has clearly been in the sea for a long time since sand, shells and pearls are clinging to it. 


Layers of ink - Altered Bottle Message in a bottle tutorial by Anna-Karin Evaldsson.

Start by coloring the bottle with alcohol ink using an ink-blending tool with a felt applicator. I also colored the cap, which used to be cream. Continue until you are happy with the look.

Layers of ink - Altered Bottle Message in a bottle tutorial by Anna-Karin Evaldsson. Stamp with Simon Says Stamp Mixed Labels.

Stamp the sentiment on a Tim Holtz Journal Card using Simon Says Stamp Mixed Labels stamp set and die cut with the coordinating die.

Layers of ink - Altered Bottle Message in a bottle tutorial by Anna-Karin Evaldsson.

Ink the label with Antique Linen and Vintage Photo. The sentiment comes from Tim Holtz Simple Sayings.

Layers of ink - Altered Bottle Message in a bottle tutorial by Anna-Karin Evaldsson.

Adhere the label to the bottle. Mix a little brown paint into Snowfall Grit Paste to create the look of sand and apply along the bottom of the bottle. Press tiny shells and Tim Holtz Baubles into the paste. Sprinkle Mica Flakes on top.

Layers of ink - Altered Bottle Message in a bottle tutorial by Anna-Karin Evaldsson.

The grit-paste has a translucent quality which comes through even with the addition of the paint.

Layers of ink - Altered Bottle Message in a bottle tutorial by Anna-Karin Evaldsson.

I added a little grit paste around the cap too and finished it with a piece of Tim Holtz ephemera and an idea-ology Adornment Star.

Layers of ink - Altered Bottle Message in a bottle tutorial by Anna-Karin Evaldsson.

Apply brown Distress Inks to a non-stick craft sheet. Mist with water and press heavystock paper into the ink. Repeat on both sides. 

Layers of ink - Altered Bottle Message in a bottle tutorial by Anna-Karin Evaldsson.

Stamp with Simon Says Stamp Ledger Paper Background to get lines to write on. Cut the edges with scissors, making sure not to cut too straight. Fold some of the corners. Add more ink to the edges and distress to give them a rough look. 

Layers of ink - Altered Bottle Message in a bottle tutorial by Anna-Karin Evaldsson. Stamp sentiment on paper.

I rolled the paper up quite a few times to condition it and then stamped a whole bunch of sentiments on both sides, using stamps by Simon Says Stamp and Tim Holtz.

Layers of ink - Altered Bottle Message in a bottle tutorial by Anna-Karin Evaldsson.

Instead of stamping messages, you can of course write your own message.

Layers of ink - Altered Bottle Message in a bottle tutorial by Anna-Karin Evaldsson. Distress paper and ink.

Roll the paper up.

Layers of ink - Altered Bottle Message in a bottle tutorial by Anna-Karin Evaldsson.

Place the rolled up message into the bottle.

Layers of ink - Altered Bottle Message in a bottle tutorial by Anna-Karin Evaldsson. Add labels and ephemera.

On the other side of the bottle I added Tim Holtz ephemera pieces.

Layers of ink - Altered Bottle Message in a bottle tutorial by Anna-Karin Evaldsson.

I dyed some mummy cloth / cheese cloth and tied around the bottle together with a piece of twine. In idea-ology Thought Token was tied to the twine. I tucked.

Layers of ink - Altered Bottle Message in a bottle tutorial by Anna-Karin Evaldsson.

I colored the tip of the pen nib with black alcohol ink and rubbed Antique Linen Distress Paint into the letters. 

Layers of ink - Altered Bottle Message in a bottle tutorial by Anna-Karin Evaldsson. Attach Tim Holtz idea-ology pen nib and word.

I like that you get a peek of the rolled up message through the colored bottle.

Layers of ink - Altered Bottle Message in a bottle tutorial by Anna-Karin Evaldsson.

The baubles are meant to look like real pearls.

Layers of ink - Altered Bottle Message in a bottle tutorial by Anna-Karin Evaldsson.

There was already patina on the metallic parts of the bottle, but you can also add the effect with paint.

Layers of ink - Altered Bottle Message in a bottle tutorial by Anna-Karin Evaldsson.

Instead of adding a message to the bottle, you can also use it for storage of small items, such as sequins or beads.

Layers of ink - Altered Bottle Message in a bottle tutorial by Anna-Karin Evaldsson.


I hope you enjoyed this tutorial and that it inspired you to alter some bottles. For another example check out my Altered Vintage Bottle tutorial.


Thank you for taking the time to visit my blog today!

Happy stamping!

Anna-Karin


Supplies:

* Please note: the links are affiliate links, for which I receive a small percentage of sales generated by the link, at no extra cost to you.

Monday, March 27, 2023

Simply Fabulous Art Journal Page

Hi friends! I hope you are well and had a good weekend. We have snow again and spring went into hiding.

Please note: this post has affiliate links, for which I receive a small percentage of sales generated by the link, at no extra cost to you.


This week we have a Stencil It theme at the Simon Says Stamp Monday Challenge. Fun! There are so many different techniques that you can do with stencils. Don't miss the last project by our March guest designer Pauline C

Layers of ink - Simply Fabulous Mixed Media Art Journal tutorial by Anna-Karin Evaldsson.

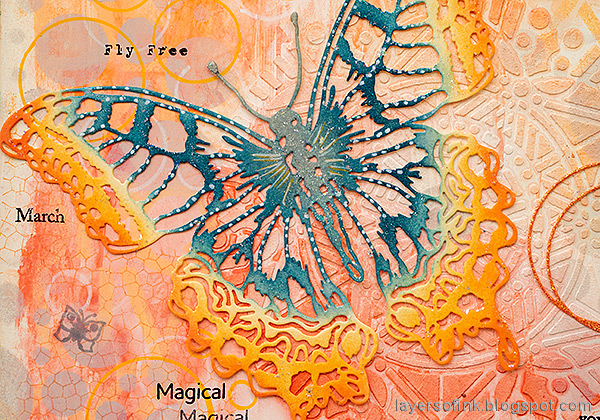
I made a double-page art journal page this week using various stencils together with both texture paste, paint and paint pens. With stencils you can easily build up layers without adding too much bulk, which works great for art journaling. The techniques can of course also be used on other types of projects.


Layers of ink - Simply Fabulous Mixed Media Art Journal tutorial by Anna-Karin Evaldsson. Paint with Distress Paint.

This page started out with gesso in my Dylusions Journal. Quite some time ago, I had left-over texture paste and added the three circles with Simon Says Stamp Holiday Boho Circle.The paint was added much later, also since I had left-over paint. I thought it was time to finish this page now.

Layers of ink - Simply Fabulous Mixed Media Art Journal tutorial by Anna-Karin Evaldsson. Add stenciling.

I used the Dina Wakley Mantras 5x8 in stencil together with Uncharted Mariner Distress Paint. I adhered Simon Says Stamp Very Very Low Tack tape over the words that I didn't want to use and along the edges as a mask.

Layers of ink - Simply Fabulous Mixed Media Art Journal tutorial by Anna-Karin Evaldsson. Simon Says Stamp Mix and Match Circles stencil.

Next, I used the Simon Says Stamp ABC stencil with Dried Marigold paint. You can also use Saltwater Taffy.

Layers of ink - Simply Fabulous Mixed Media Art Journal tutorial by Anna-Karin Evaldsson.

Next, I added sponged Lost Shadow paint through Simon Says Stamp Mix and Match Circles stencil.

Layers of ink - Simply Fabulous Mixed Media Art Journal tutorial by Anna-Karin Evaldsson. Add circles with paint pens.

I wanted even more circles and used the Mix and Match Circles stencil again, but this time together with Crafter's Companion Colorista paint markers.

Layers of ink - Simply Fabulous Mixed Media Art Journal tutorial by Anna-Karin Evaldsson. Die cut Tim Holtz Butterflies.

Die cut Tim Holtz Scribbly Butterflies and Perspective Butterfly from heavystock paper.

Layers of ink - Simply Fabulous Mixed Media Art Journal tutorial by Anna-Karin Evaldsson. Ink the butterflies.

Ink with a Simon Says Stamp Pawsitively Saturated Grapefruit and Cantaloupe inks, combined with Lost Shadow and Uncharted Mariner Distress Ink.

Layers of ink - Simply Fabulous Mixed Media Art Journal tutorial by Anna-Karin Evaldsson.  Add white dots.

Add dots with a white paint pen.

Layers of ink - Simply Fabulous Mixed Media Art Journal tutorial by Anna-Karin Evaldsson. Add Ranger Stickles.

Finally, apply a little Ranger Moon Dust Glitter Gel.

Layers of ink - Simply Fabulous Mixed Media Art Journal tutorial by Anna-Karin Evaldsson.  Stamp with Simon Says Stamp Stained Glass.

Stamp Simon Says Stamp Stained Glass here and there using Peachy Keen Archival Ink.

Layers of ink - Simply Fabulous Mixed Media Art Journal tutorial by Anna-Karin Evaldsson.

The dark blue colors works well in combination with the shades of peach and grey.

Layers of ink - Simply Fabulous Mixed Media Art Journal tutorial by Anna-Karin Evaldsson.

Die cut Simon Says Stamp Circle Loops from Tonic Sugared Coral Glitter Card.

Layers of ink - Simply Fabulous Mixed Media Art Journal tutorial by Anna-Karin Evaldsson.

Simon Says Stamp Simply Fabulous was die cut from the same paper. I used only the outline.

Layers of ink - Simply Fabulous Mixed Media Art Journal tutorial by Anna-Karin Evaldsson.

The butterflies were placed to that it looks like they are fluttering across the page.

Layers of ink - Simply Fabulous Mixed Media Art Journal tutorial by Anna-Karin Evaldsson.

I also stamped a bunch of words and sentiments on the page.

Layers of ink - Simply Fabulous Mixed Media Art Journal tutorial by Anna-Karin Evaldsson.

Paint pens are fun to use together with stencils. This sentiment comes from Simon Says Stamp All Seasons Tree.

Layers of ink - Simply Fabulous Mixed Media Art Journal tutorial by Anna-Karin Evaldsson. Tim Holtz Butterfly.

I really like this big Perspective Butterfly design and it is great for a large journal page.

Layers of ink - Simply Fabulous Mixed Media Art Journal tutorial by Anna-Karin Evaldsson.

The glitter gel adds nice shine to the butterflies.

Layers of ink - Simply Fabulous Mixed Media Art Journal tutorial by Anna-Karin Evaldsson. Stamp with Simon Says Stamp Thoughtful Florals.

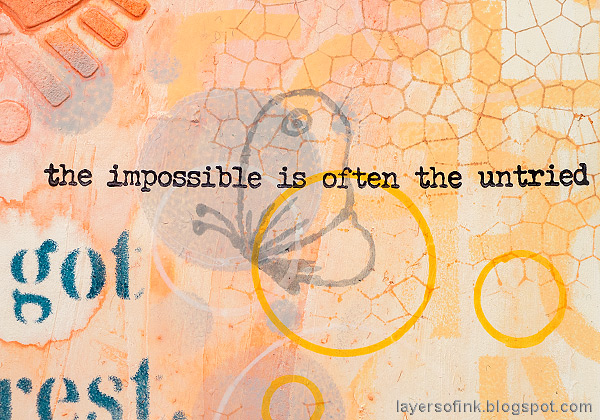
The grey butterfly comes from Simon Says Stamp Thoughtful Flowers and the sentiment is from Tim Holtz Tiny Text.

Layers of ink - Simply Fabulous Mixed Media Art Journal tutorial by Anna-Karin Evaldsson.

Some of the words were stamped more than once without reinking in between. This word comes from Simon Says Stamp Forest Scenery.

Layers of ink - Simply Fabulous Mixed Media Art Journal tutorial by Anna-Karin Evaldsson.

It is fun to mix stamped and stenciled words and different typefaces.

I hope you will join us this week in our Stencil It challenge. You have a chance to win a $25 gift voucher to do some fun shopping at Simon Says Stamp. You have until Monday 8am Ohio time. 1pm UK time, 2 pm CET to join in.


Do you use Instagram? If so please add #sssmchallenge so we can see your entries there too.


Thank you so much for stopping by here today! 

Happy crafting!

Anna-Karin

Supplies:

* Please note: the links are affiliate links, for which I receive a small percentage of sales generated by the link, at no extra cost to you.