Saturday, November 30, 2019

December Countdown Calendar

Hello friends! December starts tomorrow, and today I am sharing the inside tags for my December Daily journal. The tags also double as a countdown calendar for December. 

Layers of ink - December Countdown Calendar by Anna-Karin Evaldsson.

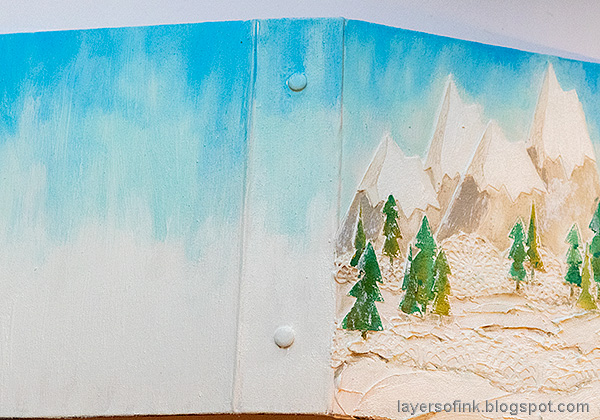
In 2015, I made a countdown calendar using a burlap panel as a base. It has a hook where all my December tags fit perfectly. Every evening, I remove the day's tag and write the journaling for the day on it. Then it goes right into a tag pocket in the journal. I used the same colors as on the snowy mountain cover, but in Distress Ink instead of Distress Paint.

Layers of ink - December Countdown Calendar by Anna-Karin Evaldsson. Die cut the tags.

Start by die cutting tags. I used watercolor paper, but you can also use other papers, or use premade tags. I die cut 27 tags, since my December journal reaches until Family Day, and I added an additional tag, for extras.

Layers of ink - December Countdown Calendar by Anna-Karin Evaldsson. Ink with Distress Ink.

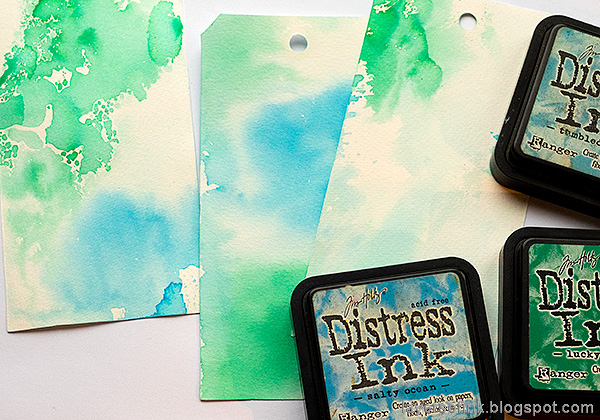
Smear Distress Inks on a craft sheet, mist with water and press the tags into the ink, on both sides. I let them to dry at least partly on one side before doing the other.

Layers of ink - December Countdown Calendar by Anna-Karin Evaldsson. Stamp the dates.

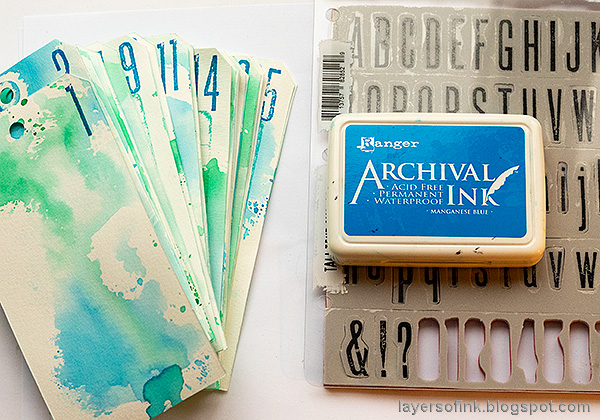
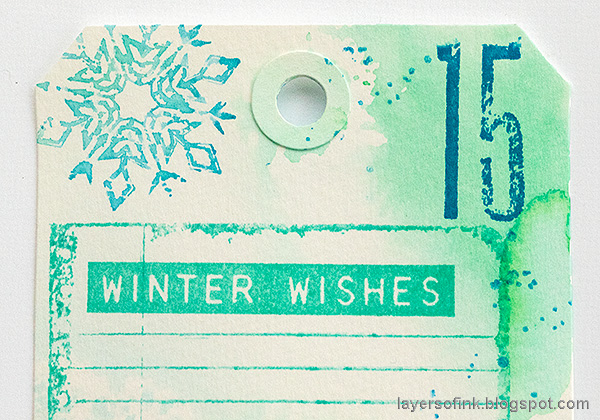
Stamp dates with a number stamp from Tim's Tall Text and Manganese Blue ink.

Layers of ink - December Countdown Calendar by Anna-Karin Evaldsson. Stamp with a ledger stamp.

Stamp the ledger stamp from Tim's School Desk on the tags with Garden Patina ink, on both sides. I have used this stamp in all my December Daily journals. It is one of my all time favorite stamps.

Layers of ink - December Countdown Calendar by Anna-Karin Evaldsson. Stamp Christmas images.

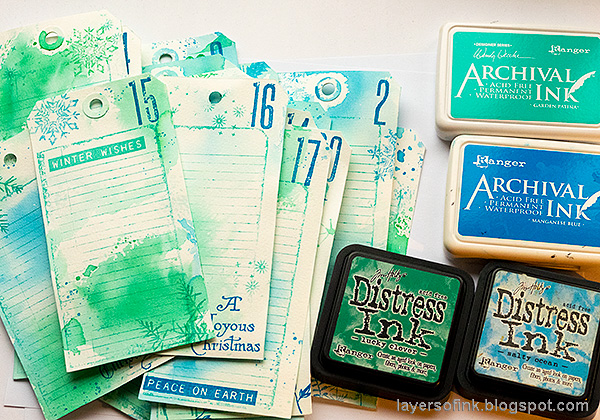
Now comes the really fun part. Surround yourself with Christmas stamps and stamp and stamp. I added stamps on both sides, some sentiment stamps, some image stamps, and some stamps for texture. I used the coordinating Archival Inks for the stamps where I wanted more details, and the Distress Inks for the rest of the stamps. Some of the Distress Ink impressions were misted with water after they were inked, for a watercolor effect.

Layers of ink - December Countdown Calendar by Anna-Karin Evaldsson. Christmas tags.

It's a lot of fun and very relaxing to just sit and stamp. Don't worry about getting each tag perfect, the final result with all the tags together look great even if you might not be as happy with a few of the tags.

Layers of ink - December Countdown Calendar by Anna-Karin Evaldsson. Christmas tags. Into the Woods.

I love these animals from Into The Woods. It was stamped with Manganese Archival Ink to get a nice solid impression.

Layers of ink - December Countdown Calendar by Anna-Karin Evaldsson. Christmas tags.

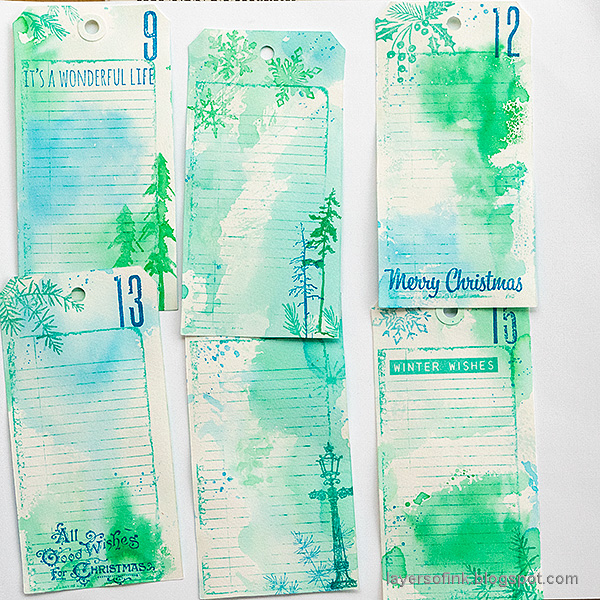
All the tags are different, since both the inky backgrounds are different and the stamping.

Layers of ink - December Countdown Calendar by Anna-Karin Evaldsson. Christmas tags.

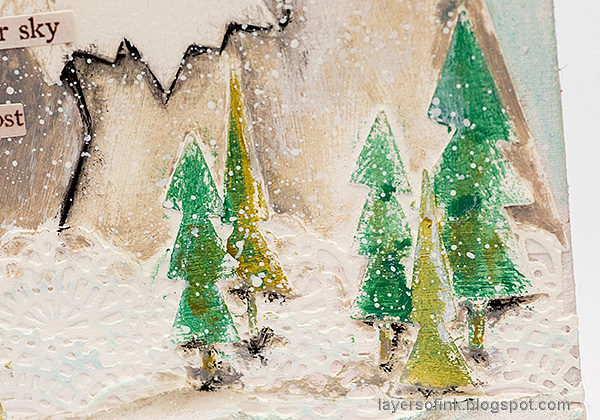
The trees were stamped with Lucky Clover, after misting the stamp with water before stamping.

Layers of ink - December Countdown Calendar by Anna-Karin Evaldsson. Christmas tags.

I like the mix of watercolor stamping (the snowflake) and the Archival Ink Impressions (the Modern Christmas sentiment).

Layers of ink - December Countdown Calendar by Anna-Karin Evaldsson. Christmas tags.

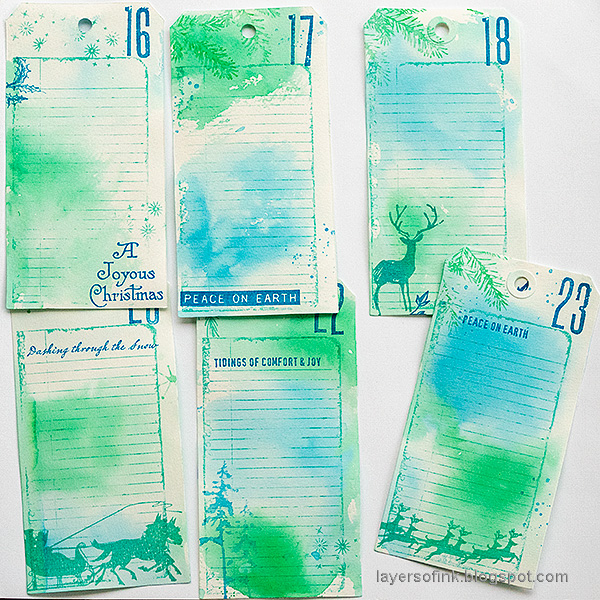
Many of the tags have an outdoor theme, with trees, plants and wildlife, which fit with the mountain cover of the journal.

Layers of ink - December Countdown Calendar by Anna-Karin Evaldsson. Christmas tags.

I love the font used for the sentiments in the new Scenic Holiday set.

Layers of ink - December Countdown Calendar by Anna-Karin Evaldsson. Christmas tags.

Santa always comes on the 24th in Sweden, so he is featured on that tag. The tag in the middle is the back of the 25th.

Layers of ink - December Countdown Calendar by Anna-Karin Evaldsson. Christmas tags.

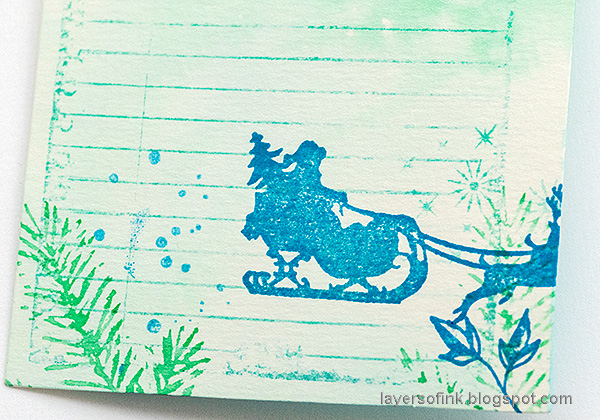
Here's Santa on the way to the next house.

Layers of ink - December Countdown Calendar by Anna-Karin Evaldsson.

My countdown calendar and December Daily tags are now ready for tomorrow.

Layers of ink - December Countdown Calendar by Anna-Karin Evaldsson.

Here are the previous countdown calendars:

2015 Christmas Countdown Calendar (the first calendar with a tutorial for the burlap base)
2016 Christmas Countdown Calendar (with a video for how I made the tags)
2018 Christmas Countdown Calendar


Thank you so much for looking!

Happy Christmas crafting!!

Anna-Karin

Supplies:

* Please note: the links are affiliate links, for which I receive a small percentage of sales generated by the link, at no extra cost to you.


Wednesday, November 27, 2019

Snowy Mountains December Daily Tutorial

Hello friends! It is time for one of my favorite posts every year. I really like Ali Edwards' concept of a December Daily and this will be my eight year of documenting our month of December. I do something of a mini version, focusing more on words than on photos. This is partly since I don't print photos at home, so having new photos daily becomes impractical. Instead, I write daily, and add some photos later.

Layers of ink - Snowy Mountains December Daily Tutorial by Anna-Karin Evaldsson.

For the past seven years, I have done my December Daily in one of Tim Holtz's Worn Binders. It's a great format and all my journals look nice standing together in a book shelf. But even though I use the same base, the journals look very different from each other. Last years journal was a birch forest, and the year before that I did a Narnia theme. This year, we are going to the peaceful winter mountains. I used fairly light colors, to increase the feeling of peace and tranquility, and of spaces filled only with nature. The mountains and trees were die cut with Tim Holtz's Alpine set.

Layers of ink - Snowy Mountains December Daily Tutorial by Anna-Karin Evaldsson. Apply gesso to the cover.

I used the Tattered Worn Binder. Start by coating the cover with gesso. This requires some patience since you need to add quite mainly layers to cover up the background, since the gesso soaks into the cover. Let dry in between.

Layers of ink - Snowy Mountains December Daily Tutorial by Anna-Karin Evaldsson. Die cut mountains with Tim Holtz Alpine die.

Die cut pieces for two mountains from watercolor paper and glue them to the background with matte medium.

Layers of ink - Snowy Mountains December Daily Tutorial by Anna-Karin Evaldsson. Tim Holtz Crochet die.

I also die cut some Crochet borders, to look like snowy hills, and for their great texture.

Layers of ink - Snowy Mountains December Daily Tutorial by Anna-Karin Evaldsson.

Continue by gluing trees to the background, overlapping some of them.

Layers of ink - Snowy Mountains December Daily Tutorial by Anna-Karin Evaldsson.

Now, add thick layers of white texture paste at the front and a bit further into the scene. Cover up some of the crochet pieces and the bases of some of the trees. Let dry.

Layers of ink - Snowy Mountains December Daily Tutorial by Anna-Karin Evaldsson. Paint with acrylic paint.

Now you can start painting the scene. I used Distress Paints. Don't worry about getting it perfect.

Layers of ink - Snowy Mountains December Daily Tutorial by Anna-Karin Evaldsson.

The sky was painted with Tumbled Glass, Salty Ocean, and then Dina Wakley's white paint at the bottom. I also painted the snow areas with Dina's white paint, to make them even whiter.

Layers of ink - Snowy Mountains December Daily Tutorial by Anna-Karin Evaldsson.

Add some white dry-brushing to the trees and the mountain sides.

Layers of ink - Snowy Mountains December Daily Tutorial by Anna-Karin Evaldsson. Add shading.

Shade the snow with Pumice Stone and the trees and mountains with Hickory Smoke and Black Soot. This step adds dimension, and if you want a piece with darker colors, you can add even more shadows. You can also make the top of the sky darker to turn it into a dusk setting (check out my Narnia book for an example of this).

Layers of ink - Snowy Mountains December Daily Tutorial by Anna-Karin Evaldsson. Splatter white paint.

Splatter white paint pretty heavily on the sky and all over the scene.

Layers of ink - Snowy Mountains December Daily Tutorial by Anna-Karin Evaldsson.

Here's a close up of the white splatters, creating snowfall. White paint was rubbed into the three metallic pieces.

Layers of ink - Snowy Mountains December Daily Tutorial by Anna-Karin Evaldsson.

By gluing the die cuts to the background before coloring, you make them more a part of the background. It doesn't look like they were glued on top of the background. If you want to, you can add some paste to the top of the mountains too.

Layers of ink - Snowy Mountains December Daily Tutorial by Anna-Karin Evaldsson.

The trees were painted with Pine Tree and Peeled Paint, and I like how these two green shades mix on the trees.

Layers of ink - Snowy Mountains December Daily Tutorial by Anna-Karin Evaldsson.

You could add even more trees to make a denser forest, but I only wanted a sprinkling.

 Layers of ink - Snowy Mountains December Daily Tutorial by Anna-Karin Evaldsson. Add sentiments, found poetry.

I picked some sentiments from Tim's Christmas Sticker Book for my cover. They form something like a found poem.

Layers of ink - Snowy Mountains December Daily Tutorial by Anna-Karin Evaldsson. Texture paste snow.

And the words are continued at the bottom of the scene. Here you can also see the texture of the paste and crochet snow better.

Layers of ink - Snowy Mountains December Daily Tutorial by Anna-Karin Evaldsson.

For the spine, I painted a piece of watercolor paper with the two green colors used on the tree, splattered with white paint and die cut the year with Tim's Letterboard die.

Layers of ink - Snowy Mountains December Daily Tutorial by Anna-Karin Evaldsson.

Last year, I continued my winter scene on the back cover, but this year, I decided to keep it plain.

Layers of ink - Snowy Mountains December Daily Tutorial by Anna-Karin Evaldsson.

I am now looking forward to filling my journal with memories, even though I can't believe that December starts so soon. In a couple of days, I will be back with a post showing you the process of making the inside pages. They are drying all over my floor as I am typing this up.

If you want more inspiration, check out my previous December Daily journals:  


Thank you so much for taking the time to visit my blog today!  

Happy Christmas crafting!

Anna-Karin

Supplies:

* Please note: the links are affiliate links, for which I receive a small percentage of sales generated by the link, at no extra cost to you.


Monday, November 25, 2019

Design Tape and Stickers

Hello friends! I hope your weekend was a good one. I managed to find a second-hand gown for the Lucia celebrations on 13 December. The boys are going to be 'star boys' and I didn't want to buy brand new gowns, which they will only wear once. I was also lucky to find some plates from my set of chinaware, which is no longer made. And they cost almost nothing. The weekend was finished with a soccer game.


This week at the Simon Says Stamp Monday Challenge Blog we have a Tape It Up theme. Lots of options for this one. I hope you will join us! Don't miss the gorgeous project by our November guest designer Nikki Acton with her blog Addicted to Art.

Layers of ink - Design Tape and Stickers Christmas Tag Tutorial by Anna-Karin Evaldsson.

I had fun covering a tag completely with Design Tape and stickers. I wanted to use some of the pretty vintage Christmas cards stickers in Tim Holtz's Christmas Sticker Book, and filled the rest of the space with design tape and clippings sentiments. If you have small pieces of left-over tape, this is a great project to make them shine. 

Layers of ink - Design Tape and Stickers Christmas Tag Tutorial by Anna-Karin Evaldsson. With Tim Holtz idea-ology stickers and design tape.

Start by simply adhering tape, stickers and sentiments to a tag. It's like doing a puzzle and lots of fun. Trim the edges.

Layers of ink - Design Tape and Stickers Christmas Tag Tutorial by Anna-Karin Evaldsson.

Paint with Picket Fence to whitewash the colors a little. Wipe most of the paint off before it dries.

Layers of ink - Design Tape and Stickers Christmas Tag Tutorial by Anna-Karin Evaldsson.

Draw borders with a white gel pen. If you use darker stickers, the white pen will be more visible, or you might use black instead. I wanted a light look to this tag.

Layers of ink - Design Tape and Stickers Christmas Tag Tutorial by Anna-Karin Evaldsson.

Splatter some Picket Fence paint on the tag using a splatter brush.

Layers of ink - Design Tape and Stickers Christmas Tag Tutorial by Anna-Karin Evaldsson.

Some stickers or paper ephemera are just too pretty to cover up with anything and this is a great project for those pieces.

Layers of ink - Design Tape and Stickers Christmas Tag Tutorial by Anna-Karin Evaldsson.

The splatters add a winter feeling to the tag, and gives it some more texture.

Layers of ink - Design Tape and Stickers Christmas Tag Tutorial by Anna-Karin Evaldsson.

I rubbed white paint into the Word Band. The paper border was die cut with Tim's Crochet die and I also use a piece of lace.

I hope you will join us this week in our Tape It Up challenge. As always, you have a chance to win a $50 gift voucher to do some fun shopping at Simon Says Stamp. You have until next Monday 8am Ohio time. 1pm UK time, 2 pm CET to join in.


Don't forget to follow Simon Says Stamp on Instagram, they post great stuff daily. 


Do you use Instagram? If so please add #sssmchallenge so we can see your entries there too.


Thank you so much for taking the time to visit my blog today!  

Happy crafting!

Anna-Karin

Supplies:

* Please note: the links are affiliate links, for which I receive a small percentage of sales generated by the link, at no extra cost to you.