
Hello friends! Last week winter started to make itself felt here, with snow flurries falling, frost that had to be removed from my car windows, and much prettier frost on grass, leaves and branches. Still no snow on the ground, but it might be here any day now.
And of course, it is the perfect time for some winter crafting. Today I have an easy winter landscape mixed media tutorial to share with you.

Creating snow with different techniques is one of my favorite things to do. You can create snow in so many different ways, and here I used texture paste, paint splatters and Tim Holtz's new mica flakes. I have loved mica since I was a child and often look for it when out walking. There is mica to be found along some of my walking trails. Tim's mica flakes are not real mica, but they look very similar to the real thing, and they are heavier than I thought they would be. I expected the jar to be very lightweight and was happily surprised to discover that it does have some weight.
For the canvas I used a brand new stencil by Darkroom Door, and also one of their background stamps.

I worked on a 5x7 canvas board. I wanted to use one of the Dina Wakley media boards, but I couldn't find them. Not everything has ended up in a logical place since the move, and I still find myself having to look for things. You can use one of Dina's boards instead. Smear gesso on the board with a palette knife. Press the lid of a Distress Paint bottle into the gesso to create circles.

When dry, paint the sky with watered-down Distress Paint and mist with even more water to make them blend. Leave to dry, it takes a little while because of all the water, but it looks better if left to dry on its own.

Apply texture paste through the Reindeer set stencil with a palette knife. I just love how proud and joyful this deer looks. The set also comes with a mask.
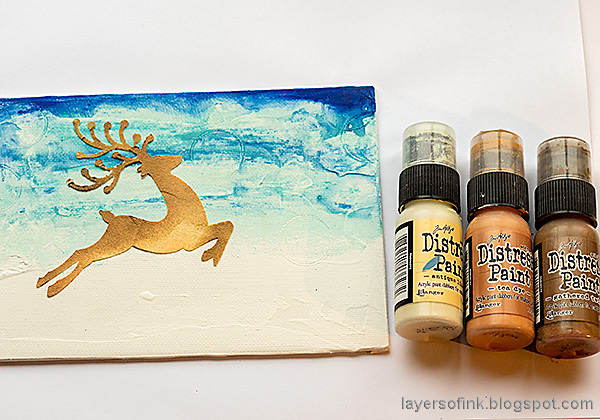
When the paste is dry, put the stencil back and apply Distress Inks with a mini round blending tool. Start with Antique Linen and then add the other two colors.

Darken the brown shades with a little Ground Espresso.

I painted the tail and the belly of the deer white, and added some white to the antlers. Stamp the background with the Starry Night Background stamp and white paint. Always clean your stamp immediately after using it with acrylic paint.

Apply white texture paste with a palette knife in thick layers. Try to create the look of snowy hills. Leave to dry. This takes a while since the paste is so thick. I left it overnight.

Paint the paste with white paint. The white paint is whiter than the paste.

Add just a tiny bit of Pumice Stone to the snow, to create texture, and Ground Espresso around the edges of the canvas.

Splatter with white paint using Tim's splatter brush. Always cover up your work surface and protect your clothing when splattering paint.

Apply gloss multi-medium along the base of the canvas, here and there in the snow, and as dots over the sky. Sprinkle Mica Flakes on top. They will stick to the gel and create the look of glimmering snow.

To add a few more warmer elements, I colored a Gumdrop Heart with Teakwood alcohol ink.

Here you can see the effect of the splattering and mica flakes on the antlers.

The stamped white stars in the sky are subtle, and I really like how they add another layer to the background.

One of my favorite parts of a project is often to add words and here I had such fun picking out phrases from Tim's Christmas sticker book. This is meant as a general winter decor item, and not only for Christmas.

I tied a Word Band around the base with twine. Here you can also see the mica better.

White paint was rubbed into the word band.

The texture paste in combination with the sponged paint gives a very nice texture to the deer, looking almost like the fur of a real deer. We haven't seen our two deer visitors in the garden for a couple of weeks, but they are bound to return.

Thank you so much for taking the time to visit my blog today!
Happy crafting!
Anna-Karin
Supplies:
* Please note: the links are affiliate links, for which I receive a small percentage of sales generated by the link, at no extra cost to you.
* Please note: the links are affiliate links, for which I receive a small percentage of sales generated by the link, at no extra cost to you.
Fantastic tutorial - wonderful piece!
ReplyDeleteWhat a snowy treat - I love how the mica glistens and the wonderful shading on the deer. Great selection of words too.
ReplyDeleteAlison x
What a stunning winter landscape! I love all the snowy texture that you created and the reindeer stands out beautifully against the blue background - perfect 😁. Happy Friday and wishing you a wonderful weekend! Hugs, Jo x
ReplyDeleteAwwwww..... I'm speechless!!! Sch a WONDERFUL piece of Art!! Thanks so much for sharing all the steps!!
ReplyDeleteYour creation is swoon worthy. Incredibly beautiful. I love all the texture and color and words. Just amazing.
ReplyDelete