
Hello friends! Today I have a tutorial to share for a mini envelope and a card. It's a Christmas project, but you can of course use other stamps and turn it into a different theme.

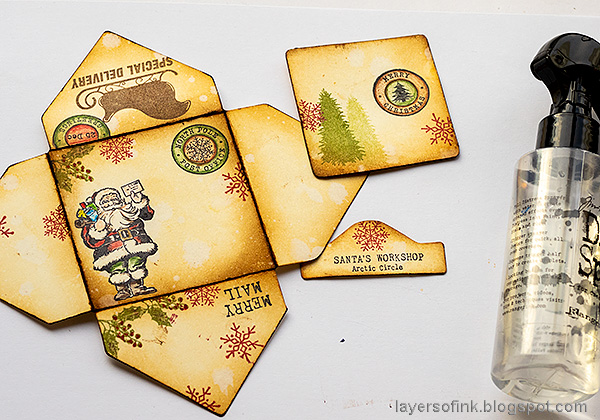
This month the Eileen Hull Inspiration Team has been sharing holiday projects, and I used Eileen's Gift Card Folder & Label #2 die to create this. The stamps are from the newest release by Darkroom Door and are perfect for Christmas cards and envelopes. The envelope is 3 x 3 inches, which is such a cute size. It can also become more dimensional, but I decided to keep it flat.

Here's the back of the envelope. I decided to only use stamps, ink and pencils for this project, with just a couple of stickers.

I also made a little card to go into the envelope. This is meant to be a gift card holder, but I cut it smaller and turned it into a mini card instead.

Start by die cutting the envelope and gift card from mixed media paper. I cut the card smaller so that it fits into the envelope.

Fold and score along the score lines. There are score lines also for a more dimensional envelope, if you want to fold along those too. Stamp with stamps from the Darkroom Door Merry Mail set. I used black, green, red and brown Archival Inks.

Stamp the card too, on both sides.

Color the Santa and some of the other elements with colored pencils.

Stamp the Santa and the label on masking paper, cut out and mask the images.

Ink with Distress Inks. I used Antique Linen, Vintage Photo and Ground Espresso.
Splatter with a little bit of water, and then remove the masks.

I left space for the recipient's name, or a short message.

I colored the images quite quickly, and didn't blend the colors. I wanted the texture of the pencils to be visible on this project.

Apply tape along the edges to assemble the envelope. The two stickers in fact cover up ink from when I dropped the envelope on the open red ink pad.

Here you can see how the the gift card holder piece sticks up so that it is easy to take out the card. When it is a gift card holder, you would place it the other way around.

Restamp the tree without reinking to make it look like there are trees further away.

On the back of the card I left a space for a little message. If you want to cover up the staples add a flower, snowflake, sequin or something similar there.
Thank you so much for taking the time to visit my blog today!
Happy crafting!
Anna-Karin
Supplies:
* Please note: the links are affiliate links, for which I receive a small percentage of sales generated by the link, at no extra cost to you.
* Please note: the links are affiliate links, for which I receive a small percentage of sales generated by the link, at no extra cost to you.
That is so creative! I love it!
ReplyDeleteWhat a sweet envelope and card Anna-Karin! Love the stamps you used, your lovely coloring and sponging! A creative use for Eileen's Gift Card Folder! xx
ReplyDeleteThis is wonderful- I need to get that stamp set, I have been eyeing it for awhile! Love that you used colored pencils- I need to do that more.
ReplyDelete