Friday, April 30, 2021

Simon Says Stamp Born To Sparkle Blog Hop

Hello stampers! I am very happy to take part in the Simon Says Stamp Born To Sparkle blog hop, to celebrate the new collection. If you follow along in the hop, you should have come here from the very creative Heather Hoffman.

Please note: this post has affiliate links, for which I receive a small percentage of sales generated by the link, at no extra cost to you.


The Born To Sparkle release is full of versatile stamps, dies, stencils, sequins and paper products. If you use the code CRUSH428 Island Crush Ink Cube set for free (with purchase).This promotion will expire 5/2 at 11:59 pm EDT or while supplies last.


I just love the name of this release. We are all born to sparkle.

Layers of ink - Simon Says Stamp Born To Sparkle Blog Hop by Anna-Karin Evaldsson.

I made a tag and a card, with some fun and easy technique. I'll show you two of the many ways in which you can use the Open Grid Background stamp (which is one of the stamps from Born To Sparkle that I designed). As always, the techniques work for many types of projects.
 
Layers of ink - Simon Says Stamp Born To Sparkle Blog Hop Congrats Card by Anna-Karin Evaldsson.

Let's start with the congrats card, which could be a birthday card or a graduation card, or something else. Congrats is one of the sentiments that work for many themes. The background was watercolored stamped, which is a favorite technique of mine. 

Layers of ink - Simon Says Stamp Born To Sparkle Blog Hop Congrats Card by Anna-Karin Evaldsson. Stamp the Open Grid Background.

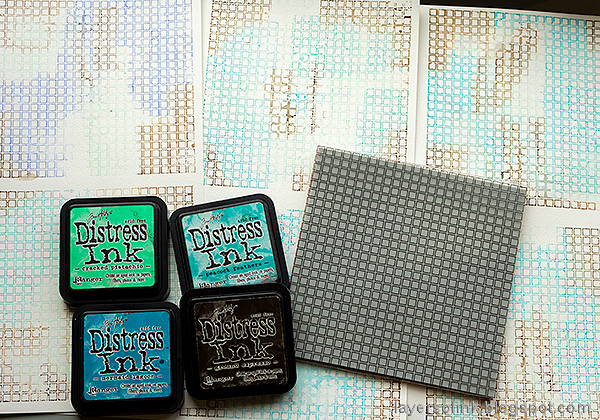
I had fun and made a bunch of backgrounds using the Open Grid Background, using slightly different combinations of Distress Inks. The four inks shown here are the ones I used in the panel that ended up on the card. Ink the stamp starting with the lightest ink first. Mist 4-5 times with water and then stamp. I just love the unpredictable results of this technique and the way in which the inks blend. Watercolor paper works best for this technique.

Layers of ink - Simon Says Stamp Born To Sparkle Blog Hop Congrats Card by Anna-Karin Evaldsson.

When dry, cut out and distress the edges. Mist in a just a few places with Antique Linen Distress Oxide spray, and add some splatters too.

Layers of ink - Simon Says Stamp Born To Sparkle Blog Hop Congrats Card by Anna-Karin Evaldsson.

Stamp the Party Balloons on watercolor paper, with Jet Black Archival Ink.

Layers of ink - Simon Says Stamp Born To Sparkle Blog Hop Congrats Card by Anna-Karin Evaldsson.

Smear Distress Inks on a non-stick craft sheet, mist with water and pick up with a paint brush. Watercolor the balloons that aren't partly covered by other balloons. Leave some of the paper showing through for highlights.

Layers of ink - Simon Says Stamp Born To Sparkle Blog Hop Congrats Card by Anna-Karin Evaldsson.

There are two sizes in the Congrats On A Line set. Die cut the larger from heavystock paper.

Layers of ink - Simon Says Stamp Born To Sparkle Blog Hop Congrats Card by Anna-Karin Evaldsson.

Ink in an ombre fashion and mist lightly with water.

Layers of ink - Simon Says Stamp Born To Sparkle Blog Hop Congrats Card by Anna-Karin Evaldsson. Open Grid Background stamp.

No square will look exactly like the other. My favorites are the ones that end up being more than one color.

Layers of ink - Simon Says Stamp Born To Sparkle Blog Hop Congrats Card by Anna-Karin Evaldsson.

This technique works great with the Solid Grid Background stamp too.

Layers of ink - Simon Says Stamp Born To Sparkle Blog Hop Congrats Card by Anna-Karin Evaldsson.

Cut out the balloons and add twine strings. Most of them were adhered with foam dots and two are glued directly to the background.

Layers of ink - Simon Says Stamp Born To Sparkle Blog Hop Congrats Card by Anna-Karin Evaldsson.

I folded the ends of the sentiment strip around the edges of the card. The smaller sentiment was stamped with Dark Chocolate ink and comes from the very versatile Family Headlines set.

Layers of ink - Simon Says Stamp Born To Sparkle Blog Hop Open Grid Tag Tutorial by Anna-Karin Evaldsson.

For the tag, I used almost an opposite technique as for the card, with the squares being cream and the background colored. And I used a very warm color combo with touches of gold.

Layers of ink - Simon Says Stamp Born To Sparkle Blog Hop Congrats Card by Anna-Karin Evaldsson.

Start by embossing the Open Grid Background on a heavystock tag, using the Simon Says Stamp Cream embossing powder.

Layers of ink - Simon Says Stamp Born To Sparkle Blog Hop Open Grid Tag Tutorial by Anna-Karin Evaldsson. Ink with distress ink.

Ink the tag with yellow, orange and brown Distress Ink, using an ink-blending tool.

Layers of ink - Simon Says Stamp Born To Sparkle Blog Hop Open Grid Tag Tutorial by Anna-Karin Evaldsson.

Smear a little Mustard Seed Distress Oxide ink on a non-stick craft sheet. Mist with water and dip the tag into the ink, just here and there.

Layers of ink - Simon Says Stamp Born To Sparkle Blog Hop Open Grid Tag Tutorial by Anna-Karin Evaldsson.

When dry, splatter with a brown Scribble Stick. Dip the stick in water and flick a paint brush against it. This is the least messy way of adding splatters that I know of.

Layers of ink - Simon Says Stamp Born To Sparkle Blog Hop Congrats Card by Anna-Karin Evaldsson.

Die cut the You Shine die from brown and gold papers.

Layers of ink - Simon Says Stamp Born To Sparkle Blog Hop Open Grid Tag Tutorial by Anna-Karin Evaldsson.

Using cream instead of white embossing powder gives an even warmer look to the background. Don't worry about stray powder, it just adds texture.

Layers of ink - Simon Says Stamp Born To Sparkle Blog Hop Open Grid Tag Tutorial by Anna-Karin Evaldsson.

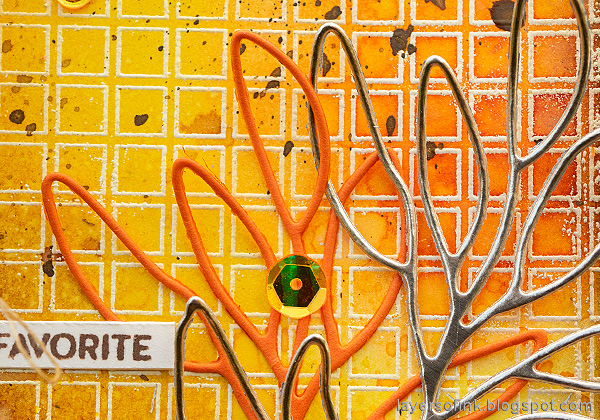
The only thing that I used which wasn't from the Born To Sparkle release was the Leafy Branch die, die cut from gold and orange cardstock.

Layers of ink - Simon Says Stamp Born To Sparkle Blog Hop Open Grid Tag Tutorial by Anna-Karin Evaldsson.

The sentiment comes from the Family Headlines set. My youngest loves to say 'my favorite' about lots of things, so I was happy to find this sentiment on the set. It is meant to be followed by one of the other sentiment stamps on the set (mom, dad, son, etc.), but I like it on its own too.

Layers of ink - Simon Says Stamp Born To Sparkle Blog Hop Open Grid Tag Tutorial by Anna-Karin Evaldsson.

The You Shine sentiment is so gorgeous. And you can use the 'shine' letters on their own too. I will be using this sentiment a lot.

Don't miss all the inspiration along the hop. There are of course prizes to be won too, and at each stop on the hop SSS is giving away a $25 coupon, randomly drawn from those who leave a comment. The winners will be posted post on the Simon Says Stamp store blog on Wednesday, the 5th of May.

Your next stop on the hop is my wonderful Simon Says Monday Challenge Blog team mate Emma Williams and she will show you one of her gorgeous projects.

Here are all the stops along the hop:


Anna-Karin Evaldsson (you are here)


For more Born To Sparkle inspiration, remember to check out the Born To Sparkle gallery at Simon Says Stamp, and if you make something with products from the range, it is fun if you post it in the gallery too. There are galleries for all releases, and for the card kits, full of inspiration. Part one of the blog hop was yesterday, so don't miss all the inspiration there.


Thank you so much for taking the time to stop by here today! I will see you again tomorrow.

Happy crafting!

Anna-Karin

Supplies:

* Please note: the links are affiliate links, for which I receive a small percentage of sales generated by the link, at no extra cost to you.

Thursday, April 29, 2021

Shadow Stenciling Tutorial

Hello friends! I have a fun tutorial to share with you using a stencil to create a 3-D effect. There is quite a bit of stamping too. I made an art journal page, but the techniques work just as well for cardmaking. 

Please note: this post has affiliate links, for which I receive a small percentage of sales generated by the link, at no extra cost to you.

Layers of ink - Shadow Stenciling and Stamping Tutorial by Anna-Karin Evaldsson. With Simon Says Stamp Mix and Match Squares.

I wanted to create a 3-D effect with the Simon Says Stamp Mix and Match Squares stencil. This can be done in different ways, but here I used paint and embossing powder. I also did some colorful stamping with Distress Oxide ink. You can try the technique on different surfaces. It works very well on kraft cardstock. I worked in my Dina Wakley Media Journal.

Layers of ink - Shadow Stenciling and Stamping Tutorial by Anna-Karin Evaldsson. Apply paint through Simon Says Stamp Mix and Match Squares Stencil.

Start by applying Dina Wakley white paint through the stencil with a mini-round ink-blending tool.

Layers of ink - Shadow Stenciling and Stamping Tutorial by Anna-Karin Evaldsson.

Continue until you have covered as much of the background as you want.

Layers of ink - Shadow Stenciling and Stamping Tutorial by Anna-Karin Evaldsson. Stamp with Simon Says Stamp Mix and Match Squares Stamp Set.

Stamp squares from the coordinating Mix and Match Squares Stamp Set with various Distress Oxide ink. I used both solid and frame square stamps. These are two of the products I designed.

Layers of ink - Shadow Stenciling and Stamping Tutorial by Anna-Karin Evaldsson. Heat emboss.

Pour clear embossing powder over the page. It will stick to the Distress Oxide stamping. Heat emboss. Always be very careful when using a heat tool and never touch the melted powder until it has cooled down completely.

Layers of ink - Shadow Stenciling and Stamping Tutorial by Anna-Karin Evaldsson. Shadow emboss.

Place the stencil back over the design, but off-set it slightly. Apply clear embossing ink through the stencil and emboss with clear powder. This will give a shadow effect and a 3-D look. Make sure that you off-set the stencil in the same direction all the time. 

Layers of ink - Shadow Stenciling and Stamping Tutorial by Anna-Karin Evaldsson.

Here you can see the cool glossy look of the squares. 

Layers of ink - Shadow Stenciling and Stamping Tutorial by Anna-Karin Evaldsson.

I also die cut a few Circle Loops from Simon Says Stamp Cornflower Blue cardstock. The small sentiments and stamped stars come from the Mix and Match Squares Stamp Set.

Layers of ink - Shadow Stenciling and Stamping Tutorial by Anna-Karin Evaldsson.

The combination of slightly textured white paint, the colorful stamping and shadows is pretty cool.

Layers of ink - Shadow Stenciling and Stamping Tutorial by Anna-Karin Evaldsson.

The title was die cut with the Simon Says Stamp You word die from blue and black cardstock. The sentiment stamp comes from the Beautiful Butterflies set.

Layers of ink - Shadow Stenciling and Stamping Tutorial by Anna-Karin Evaldsson.

More circles and a sentiment from Mix and Match Squares.

Layers of ink - Shadow Stenciling and Stamping Tutorial by Anna-Karin Evaldsson.

I made the shadow effect too subtle on one of the applications, and redid it. That works fine, it just gives a thicker layer of clear powder.

Layers of ink - Shadow Stenciling and Stamping Tutorial by Anna-Karin Evaldsson.

Some stray powder might appear on the cardstock, as you can see here, but I was fine with that. 

Layers of ink - Shadow Stenciling and Stamping Tutorial by Anna-Karin Evaldsson.

It is tricky to photograph the glossy effect. I really like how the colorful oxide ink squares turned out.

Layers of ink - Shadow Stenciling and Stamping Tutorial by Anna-Karin Evaldsson.

You can do a large variety of different squares by combining the Mix and Match Squares Stencil with the Mix and Match Squares Stamp set.

Layers of ink - Shadow Stenciling and Stamping Tutorial by Anna-Karin Evaldsson.

You can also try to use white pigment ink to see what effect you can get. The technique work with lots of stencils, but is easiest to do with stencils that aren't too intricate. The Mix and Match Circles Stencil would give a similar effect as the squares on.


Thank you so much for taking the time to stop by here today! I will see you again tomorrow.

Happy crafting!

Anna-Karin

Supplies:

* Please note: the links are affiliate links, for which I receive a small percentage of sales generated by the link, at no extra cost to you.

Monday, April 26, 2021

Cherry Blossom Tree Tutorial

Hello friends! I hope you are well and had a good weekend. Around this time of the year, we usually go into Stockholm and look at the cherry trees blossoming, but this is now the second year that we miss that so instead I created my own cherry blossom trees. In the tutorial below you will see how easy it is. 

Our theme this week at the Simon Says Stamp Monday Challenge Blog is 'Add a quote'. I really like to use quotes on my projects and I am looking forward to seeing all the quotes.  I hope you will join us and don't miss the last project by our April guest designer Autumn Clark.

Please note: this post has are affiliate links, for which I receive a small percentage of sales generated by the link, at no extra cost to you.

Layers of ink - Cherry Blossom Tree Tutorial by Anna-Karin Evaldsson. With Simon Says Stamp All Seasons Tree stamp set.

As I was thinking about missing the cherry blossom trees this year again, I thought about how nice the pink flowers look when photographed against a blue sky and suddenly got the idea for this card. I used the Simon Says Stamp All Seasons Tree. The trees on the set can be turned into a large number of trees and the two smaller trees were perfect for my cherry blossom trees.

Layers of ink - Cherry Blossom Tree Tutorial by Anna-Karin Evaldsson. With Simon Says Stamp All Seasons Tree stamp set. Stamp and emboss the cherry blossoms.

I started with the flowers and used the two leaf texture stamps on the set. Stamp them with Worn Lipstick Distress Oxide Ink on watercolor paper and immediately emboss with clear powder. Add more powder before the first layer is dry and repeat about three or four times. I also sprinkled a tiny bit of white powder. Be very careful when using a heat tool and never touch the melted powder until it has cooled down completely. I did one tree at a time since you need to work quickly. 

Layers of ink - Cherry Blossom Tree Tutorial by Anna-Karin Evaldsson. With Simon Says Stamp All Seasons Tree stamp set.

Don't worry about stray powder, it will look like petals blowing in the wind later.

Layers of ink - Cherry Blossom Tree Tutorial by Anna-Karin Evaldsson. With Simon Says Stamp All Seasons Tree stamp set. Watercolor the background.

Smear Distress Ink on a craft sheet, mist with water and pick up with a paint brush. I used Tumbled Glass and Salty Ocean for the sky. Paint the scene.

Layers of ink - Cherry Blossom Tree Tutorial by Anna-Karin Evaldsson. With Simon Says Stamp All Seasons Tree stamp set.

When dry, apply Salty Ocean and Mowed Lawn to the craft sheet and mist with water. Press the paper into the ink, just here and there, to get more texture.

Layers of ink - Cherry Blossom Tree Tutorial by Anna-Karin Evaldsson. With Simon Says Stamp All Seasons Tree stamp set. Add texture with Distress Oxides.

Repeat, but this time with Distress Oxide ink. I made the grass darker towards the front and the sky darker towards the top, which adds a sense of perspective.

Layers of ink - Cherry Blossom Tree Tutorial by Anna-Karin Evaldsson. With Simon Says Stamp All Seasons Tree stamp set.

Use the medium and the smaller tree from the set and ink with Forest Moss. Mist with water before stamping. Stamp for each tree. You can also use just a portion of a trunk to make a smaller tree.

Layers of ink - Cherry Blossom Tree Tutorial by Anna-Karin Evaldsson. With Simon Says Stamp All Seasons Tree stamp set. Shade the tree trunks.

Next, smear Mowed Lawn and Forest Moss on a craft sheet and mist with water. Use a paint brush and add shading and grass around the base of the tree trunks. I also painted branches in between the embossed blossoms here and there.

Layers of ink - Cherry Blossom Tree Tutorial by Anna-Karin Evaldsson. With Simon Says Stamp All Seasons Tree stamp set. Add splatters.

There are usually lots of blossoms in the air and on the ground and to get that look, I splattered with two shades of pink Scribble Sticks. Dip the stick in water and flick a paint brush against it. Avoid the area where you plan to stamp the sentiment.

Layers of ink - Cherry Blossom Tree Tutorial by Anna-Karin Evaldsson. With Simon Says Stamp All Seasons Tree stamp set.

Next, I also wanted some white splatters and used acrylic paint for that. Again, protect the area where you have stamped or plan to stamp the sentiment.

Layers of ink - Cherry Blossom Tree Tutorial by Anna-Karin Evaldsson. With Simon Says Stamp All Seasons Tree stamp set.

The trees look really nice with all the embossing powder and the mix of white, pink and green. 

Layers of ink - Cherry Blossom Tree Tutorial by Anna-Karin Evaldsson. With Simon Says Stamp All Seasons Tree stamp set.

This is a lovely quote and I was happy when I found it and with how well it fit on the All Seasons Tree Set (it is one of the Simon Says Stamp sets that I designed).

Layers of ink - Cherry Blossom Tree Tutorial by Anna-Karin Evaldsson. With Simon Says Stamp All Seasons Tree stamp set.

The stray embossing powder in the background creates a great resist effect when you add the blue ink for the sky. I stamped one of the trees in the background a little too low, so you can see more of the branches than for the other trees. But, since this is also sometimes the case with cherry blossom trees, I decided that I was okay with that.

Layers of ink - Cherry Blossom Tree Tutorial by Anna-Karin Evaldsson. With Simon Says Stamp All Seasons Tree stamp set.

The petal-filled grass. And the white splatters might be white anemone flowers.

Layers of ink - Cherry Blossom Tree Tutorial by Anna-Karin Evaldsson. With Simon Says Stamp All Seasons Tree stamp set.

I with you could see the tree crowns in real life, since the effect of the embossing powder is hard to capture on photo. They also have a bumpy texture.

Layers of ink - Cherry Blossom Tree Tutorial by Anna-Karin Evaldsson. With Simon Says Stamp All Seasons Tree stamp set.

Using two shades of pink splatters add life. I also used a white gel pen on some of the trunks.

Layers of ink - Cherry Blossom Tree Tutorial by Anna-Karin Evaldsson. With Simon Says Stamp All Seasons Tree stamp set.

I hope you enjoyed this tutorial. You can make the trees any color by just using a different color Distress Oxide ink when stamping the crowns. For more inspiration on the All Seasons Tree set check out my: Three Mixed Media Tree ATCs, Spring Mixed Media Canvas, and Spring Forest Art Journal.

I hope you will join us this week in our Add A Quote challenge. You have a chance to win a $25 gift voucher to do some fun shopping at Simon Says Stamp. You have until Monday 8am Ohio time. 1pm UK time, 2 pm CET to join in.


Do you use Instagram? If so please add #sssmchallenge so we can see your entries there too.


Thank you so much for taking the time to stop by here today! 

Happy crafting!

Anna-Karin

Supplies:

* Please note: the links are affiliate links, for which I receive a small percentage of sales generated by the link, at no extra cost to you.