Hello friends! I have a spring canvas to share with you today, with fun and easy mixed media and stamping techniques. You can use the techniques for cardmaking and art journaling too.
It is still a little chilly here, but spring is definitely on the way. One of my favorite things with spring is all the shades of green that you will find where ever you look and that is what inspired this 7 x 9.5 in canvas. I wanted to create green hills with a sprinkle of leafy trees. I used Simon Says Stamp All Seasons Tree and Forest Scenery stamp sets.
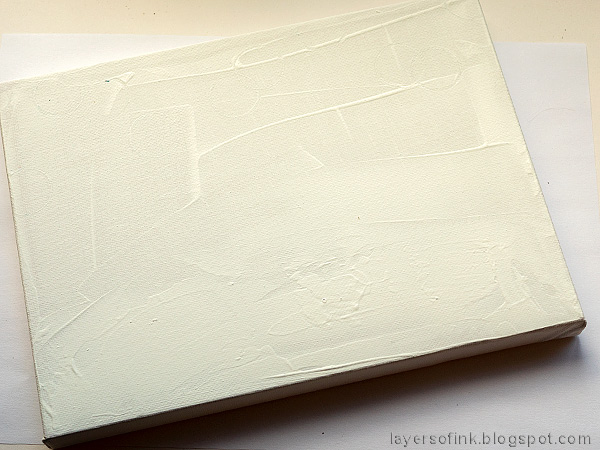
Start by coating the canvas with gesso.
Apply
texture paste where you plan the grassy hills to be. I applied it with a palette knife and made a hill-looking texture. Let dry.
When dry, paint with watered-down Distress Paints.
It is difficult to get a good stamped impression on such a textured surface, so I reached for my favorite solution to that, namely stamping on tissue paper. Stamp on the glossy side of the tissue paper, with Archival Ink, or another waterproof ink. I hadn't yet decided if I wanted black or brown trees, so I stamped both. The trees from from the All Seasons Tree and the deer from the Forest Scenery set.
I went with the brown trees this time since I wanted a softer look. Tear around the images as a cut edge will be more visible. Place them out to try out different compositions.
Use gloss medium to glue down the tissue papers. Apply medium on the background, place the paper into the medium and add another layer of medium on top. As you can see the tissue paper disappears almost completely. I turned one of the deer around so that they would face each other. At this stage, I often think the canvas looks terrible, but we will fix that.
Add more green to the grass to deepen the shades. I made it darker in the foreground, which adds a sense of distance.
Add more color to the sky too.
I wanted my trees to have a leafy texture. Mix a tiny bit of paint into
texture paste. I did one lighter version with Twisted Citron and a darker version with Mowed Lawn. Apply to the trees with a palette knife, creating lots of texture. Don't apply it smoothly and let some of the branches show through, as they would on a real tree. I had a jar of
Simon Says Stamp Unicorn Confetti on my desk and decided to toss some of it on top of the paste leaves. Add some of the texture to the background too.
I painted the sky with gloss medium and sprinkled just a little bit of Unicorn glitter on top. The sentiment was stamped on tissue paper and applied in the same way as the other stamps. Use darker brown and green to add shading to the tree trunks, deer, and under the trees and deer.
I also splattered some white and yellow paint on the background, to create the look of spring flowers growing in the grass. This sentiment comes from
Anna's Flowers.
The glitter was added on a whim and I thought it gave a fun sparkle and added to the happy spring feel of the canvas.
I also stamped some sentiments from the
Forest Scenery right on the background, placing a closed ink pad underneath the spot for a firm surface to stamp on.
The trees have a cool texture that you want to reach out and touch.
With tissue paper stamping you can easily flip an image, to get a mirror effect. I added shading and some highlights to the deer, which adds dimension.
Here you can see that I painted a darker brown on one side of the deer. The 'shades of green' sentiment was originally inspired by spring-time trees.
The tissue paper is a little more visible on this
sentiment stamp, if you look closely. The reason for that is that it was applied over darker paint. Tissue paper disappears better over light colored shades. I wanted that sentiment in a place with lots of texture, otherwise I would have stamped it directly on the background.
The small trees have shading on the trunks too. I used mainly the lighter green paste for these, so that they would look further away.
Here you might be able to see the tree texture a little better.
Thank you so much for taking the time to stop by here today! I will see you again tomorrow.
Happy crafting!
Anna-Karin
Supplies:
* Please note: the links are affiliate links, for which I receive a small percentage of sales generated by the link, at no extra cost to you.


No comments:
Post a Comment
Thank you so much for leaving a comment! Happy Crafting!