Wednesday, August 31, 2022

Everyday Moments Art Journal Tutorial

Hi friends! It is the last day of August and I have an art journal page to share about everyday moments, made with stamps, paint, stencils and pens.

Please note: this post has affiliate links, for which I receive a small percentage of sales generated by the link, at no extra cost to you.


Layers of ink - Mixed Media Art Journal Background Tutorial by Anna-Karin Evaldsson.

Here, I started by stamping a background layer with various stamps and then painted, stenciled and stamped some more on top of that layer. It is a fun way of using your stamps and creates an interesting surface to work on. Experiment with different types of stamps to see what effects you can get.

Layers of ink - Mixed Media Art Journal Background Tutorial by Anna-Karin Evaldsson.

Working in my Dylusions Small Creative Journal, I first added a layer of gesso. Let dry.

Layers of ink - Mixed Media Art Journal Background Tutorial by Anna-Karin Evaldsson. Stamp with Simon Says Stamp Ledger Background.

Stamp the background with Simon Says Stamp Ledger Background stamp. It doesn't need to be perfect.

Layers of ink - Mixed Media Art Journal Background Tutorial by Anna-Karin Evaldsson. Stamp with Simon Says Stamp Thoughtful Flowers and Document It.

Continue stamping. I used a mix of quote stamps from Simon Says Stamp Document It and Thoughtful Flowers and script from Old Letter.

Layers of ink - Mixed Media Art Journal Background Tutorial by Anna-Karin Evaldsson.

Add a few pieces of old book paper with matte medium and coat the whole page with the medium.

Layers of ink - Mixed Media Art Journal Background Tutorial by Anna-Karin Evaldsson. Paint with distress paint.

When dry, paint with Cracked Pistachio and Tea Dye.

Layers of ink - Mixed Media Art Journal Background Tutorial by Anna-Karin Evaldsson.

Sponge Turquoise paint through the Mix and Match Squares stencil.

Layers of ink - Mixed Media Art Journal Background Tutorial by Anna-Karin Evaldsson.

When dry, do the same with white paint and a dot stencil.

Layers of ink - Mixed Media Art Journal Background Tutorial by Anna-Karin Evaldsson.

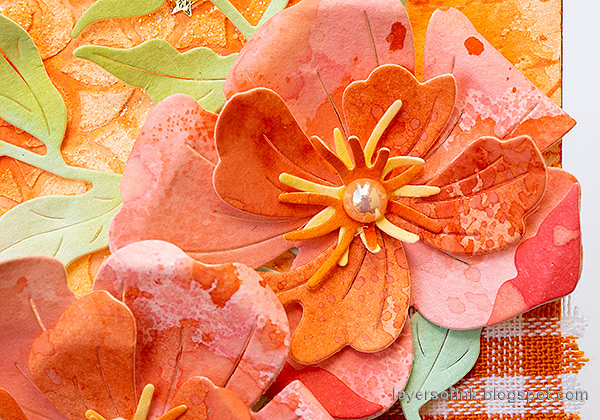
Stamp flowers from Simon Says Stamp Laugh in Flowers, Anna's Flowers and Thoughtful Flowers. Extend the stems with a black marker.

Layers of ink - Mixed Media Art Journal Background Tutorial by Anna-Karin Evaldsson.

Stamp a star circle from Mix and Match Circles with brown ink and add lines with a black pen and a white gel pen. Stamp sentiments here and there. 

Layers of ink - Mixed Media Art Journal Background Tutorial by Anna-Karin Evaldsson.

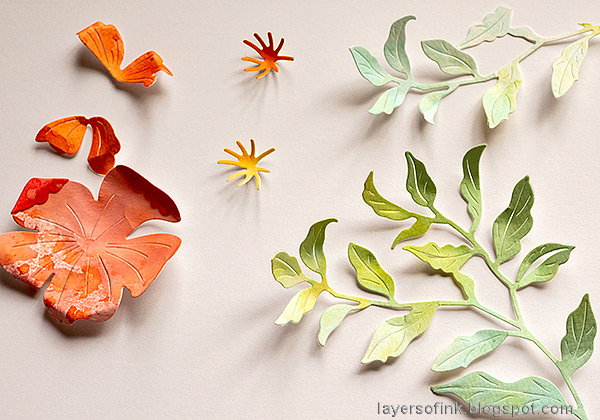
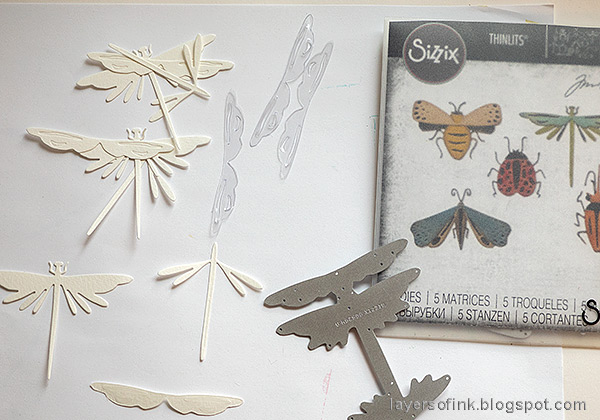
Die cut the Stitching Butterflies from inky paper and old book paper.

Layers of ink - Mixed Media Art Journal Background Tutorial by Anna-Karin Evaldsson.

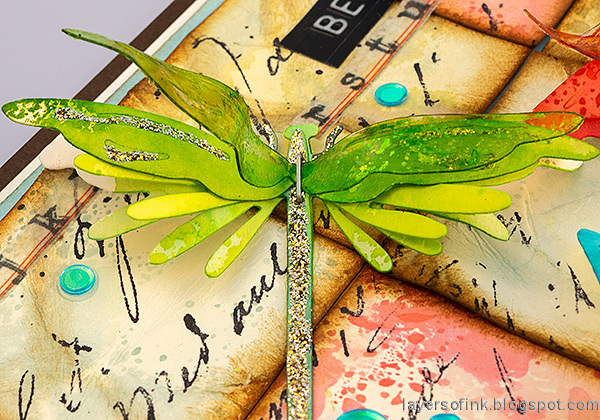
The combination of partly visible ledger lines and text in the background, with the stark black stamping makes for an interesting look.

Layers of ink - Mixed Media Art Journal Background Tutorial by Anna-Karin Evaldsson.

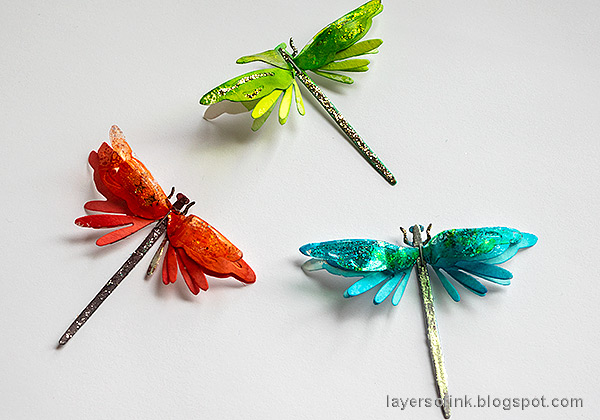
Layer the butterflies together and shape the wings slightly.

Layers of ink - Mixed Media Art Journal Background Tutorial by Anna-Karin Evaldsson.

The second butterfly.

Layers of ink - Mixed Media Art Journal Background Tutorial by Anna-Karin Evaldsson.

Die cut a title from Tim Holtz Friendship Words Script, from the same paper used for the butterflies.

Layers of ink - Mixed Media Art Journal Background Tutorial by Anna-Karin Evaldsson.

The flowers were lightly colored with pencils.

Layers of ink - Mixed Media Art Journal Background Tutorial by Anna-Karin Evaldsson.

The grass stamps come from Simon Says Stamp Thoughtful Flowers.

Layers of ink - Mixed Media Art Journal Background Tutorial by Anna-Karin Evaldsson.

Important words in the background were circled with the white gel pen. You can also wipe the paint off from some of the words before it dries completely.


Thank you so much for taking the time to visit my blog today! STAMPtember® starts tomorrow at Simon Says Stamp. Don't miss this wonderful month of stamping inspiration and surprises!


Happy stamping!

Anna-Karin

Supplies:

* Please note: the links are affiliate links, for which I receive a small percentage of sales generated by the link, at no extra cost to you.

Monday, August 29, 2022

Apricot Textured Background Card

Hi friends! The weather has started turn here and there is a new chill in the air. I worked at a market this weekend, starting with a very warm day, and finishing with pouring rain, but luckily not until the last two hours.

Please note: this post has affiliate links, for which I receive a small percentage of sales generated by the link, at no extra cost to you.


We have a Make a Background theme at the Simon Says Stamp Monday Challenge Blog this week. Making background is one of my absolut favorite things. I hope you will join us and don't miss the last project by our August guest designer Estelle Palumbo, with her blog Atouscrap.

Layers of ink - Apricot Textured Background Tutorial by Anna-Karin Evaldsson.

I made a card today, with a textured background, using a stencil, paste, paint, stamping and glitter gel. The card is 4 x 8 in and I used mainly shades of apricot, melon, orange and pink.

Layers of ink - Apricot Textured Background Tutorial by Anna-Karin Evaldsson.

Start by applying texture paste through Tim Holtz Ornate stencil. I already had this piece since I had used up leftover texture paste once. So it was already a tall and slightly torn piece, which inspired the rest of the design.

Layers of ink - Apricot Textured Background Tutorial by Anna-Karin Evaldsson.

Paint with Dried Marigold and Carved Pumpkin.

Layers of ink - Apricot Textured Background Tutorial by Anna-Karin Evaldsson.

When dry, tear the top and left hand edge and stamp here and there with Simon Says Stamp Sherbet Pawsitively Saturated Ink and the Old Letter Background.

Layers of ink - Apricot Textured Background Tutorial by Anna-Karin Evaldsson.

Apply Nebula Stickles Gel on the texture paste.

Layers of ink - Apricot Textured Background Tutorial by Anna-Karin Evaldsson.

I used backgrounds for the die cutting too, some I had already and some I made for this project using various Distress Inks and Distress Oxide inks.

Layers of ink - Apricot Textured Background Tutorial by Anna-Karin Evaldsson.

Die cut the Simon Says Stamp Etched Magnolia Blossom from the inky papers.

Layers of ink - Apricot Textured Background Tutorial by Anna-Karin Evaldsson.

Shape with Tim Holtz Shaping tool kit. I also die cut Simon Says Stamp Tattered Leaves from a green/glue inky paper.

Layers of ink - Apricot Textured Background Tutorial by Anna-Karin Evaldsson.

Assemble the flower and add a pearl to the center.

Layers of ink - Apricot Textured Background Tutorial by Anna-Karin Evaldsson.

The title was die cut from white and leftover inky paper, with a pearl for the 'i' and a stamped 'happy'.

Layers of ink - Apricot Textured Background Tutorial by Anna-Karin Evaldsson.

I really like the Etched Magnolia Blossom and the dimensional flower that it creates.

Layers of ink - Apricot Textured Background Tutorial by Anna-Karin Evaldsson.

The touch of glitter adds interest to the background. I also like the uneven edge of the stencilled design here.

Layers of ink - Apricot Textured Background Tutorial by Anna-Karin Evaldsson.

There are stars and some other larger chunks in the Nebula glitter which add a fun touch.

Layers of ink - Apricot Textured Background Tutorial by Anna-Karin Evaldsson.

I had a piece of checkered fabric on my desk from a jar of jam that I got some time ago and also added a piece of lace trim.

I hope you will join us this week in our Make a background challenge. You have a chance to win a $25 gift voucher to do some fun shopping at Simon Says Stamp. You have until Monday 8am Ohio time. 1pm UK time, 2 pm CET to join in.


Do you use Instagram? If so please add #sssmchallenge so we can see your entries there too.


Thank you so much for stopping by here today! 

Happy crafting!

Anna-Karin

Supplies:

* Please note: the links are affiliate links, for which I receive a small percentage of sales generated by the link, at no extra cost to you.

Sunday, August 28, 2022

Sparkly Dragonflies Tutorial

Hi friends! Today I have a card tutorial to share, with sparkly dimensional dragonflies on a fun background. There has been many dragonflies around here lately, which inspired this card.

Please note: this post has affiliate links, for which I receive a small percentage of sales generated by the link, at no extra cost to you.

Layers of ink - Sparkly Dragonflies Tutorial by Anna-Karin Evaldsson.

It was a long time ago that I crumbled up paper as a way of distressing it and this background is a version of that, but with different colored squares. The dragonflies were die cut with Tim Holtz Funky Insects and got dimensional wings.

Layers of ink - Sparkly Dragonflies Tutorial by Anna-Karin Evaldsson. Ink with Distress Ink.

Start by cutting squares of heavystock paper. Smear Distress Inks on a non-stick craft sheet, mist with water and press the paper into the ink. I was aiming for a soft, light color.

Layers of ink - Sparkly Dragonflies Tutorial by Anna-Karin Evaldsson.

Crumble up the papers.

Layers of ink - Sparkly Dragonflies Tutorial by Anna-Karin Evaldsson.

Smear more Distress Ink on the craft sheet, mist with water and press the papers into the ink, here and there.

Layers of ink - Sparkly Dragonflies Tutorial by Anna-Karin Evaldsson. Die cut into squares with Tim Holtz Stacked Tiles.

When dry, cut into squares with Tim Holtz Stacked Squares.

Layers of ink - Sparkly Dragonflies Tutorial by Anna-Karin Evaldsson.

Ink the edges and some of the creases.

Layers of ink - Sparkly Dragonflies Tutorial by Anna-Karin Evaldsson. Stamp with Simon Says Stamp Old Letter.

Glue to a piece of Simon Says Stamp Sea Glass cardstock. Stamp here and there with the Simon Says Stamp Old Letter Background.

Layers of ink - Sparkly Dragonflies Tutorial by Anna-Karin Evaldsson.


Layers of ink - Sparkly Dragonflies Tutorial by Anna-Karin Evaldsson.

Color the Modeling Film pieces with alcohol ink.

Layers of ink - Sparkly Dragonflies Tutorial by Anna-Karin Evaldsson. Die cut Tim Holtz Sizzix Funky Insects.

Watercolor the dragonflies with Distress Ink.

Layers of ink - Sparkly Dragonflies Tutorial by Anna-Karin Evaldsson.

Shape the wings of the paper dragonflies. Gently heat the Modeling Film wings with a heat tool and shape them. Be careful not to burn yourself. Apply Stickles to the back of the wings and to some of the bodies and Opal Blaze Polish to the rest of the bodies.

Layers of ink - Sparkly Dragonflies Tutorial by Anna-Karin Evaldsson.

Assemble the dragonflies. The Modeling Film wings will keep their shape perfectly.

Layers of ink - Sparkly Dragonflies Tutorial by Anna-Karin Evaldsson.

Add some Design Tape and sequins to the card.

Layers of ink - Sparkly Dragonflies Tutorial by Anna-Karin Evaldsson.

The sentiment is a Tim Holtz sticker.

Layers of ink - Sparkly Dragonflies Tutorial by Anna-Karin Evaldsson.

I like the almost leathery texture of the crumbled heavystock paper. The paper is thick.

Layers of ink - Sparkly Dragonflies Tutorial by Anna-Karin Evaldsson.

The dragonflies appear to fly across the paper.

Layers of ink - Sparkly Dragonflies Tutorial by Anna-Karin Evaldsson.

Here you can see the dimension of the wings better.

Layers of ink - Sparkly Dragonflies Tutorial by Anna-Karin Evaldsson.

The glitter adds shine and interest to the dragonflies.


Thank you so much for taking the time to visit my blog today! 

Happy crafting!

Anna-Karin

Supplies:

* Please note: the links are affiliate links, for which I receive a small percentage of sales generated by the link, at no extra cost to you.