Tuesday, August 16, 2022

Folded Tag Book Tutorial

Hi crafters! I have a fun tag mini book to share today. The inside pages were folded from a single piece of paper, without using any adhesive.

Please note: this post has affiliate links, for which I receive a small percentage of sales generated by the link, at no extra cost to you.

Layers of ink - Folded Tag Book Tutorial by Anna-Karin Evaldsson.

I had fun looking through some older magazines and found an article about a folded book in one of my South African papercraft magazines. The magazine is called Creative Reflections, but no longer exists. The basic fold of the inside pages comes from that magazine (issue no 15, 2007), but I changed it a bit and made a different type of cover.

Layers of ink - Folded Tag Book Tutorial by Anna-Karin Evaldsson.

The inside looks like this and there is space for tags or little notes in the four folded pockets. You can also fold more than one paper to get more pages. 

Layers of ink - Folded Tag Book Tutorial by Anna-Karin Evaldsson.

I used a mix of stamped and printed papers, but you can also stick to just one of them.

Layers of ink - Folded Tag Book Tutorial by Anna-Karin Evaldsson. Fold a Tim Holtz Backdrops paper

I tested the fold on scrap paper first and then decided to use a Tim Holtz Backdrops paper. This paper comes from Backdrops vol. 2. Different sized paper will give a differently sized booklet. The backdrops paper is slightly too thick, but with the help of a bone folder, you can make it work.

Fold once in the middle, unfold.

Layers of ink - Folded Tag Book Tutorial by Anna-Karin Evaldsson.

Fold the edges towards the center, leaving a small space of about 3 millimeters (1/8 in) in the center. I used a bone folder for all the folds.

Layers of ink - Folded Tag Book Tutorial by Anna-Karin Evaldsson.

Fold the outer edges inwards, about 10-12 millimeters (3/8 in).

Layers of ink - Folded Tag Book Tutorial by Anna-Karin Evaldsson.

Fold the corners inwards to the first fold.

Layers of ink - Folded Tag Book Tutorial by Anna-Karin Evaldsson.

Fold the outer section towards the center.

Layers of ink - Folded Tag Book Tutorial by Anna-Karin Evaldsson.

Turn the paper around and fold the edges as shown, about 10-12 millimeters (3/8 in), or a little more.

Layers of ink - Folded Tag Book Tutorial by Anna-Karin Evaldsson.

Fold the bottom half up and tuck the corners into the triangles. Because of the thickness of my paper, I left a small edge at the top, not folding quite at the center, so that it would be possible to tuck the corners in. Press all folds again with a bone folder.

Layers of ink - Folded Tag Book Tutorial by Anna-Karin Evaldsson.

On the other side it will not look like this and you will have four pockets for tags or little notes.

Layers of ink - Folded Tag Book Tutorial by Anna-Karin Evaldsson.

I cut tags from Tim Holtz Journal Cards, using an We R Memory Keepers Angle Corner Chomper for the angles, my Crop-a-dile for the holes and a rounded Corner Chomper for two of the tags.

Layers of ink - Folded Tag Book Tutorial by Anna-Karin Evaldsson.

Sand all edges and then ink.

Layers of ink - Folded Tag Book Tutorial by Anna-Karin Evaldsson.

I stamped sentiments from Tim Holtz Odds & Ends on all the four pages.

Layers of ink - Folded Tag Book Tutorial by Anna-Karin Evaldsson.

I used a tag for the cover, cutting the bottom corners with the Angle Corner Chomper. Ink with Antique Linen.

Layers of ink - Folded Tag Book Tutorial by Anna-Karin Evaldsson. Stamp Simon Says Stamp Thoughtful Flowers.

Stamp with flowers from Simon Says Stamp Thoughtful Flowers using Pumice Stone ink. If you want the outline to be more invisible, use Antique Linen instead.

Layers of ink - Folded Tag Book Tutorial by Anna-Karin Evaldsson.

Color with pencils.

Layers of ink - Folded Tag Book Tutorial by Anna-Karin Evaldsson.

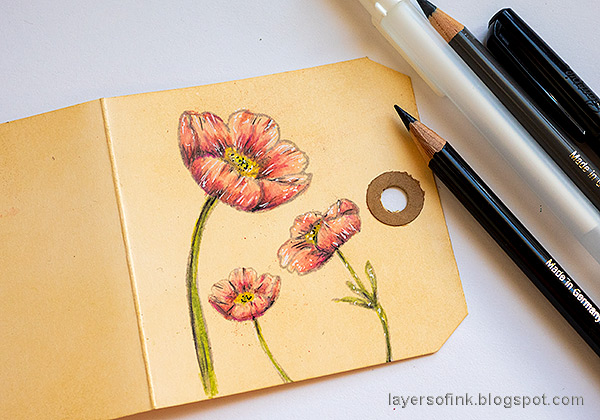
Add shading and then add highlights and some lines with a white gel pen and a black pen.

Layers of ink - Folded Tag Book Tutorial by Anna-Karin Evaldsson. Ink with Distress Ink.

Ink with Distress Inks and stamp a sentiment on the back cover. 

Layers of ink - Folded Tag Book Tutorial by Anna-Karin Evaldsson.

Add more sentiments, from Tim Holtz Nature's Wonder and Simon Says Stamp Anna's Flowers.

Layers of ink - Folded Tag Book Tutorial by Anna-Karin Evaldsson. Ink through Tim Holtz Bubble stencil.

Apply Mustard Seed Distress Oxide through Tim's Bubble stencil.

Layers of ink - Folded Tag Book Tutorial by Anna-Karin Evaldsson.

Stamp the tags with various sentiments and images.

Layers of ink - Folded Tag Book Tutorial by Anna-Karin Evaldsson.

The inside covers were inked, stamped and stenciled too. The large flower stamp comes from Simon Says Stamp Laugh In Flowers.

Layers of ink - Folded Tag Book Tutorial by Anna-Karin Evaldsson.

Tie the inside pages with twine and tuck the tags into the pockets. 

Layers of ink - Folded Tag Book Tutorial by Anna-Karin Evaldsson.

Experiment with different papers and sizes to see what booklets you can come up with.

Layers of ink - Folded Tag Book Tutorial by Anna-Karin Evaldsson.

The fold is fun to do and I like the little triangles in the corners.

Layers of ink - Folded Tag Book Tutorial by Anna-Karin Evaldsson.

Double-sided papers work great for the inside pages.

Layers of ink - Folded Tag Book Tutorial by Anna-Karin Evaldsson.

This sentiment comes from Tim Holtz Life Quotes.

Layers of ink - Folded Tag Book Tutorial by Anna-Karin Evaldsson.

You can use double-sided paper for the covers too, but I wanted to include some stamping.

Layers of ink - Folded Tag Book Tutorial by Anna-Karin Evaldsson.

I added some Tim Holtz idea-ology ephemera to the tags, but mostly just stamped sentiments and a few images. The flowers comes from Tim's Flower Jar and were colored with pencils. The sentiment comes from Simon Says Stamp All Seasons Tree.

Layers of ink - Folded Tag Book Tutorial by Anna-Karin Evaldsson.

Stamping and mixing sentiments is one of my favorite things to do. The larger sentiment is from Simon Says Stamp Beautiful Butterflies.

Layers of ink - Folded Tag Book Tutorial by Anna-Karin Evaldsson.

I stamped a couple of butterflies from Simon Says Stamp Thoughtful Flowers and colored them with pencils.

Layers of ink - Folded Tag Book Tutorial by Anna-Karin Evaldsson.

These sentiments come from Tim's Urban Chic and Warehouse District.

Layers of ink - Folded Tag Book Tutorial by Anna-Karin Evaldsson.

I enjoy using colored pencils on slightly inked or tinted papers and here it gives a warm glow to the cover.

Layers of ink - Folded Tag Book Tutorial by Anna-Karin Evaldsson.

You could leave the cover plain, but I wanted one more sentiment. This one comes from Tim's Way With Words.

Layers of ink - Folded Tag Book Tutorial by Anna-Karin Evaldsson.

Tie the booklet with twine to close. 


Thank you so much for taking the time to visit my blog today! 

Happy crafting!

Anna-Karin

Supplies:

* Please note: the links are affiliate links, for which I receive a small percentage of sales generated by the link, at no extra cost to you.

No comments:

Post a Comment

Thank you so much for leaving a comment! Happy Crafting!