Wednesday, May 31, 2023

Color Sampler Art Journal Tutorial

 Hi crafters! Today I have a fun color sampler project to share with you, made in an art journal.

Please note: this post has affiliate links, for which I receive a small percentage of sales generated by the link, at no extra cost to you.


Layers of ink - Color Sampler Art Journal Tutorial by Anna-Karin Evaldsson.

I recently got some new Zig Kuretake Gansai Tambi watercolors and they look so pretty that they inspired me to do a color sampler, but in the shape of an art journal page. I used Tim Holtz Stacked Squares to die cut the shapes and since they come in several sizes, I could pick a size that perfectly fitted the page in my Dina Wakley Blue Edition Media Journal.

Layers of ink - Color Sampler Art Journal Tutorial by Anna-Karin Evaldsson. Die cut Tim Holtz Stacked Squares.

Start by die cutting lots of squares from watercolor paper using Tim Holtz Stacked Squares.

Layers of ink - Color Sampler Art Journal Tutorial by Anna-Karin Evaldsson. Die cut Tim Holtz Stacked Squares.

I love the look of watercolor pans and these are no exception.

Layers of ink - Color Sampler Art Journal Tutorial by Anna-Karin Evaldsson. Die cut Tim Holtz Stacked Squares.

Watercolor one square at a time.

Layers of ink - Color Sampler Art Journal Tutorial by Anna-Karin Evaldsson. Watercolor the samples with Zig Kuretake Gansai Tambi.

When I was working, I accidentaly dropped one of the squares on the paper I was leaving them to dry on. It gave a really cool texture. I started over and dropped or touched all the squares to the paper. I pressed some of them down and let some just touch the paper. 

Layers of ink - Color Sampler Art Journal Tutorial by Anna-Karin Evaldsson. Paint with Zig Kuretake Gansai Tambi watercolors.

Continue until you have as many color samples as you need. The set I used has 24 colours, but you could also use a larger 48-color set.

Layers of ink - Color Sampler Art Journal Tutorial by Anna-Karin Evaldsson. Adhere color samples in art journal.

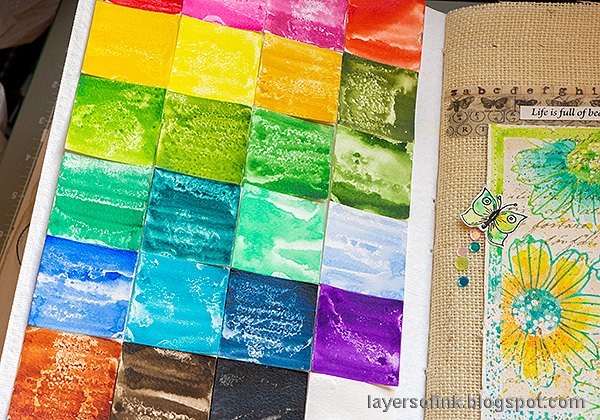
I placed the colors in the same order as they were in the watercolor set and adhered them to a cotton-rag watercolor page in my Blue Edition Journal.

Layers of ink - Color Sampler Art Journal Tutorial by Anna-Karin Evaldsson.

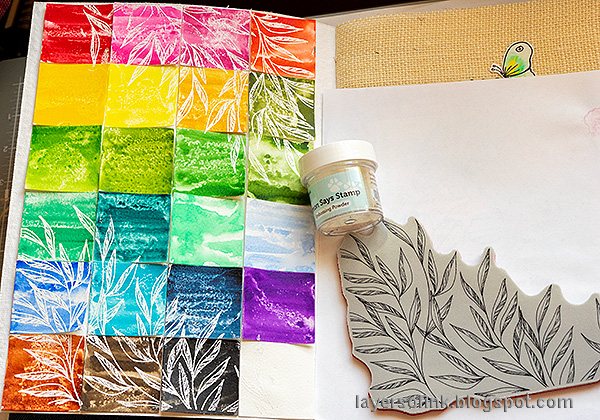
White emboss one of the Simon Says Stamp Leaf Edges on the squares.

Layers of ink - Color Sampler Art Journal Tutorial by Anna-Karin Evaldsson. Die cut Tim Holtz Emporium Alphanumeric.

Die cut the title using Tim's Alphanumeric Emporium set. I die cut the letters from Simon Says Stamp Color Blend papers.

Layers of ink - Color Sampler Art Journal Tutorial by Anna-Karin Evaldsson.

Stamp sentiments on the background and Tim Holtz alphabet stamp here and there.

Layers of ink - Color Sampler Art Journal Tutorial by Anna-Karin Evaldsson.

Don't worry if the white embossing isn't perfect. Repeat stamp some of the sentiments.

Layers of ink - Color Sampler Art Journal Tutorial by Anna-Karin Evaldsson.

The paper smooching effect isn't as visible on the lighter shades as it is on the darker.

Layers of ink - Color Sampler Art Journal Tutorial by Anna-Karin Evaldsson.

I added pieces of Tim Holtz Trims Design Tape.

Layers of ink - Color Sampler Art Journal Tutorial by Anna-Karin Evaldsson.

Use tape to underline the title. 

Layers of ink - Color Sampler Art Journal Tutorial by Anna-Karin Evaldsson.

I stamped a mix of sentiments from different Simon Says Stamp sets.

Layers of ink - Color Sampler Art Journal Tutorial by Anna-Karin Evaldsson.

The Leaf...stamps are so pretty.

Layers of ink - Color Sampler Art Journal Tutorial by Anna-Karin Evaldsson.

The color sampler could have been done without the texture too, but I really like texture.

Layers of ink - Color Sampler Art Journal Tutorial by Anna-Karin Evaldsson.

I cut a Simon Says Stamp sentiment strip apart and sanded the edges.

Layers of ink - Color Sampler Art Journal Tutorial by Anna-Karin Evaldsson.

The purple square was the one that I originally by mistake dropped on the paper. My youngest thought it looked like a galaxy.


Thank you so much for stopping by here today! 

Happy crafting!

Anna-Karin

Supplies:

* Please note: the links are affiliate links, for which I receive a small percentage of sales generated by the link, at no extra cost to you.


Monday, May 29, 2023

Starry Sky Tag Tutorial

 Hi friends! I hope you had a fun weekend and got some crafty time. 

Please note: this post has affiliate links, for which I receive a small percentage of sales generated by the link, at no extra cost to you.


This week we have a Sun, Moon and Stars theme at the Simon Says Stamp Monday Challenge Blog. Stars work well for so many different themes. Don't miss the last project by our May guest designer Cassie Lynch aka mk_knits.

Layers of ink - Starry Sky Tag Tutorial by Anna-Karin Evaldsson.

I made a tag with different types of stars in quite a few layers. Some of the are glittery, others are shiny, some are embossed and some are stamped. I also had fun using some old fibers and sheer ribbons, which I have had in my stash for a very long time.


Layers of ink - Starry Sky Tag Tutorial by Anna-Karin Evaldsson. Stamp Simon Says Stamp Star To Star.


Layers of ink - Starry Sky Tag Tutorial by Anna-Karin Evaldsson. Stamp with Simon Says Stamp Falling Snow.

I wanted smaller stars too and used Simon Says Stamp Falling Snow for that.

Layers of ink - Starry Sky Tag Tutorial by Anna-Karin Evaldsson. Ink with Distress Ink.

Smear Distress Ink on a non-stick craft sheet, mist with water and press the tag into the ink. Let dry and repeat until you are happy with the look.

Layers of ink - Starry Sky Tag Tutorial by Anna-Karin Evaldsson. Ink with Distress Ink.

Apply Unchartered Mariner and two shades of Distress Oxide Ink to a non-stick craft sheet. Carefully dabb the tag into the ink here and there. Don't smooch. 

Layers of ink - Starry Sky Tag Tutorial by Anna-Karin Evaldsson.

Apply Sizzix Luster Wax Charcoal around the edges of the tag. Add lots of small stars with a white gel pen and stamp more stars using Simon Says Stamp Royal Pawsitively Saturated ink.

Layers of ink - Starry Sky Tag Tutorial by Anna-Karin Evaldsson.

Die cut Simon Says Stamp Stars from heavystock paper and ink with Distress Ink.

Layers of ink - Starry Sky Tag Tutorial by Anna-Karin Evaldsson. Add Ranger Stickles Glitter Gel.

Apply Stickles Glitter Gel to the stars. I used Moon Dust and Venus.

Layers of ink - Starry Sky Tag Tutorial by Anna-Karin Evaldsson.

Glue the stars to the tag. I added a sequin star to the center.

Layers of ink - Starry Sky Tag Tutorial by Anna-Karin Evaldsson.

You can make these stars in any color combo that you can think of. 

Layers of ink - Starry Sky Tag Tutorial by Anna-Karin Evaldsson.

The background has the larger outline stars, stamped dot stars, gel pen stars, stamped blue stars and the various sequin stars. The sequins were applied with Simon Says Stamp glue and the Place and Score Embellishment Wand.

Layers of ink - Starry Sky Tag Tutorial by Anna-Karin Evaldsson. Add sheer ribbon and fibers.

The sentiments come from Tim Holtz Tiny Text and were stamped with Simon Says Stamp Royal Pawsitively Saturated ink.

Layers of ink - Starry Sky Tag Tutorial by Anna-Karin Evaldsson.


I hope you will join us this week in our Sun, Moon and Stars challenge. You have a chance to win a $25 gift voucher to do some fun shopping at Simon Says Stamp. You have until Monday 8am Ohio time. 1pm UK time, 2 pm CET to join in.


Do you use Instagram? If so please add #sssmchallenge so we can see your entries there too.


Thank you so much for stopping by here today! 

Happy crafting!

Anna-Karin

Supplies:

* Please note: the links are affiliate links, for which I receive a small percentage of sales generated by the link, at no extra cost to you.


Friday, May 26, 2023

Blue Flowers Mixed Media Tag

Hi friends! I hope you are well! Today I have a mixed media tag to share with a crackle background.

Please note: this post has affiliate links, for which I receive a small percentage of sales generated by the link, at no extra cost to you.

Layers of ink - Blue Flowers Mixed Media Tag Tutorial by Anna-Karin Evaldsson.

Ever since I did decoupage many years ago, I always liked the look of crackles, stamped or real. Here we have a bit of both. The flowers are die cut, colored with Distress Inks and shaped. The tag is inspired by the bright shades of spring.

Layers of ink - Blue Flowers Mixed Media Tag Tutorial by Anna-Karin Evaldsson. Apply Ranger Rock Candy Crackle.

Coat a tag with gesso and when dry, coat with Clear Rock Candy. Apply with a palette knife. Vary the thickness to get both large and small cracks. You can also use Ranger's Translucent Crackle Paste or Paint.

Layers of ink - Blue Flowers Mixed Media Tag Tutorial by Anna-Karin Evaldsson. Paint with Distress Paint.

When dry, paint with Distress Paints. Mist with water to blend.

Layers of ink - Blue Flowers Mixed Media Tag Tutorial by Anna-Karin Evaldsson. Stamp with a Simon Says Stamp Crackle Background.

Stamp partially with a Tim Holtz alphabet stamp and Simon Says Stamp Crackle Background.

Layers of ink - Blue Flowers Mixed Media Tag Tutorial by Anna-Karin Evaldsson. Apply Sizzix Luster Wax

Apply Sizzix Luster Wax Ivory and Charcoal around the edges and here and there. Rub the wax into the cracks.

Layers of ink - Blue Flowers Mixed Media Tag Tutorial by Anna-Karin Evaldsson. Die cut Simon Says Stamp Etched Evening Blossom.

Die cut the Simon Says Stamp Etched Evening Blossom from heavystock paper.

Layers of ink - Blue Flowers Mixed Media Tag Tutorial by Anna-Karin Evaldsson. Color with Distress Ink.

Smear Distress Ink on a non-stick craft sheet, mist with water and press the flowers into the ink.

Layers of ink - Blue Flowers Mixed Media Tag Tutorial by Anna-Karin Evaldsson. Add Distres Oxide Ink.

Let dry and repeat until you are happy with the look. Add a tiny bit of Distress Oxide Ink for the last layer.

Layers of ink - Blue Flowers Mixed Media Tag Tutorial by Anna-Karin Evaldsson.

Use Tim Holtz Shaping Kit to shape the flowers.

Layers of ink - Blue Flowers Mixed Media Tag Tutorial by Anna-Karin Evaldsson. Die cut Tim Holtz flowers.

Die cut small pieces from leftover yellow or green inky paper, with Tim Holtz Sizzix Brushstroke Flowers Mini.

Layers of ink - Blue Flowers Mixed Media Tag Tutorial by Anna-Karin Evaldsson.

I glued Studio Katia Iridescent Bubbles to the tag. I used Simon Says Stamp Place and Score Embellishment Wand to apply the pearls. The sentiment is a Tim Holtz Small Talk sticker.

Layers of ink - Blue Flowers Mixed Media Tag Tutorial by Anna-Karin Evaldsson.

Here you can see the effect of the Luster Wax better.

Layers of ink - Blue Flowers Mixed Media Tag Tutorial by Anna-Karin Evaldsson.

Glue the flowers to the tag and add the flower centers. 

Layers of ink - Blue Flowers Mixed Media Tag Tutorial by Anna-Karin Evaldsson.

The mix of Distress Ink and Distress Oxide Ink gives texture and layers to the flowers.

Layers of ink - Blue Flowers Mixed Media Tag Tutorial by Anna-Karin Evaldsson.


Layers of ink - Blue Flowers Mixed Media Tag Tutorial by Anna-Karin Evaldsson.

The tag has quite a bit of dimension.

Layers of ink - Blue Flowers Mixed Media Tag Tutorial by Anna-Karin Evaldsson.

The ribbons were dyed with various Distress Inks.


Thank you so much for stopping by here today! 

Happy crafting!

Anna-Karin

Supplies:

* Please note: the links are affiliate links, for which I receive a small percentage of sales generated by the link, at no extra cost to you.