Hi friends! I hope you had a fun weekend and got some crafty time.
Please note: this post has affiliate links, for which I receive a small percentage of sales generated by the link, at no extra cost to you.
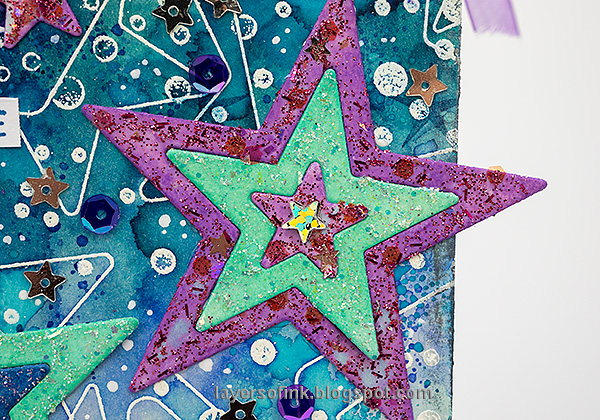
I made a tag with different types of stars in quite a few layers. Some of the are glittery, others are shiny, some are embossed and some are stamped. I also had fun using some old fibers and sheer ribbons, which I have had in my stash for a very long time.
White emboss Simon Says Stamp Star to Star on a heavystock tag.
I wanted smaller stars too and used Simon Says Stamp Falling Snow for that.
Smear Distress Ink on a non-stick craft sheet, mist with water and press the tag into the ink. Let dry and repeat until you are happy with the look.
Apply Unchartered Mariner and two shades of Distress Oxide Ink to a non-stick craft sheet. Carefully dabb the tag into the ink here and there. Don't smooch.
Apply Sizzix Luster Wax Charcoal around the edges of the tag. Add lots of small stars with a white gel pen and stamp more stars using Simon Says Stamp Royal Pawsitively Saturated ink.
Die cut Simon Says Stamp Stars from heavystock paper and ink with Distress Ink.
Glue the stars to the tag. I added a sequin star to the center.
You can make these stars in any color combo that you can think of.
The background has the larger outline stars, stamped dot stars, gel pen stars, stamped blue stars and the various sequin stars. The sequins were applied with Simon Says Stamp glue and the Place and Score Embellishment Wand.
The sentiments come from Tim Holtz Tiny Text and were stamped with Simon Says Stamp Royal Pawsitively Saturated ink.
I hope you will join us this week in our Sun, Moon and Stars challenge. You have a chance to win a $25 gift voucher to do some fun shopping at Simon Says Stamp. You have until Monday 8am Ohio time. 1pm UK time, 2 pm CET to join in.


No comments:
Post a Comment
Thank you so much for leaving a comment! Happy Crafting!