Tuesday, October 20, 2020

Autumn Postbox Tutorial

Hello crafters! We have started getting frosty mornings now, winter is coming. Here comes the tutorial for the autumn postbox that I posted earlier in the month.

Layers of ink - Autumn Postbox Tutorial by Anna-Karin Evaldsson.

I posted this postbox as a part of the blog hop for Eileen Hull's two new dies, of which the Postbox is one. This is a very quick and easy project and perfect as a gift for someone. It can also hold a little gift and the slot is meant to fit a gift card. It also works great as a money box, which is what my son is using it for.

Layers of ink - Autumn Postbox Tutorial by Anna-Karin Evaldsson. Die cut Eileen Hull Sizzix Postbox die.

Start by die cutting the Postbox from mat board. The entire box is just one piece and the die both cuts and scores the mat board, making assembly very easy.

Layers of ink - Autumn Postbox Tutorial by Anna-Karin Evaldsson. Stamp with SSS Wood Planks.

Stamp the box with the Simon Says Stamp Wood Planks background stamp using two shades of brown Archival Ink. I used Ground Espresso and Vintage Photo. For more inspiration on the Wood Planks stamp, check out my Old Spooky House tag and Nature Vintage Sketchbooks.

Layers of ink - Autumn Postbox Tutorial by Anna-Karin Evaldsson.

Ink the box with various shades of Distress Ink. Mat board takes ink beautifully.

Layers of ink - Autumn Postbox Tutorial by Anna-Karin Evaldsson.

To assemble, place a strong adhesive along the two flaps, as shown here. 

Layers of ink - Autumn Postbox Tutorial by Anna-Karin Evaldsson.

And then assemble. Super easy and quick. This box would be great for a kids' craft project.

Layers of ink - Autumn Postbox Tutorial by Anna-Karin Evaldsson. Stamp flowers with SSS Anna's Flowers.

I used flowers from SSS Anna's Flowers. Ink with two shades of Distress Ink, mist one to three times with water (depending on the size of the stamp) and stamp on watercolor paper.

Layers of ink - Autumn Postbox Tutorial by Anna-Karin Evaldsson. Watercolor stamping with SSS Anna's Flowers.

Cut the flowers out and shape them slightly with a pencil or a bone folder. Adhere to the box. There are also a couple of labels from Tim Holtz Field Notes ephemera. The stamped sentiments come from SSS Anna's Flowers and Laugh in Flowers.

Layers of ink - Autumn Postbox Tutorial by Anna-Karin Evaldsson.

Tie the box with twine or use Velcro dots. Add pearls to the flower centers.

Layers of ink - Autumn Postbox Tutorial by Anna-Karin Evaldsson.

The sentiments were stamped on cream paper with Ground Espresso Archival Ink, cut into strips and inked around the edges.

Layers of ink - Autumn Postbox Tutorial by Anna-Karin Evaldsson.

Gift cards, a little note, small photos, or money can easily fit into the slot. 

Layers of ink - Autumn Postbox Tutorial by Anna-Karin Evaldsson.

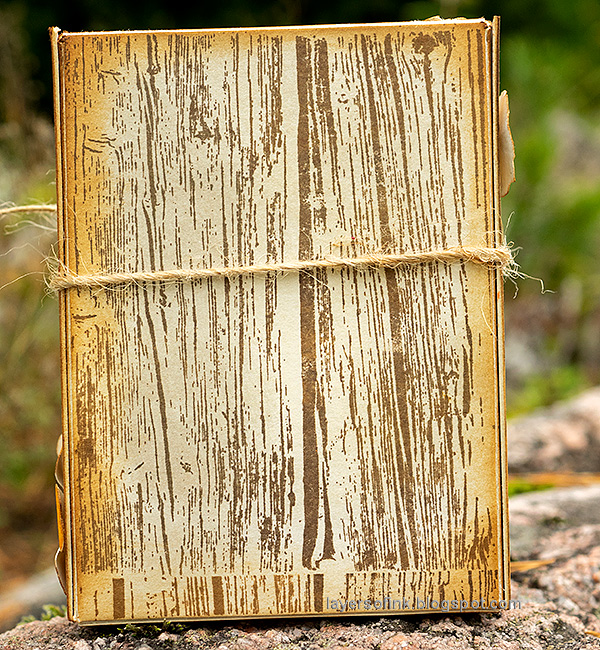
I left the back plain. You can see the joint between the stamped impressions at the bottom. If you overlap the impressions slightly, it won't show.

Layers of ink - Autumn Postbox Tutorial by Anna-Karin Evaldsson.

When open, the box looks like this.

Layers of ink - Autumn Postbox Tutorial by Anna-Karin Evaldsson.

This is a fun, quick and sturdy box that can be used for a long time. 


Thank you so much for stopping by here today! Stay safe!

Happy crafting!

Anna-Karin

Supplies:

* Please note: the links are affiliate links, for which I receive a small percentage of sales generated by the link, at no extra cost to you.


3 comments:

  1. this is gorgeous Anna-Karin! I love it. =)

    ReplyDelete
  2. So gorgeous- love the wood stamp and cute little flowers <3

    ReplyDelete
  3. What a unique idea and always appreciate your easy instructions. Love that it can hold a gift card. So pretty!!

    ReplyDelete

Thank you so much for leaving a comment! Happy Crafting!