
Hello friends! Today, I have a Sizzix tutorial to share with you. I made a geometric banner, which is easy and quick to do and a really fun decor item. Or you could make it for a special occasion, such as a party or celebration.

Here's the finished banner. Long and narrow items are notoriously difficult to photograph, but I think you can get an idea of what it looks like here. It was made with just one die, namely the Geometric Garland by Katelyn Lizardi. The banner has two different geometric shapes. It feels very cool to the touch with all those angles and corners, and also makes an interesting sound when moved around.

Here you get another view of the banner, hanging on our fence. It will looks great in a window, or on a wall. You can also easily make it longer.

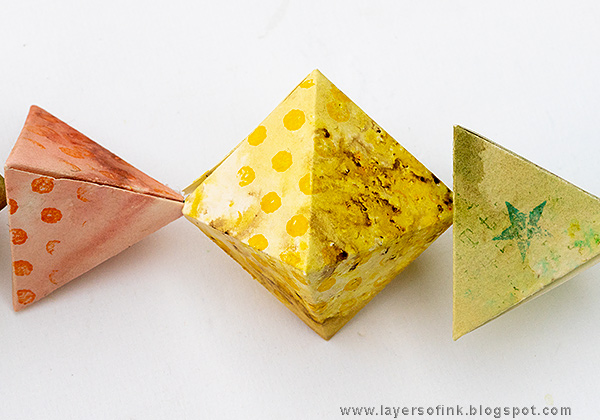
I used watercolor paper as a base for my banner and colored it with Paper Artsy's Infusions Colored Stains. This is very quick and so much fun. I made a whole bunch of papers in one go. Mist the paper with water first and then sprinkle a small amount of Infusions powder on top. I used two shades on each paper. Mist more water to blend, and if needed add a little more powder. As you can see, I pricked holes in the lids of the bottles.

Die cut enough shapes for your banner. Each time you die cut, you get one of each shape. Use this sandwich: Cutting Pad, die facing up, paper, second Cutting Pad.

Stamp the shapes with Archival Inks and various pattern stamps. I used a dot background, alphabet background and a star border stamp by Tim Holtz.

Fold the shapes along the score lines.

The shapes are easy to assemble, just add a strong adhesive along the flaps.

Don't they all look fun together? You could also use just one or two colors.

Each shape has two holes, which makes it very easy to assemble. I used twine and a long needle. If you want space in between each shape, tie a knot on each side of the shape. I liked mine to be close together.
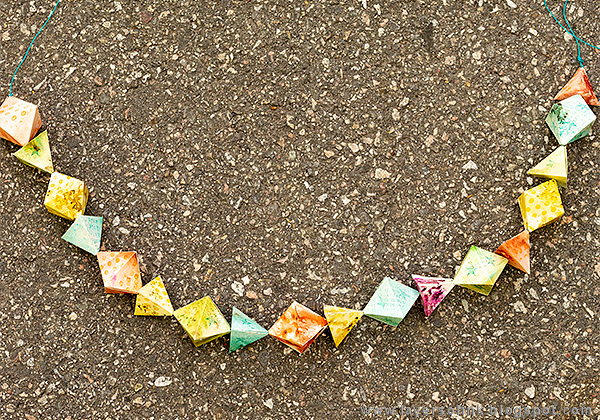
Here's the finished banner - it is 28 in long, plus the extra twine that I left so that it can be tied to something.
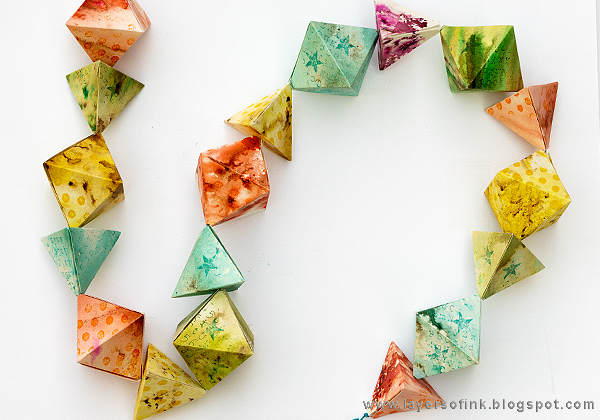
I just love all those geometric triangles and diamond shapes.

The background technique is quick and also ensures that all the shapes look different.
You can also die cut the shapes from patterned or colored paper.

The banner can easily be customized with someone's name or by using tiny photos or images.

A Christmas banner with Christmas colors and patterns would also look great, and could hang in a tree.

I hope you enjoyed this tutorial! The background technique can also be used for cards, scrapbooking pages or art journals.
Thank you so much for taking the time to visit today!
Happy crafting!!
Anna-Karin
Supplies:
* Please note: the links are affiliate links, for which I receive a small percentage of sales generated by the link, at no extra cost to you.
* Please note: the links are affiliate links, for which I receive a small percentage of sales generated by the link, at no extra cost to you.

Gorgeous, love the colours and a lovely idea too. Tracy ❤️❤️
ReplyDeleteWow, I LOVE this!! So unique and different.
ReplyDeleteSuper fun. I love how you used this Sizzix Die.
ReplyDeleteSuch a beautiful and clever projects! love it! barbara
ReplyDelete