Friday, September 29, 2023

Stenciled Flowers Art Journal Page

Hello crafters! September is almost over and today I am sharing an art journal page made with a floral stencil. The project can be turned into a card or a tag instead.  

Please note: this post has affiliate links, for which I receive a small percentage of sales generated by the link, at no extra cost to you.

Layers of ink - Stenciled Flowers Art Journal Tutorial by Anna-Karin Evaldsson.

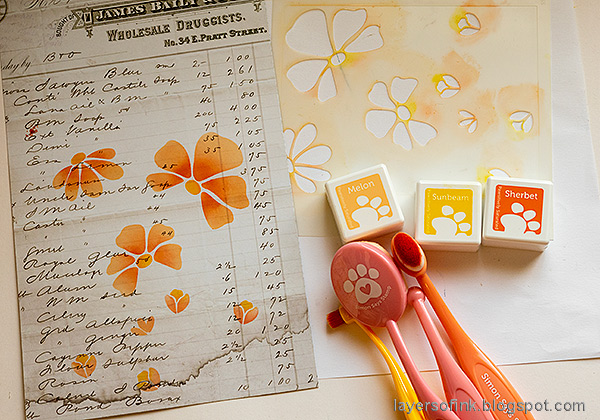
I used a stencil set from the Simon Says Stamp STAMPtember® release, called Floral Whimsy. The set consists of four stencils and I used them together with Pawsitively Saturated inks. It is fun to add stenciled designs to patterned paper and here I used one of Tim Holtz Halloween Backdrops papers. It gives a slight tint and you might already know that I love script. 

I worked on a burlap page in my Dina Wakley Blue Edition journal.


Layers of ink - Stenciled Flowers Art Journal Tutorial by Anna-Karin Evaldsson. Ink through Simon Says Stamp Floral Whimsy.

Line the stencil up with the bottom and side edges of the paper. The paper is exactly the right width for these stencils. I used Simon Says Stamp Pawsitively Saturated ink cubes sets and blending brushes.

Layers of ink - Stenciled Flowers Art Journal Tutorial by Anna-Karin Evaldsson. Add more Pawsitively Saturated Inks.

Continue with the second stencil, adding more flowers.

Layers of ink - Stenciled Flowers Art Journal Tutorial by Anna-Karin Evaldsson.

Next, ink through the third stencil with leaves using shades of green. I added Pearfection too, for a warmer shade.

Layers of ink - Stenciled Flowers Art Journal Tutorial by Anna-Karin Evaldsson. Add inky dots.

Finally, ink through the last stencil using brown inks.

Layers of ink - Stenciled Flowers Art Journal Tutorial by Anna-Karin Evaldsson. Add highlights with a white gel pen.

I added dots and highlights with a white gel pen.

Layers of ink - Stenciled Flowers Art Journal Tutorial by Anna-Karin Evaldsson. Add highlights with a white gel pen. Stitch around the card.

I trimmed the paper and placed it on a sheet of Simon Says Stamp Tangerine glitter cardstock. Pierce holes and stitch with DMC floss. I didn't want to waste too much glitter cardstock and cut out a rectangle in the middle.

Layers of ink - Stenciled Flowers Art Journal Tutorial by Anna-Karin Evaldsson. Add highlights with a white gel pen.

I added cheese cloth under the panel and adhered to a burlap page.

Layers of ink - Stenciled Flowers Art Journal Tutorial by Anna-Karin Evaldsson. Add highlights with a white gel pen.

I like how the ledger paper lines and script show through the flowers.

Layers of ink - Stenciled Flowers Art Journal Tutorial by Anna-Karin Evaldsson.

I also added some sequins, since I often turn to sequins for an extra touch, color, shine and interest without almost any bulk.

Layers of ink - Stenciled Flowers Art Journal Tutorial by Anna-Karin Evaldsson. Die cut the sentiment.

The page celebrates the last flowers of summer and I die cut the title with the Simon Says Stamp Bold Thankful die three times from Lavender cardstock, a left-over piece of the patterned paper inked with the same inks as the flowers and Simon Says Stamp purple glitter cardstock. 


Happy crafting!

Anna-Karin

Supplies:

* Please note: the links are affiliate links, for which I receive a small percentage of sales generated by the link, at no extra cost to you.


No comments:

Post a Comment

Thank you so much for leaving a comment! Happy Crafting!