
STAMPtember® is a month-long celebration of stamping at Simon Says Stamp, with inspiration, new products and many surprises. You can find the beginning of the blog party on the Simon Says Stamp Store Blog.
Please note: this post has affiliate links, for which I receive a small percentage of sales generated by the link, at no extra cost to you.

The STAMPtember® release is full of fantastic new stamps of course, but also dies, stencils, inks and paper products. So much! You can find it all here.

I also have a free gift for you. You will get the Trees and Stars free with a qualifying purchase, if you use the code TREE. Search sss202753c in the store. It is valid while supplies last. There are a whole bunch of codes that you can find among the party participants.
I made a tag, but it can also be made into a card, if you rather want that.


When I saw the Party Balloons embossing folder and die I knew I wanted to use them for my project and make something with a happy feeling. The weather varies a lot at this time of the year and this tag is about enjoying those days with wonderful weather. And it is raining balloons, what could be more cheerful?

Start by applying embossing ink on the Party Balloon folder. Emboss a tag and sprinkle white embossing powder on the background. Melt carefully with a heat tool. Don't touch the melted powder until it has cooled down completely.

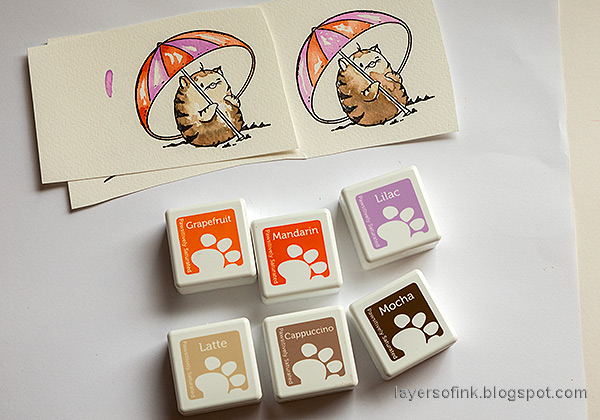
The STAMPtember® release includes two ink sets and here I used Peachy and Grapefruit Simon Says Stamp Pawsitively Saturated inks from the Orange Leaves set. The embossing will resist the ink.

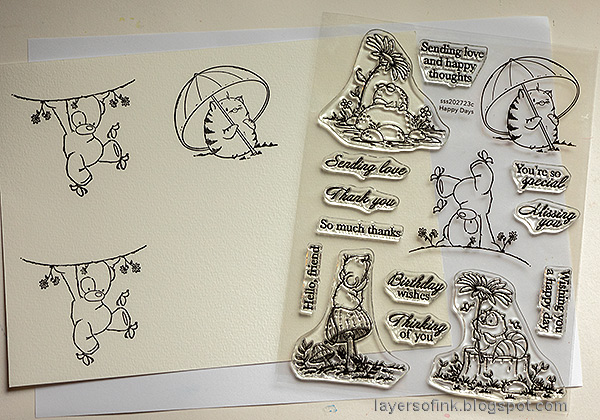
Stamp images from Happy Days on watercolor paper.

I decided to use this cute image. Sometimes I color on a failed stamped impression first, to test color and combination. That is the one to the right. Lilac is from the Purple Fields set. Smear on a non-stick craft sheet, mist with water and pick up with a paint brush.

I picked the image to the left above and added some color inside the umbrella, keeping it light since I wanted this tag to be light.

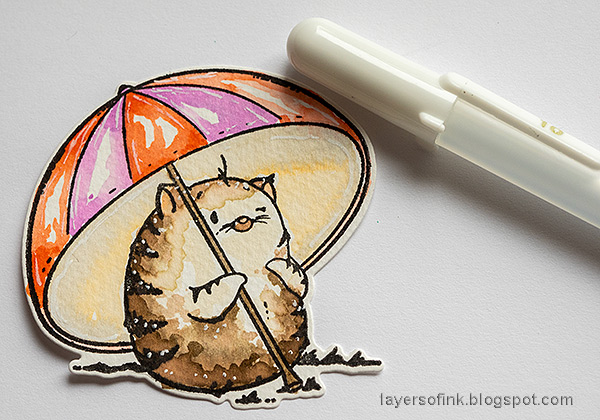
Die cut with the coordinating Happy Days die. I used Simon Says Stamp Very Very Low Tack Tape to keep the die in place.

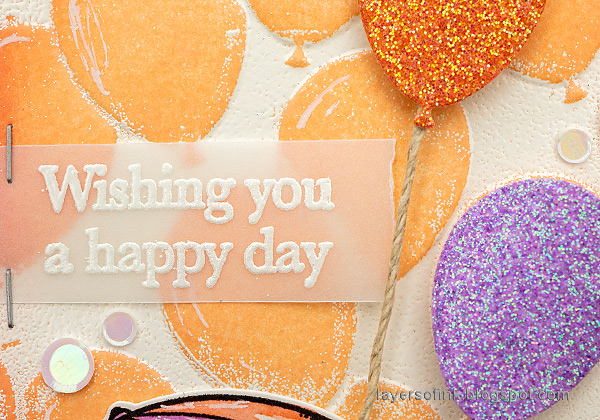
White emboss sentiments on vellum. The set with all the small sentiments is the Season's Greetings set. I love stamp sets with small sentiments.

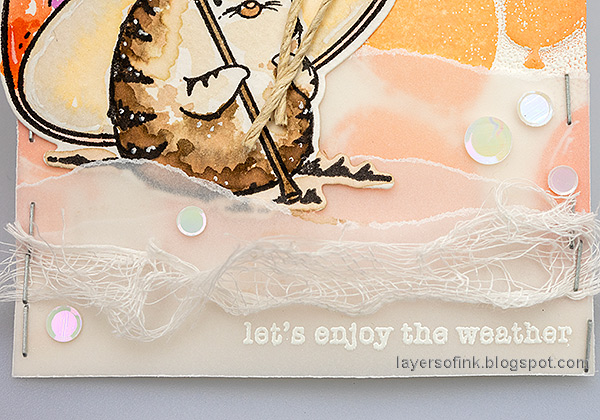
Tear vellum to form a beach and staple to the background.

Add highlights with a white gel pen.

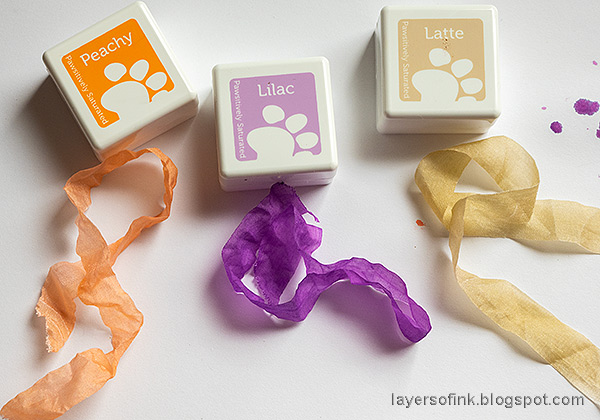
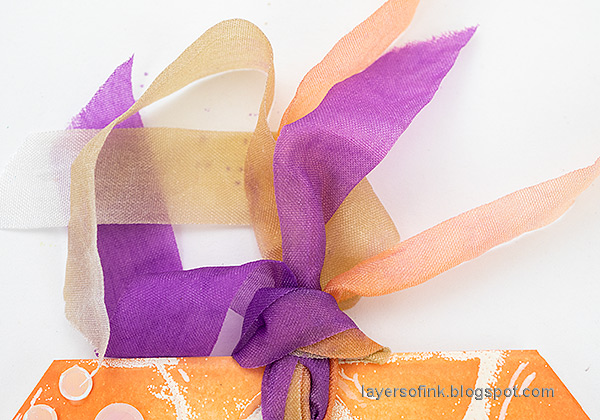
The ribbon was dyed with the Pawsitively Saturated Inks, using the same inks as for the coloring.

I also added highlights to the balloons, but my favorite part is the stray embossing powder.

The glitter balloons was die cut with the die from the Party Balloons set, from two shades of glitter paper. Add a piece of twine and adhere with two layers of Simon Says Stamp Foam Tape.

I like to white emboss sentiments on vellum since you can see the background through the sentiment strip.

Let the little cat hold the two balloons. The images from Happy Days are so cute.

I also added a small piece of cheesecloth/mummy cloth, for a bit more texture.

Dying ribbon with Simon Says Stamp Pawsitively Saturated Inks works really well and the ribbon will coordinate with your project.

Don't miss all the inspiration along the blog party. All the links are available at the Simon Says Stamp Store blog. Throughout the month there will be surprises and scavenger hunts. Don't miss it!
There is also a s special STAMPtember® Gallery where you can find inspiration and add your own projects.
Here are all the participants in this huge blog party:
- Alberto Gava
- Allison Frazier
- Amrita Pettus
- Amy Rysavy
- Angela Myhre
- Anna-Karin Evaldsson
- Anne Fiene
- Avra Williams
- Barb Engler
- Barbara Tarayao
- Beth Opel
- Bethany Deschamp
- Betsy Green
- Bibi Cameron
- Bobbi Lemanski
- Bonnie Crane
- Caly Person
- Carol Hintermeier
- Cathy Zielske
- Channin Pelletier
- Charlene Madrid
- Cheiron Brandon
- Cindy Norberg
- Debby Hughes
- Elizabeth Costa-Rogers
- Emily Midgett
- Hannelie Bester
- Heather Hoffman
- Heather Ruwe
- Jaycee Gaspar
- Jean Doeringsfeld
- Jenn Shurkus
- Jennifer Kotas
- Jennifer McGuire
- Jessica Vasher
- Joe Sysavath
- Joy Ott
- Kailash Naidoo
- Karen Boyce
- Karen Downs
- Karin Åkesdotter
- Kath Stewart
- Kathleen Darroch
- Keisha Charles
- Kim Hamilton
- Kulbir Kirkland
- Laura Bassen
- Lea Lawson
- Lisa Addesa
- Lisa Schenck
- Lorraine Aquilina
- Maggie Haas
- Mary Reiner
- Maura Hibbitts
- Megin Brooks
- Michelle Peckham
- Michelle Short
- Mindy Eggen
- Miriam Prantner
- Natasha Vacca
- Nichol Spohr
- Nicki Baxley
- Nicoletta Porcu
- Nina-Marie Trapani
- Noelle Vargas
- Pam Sparks
- Ricky Burton-Romero
- Rosemary Dennis
- Sandi MacIver
- Seeka
- Shari Carroll
- Simeen Batra
- Stefanie Loh
- Susan Babcock
- Susan R. Opel
- Suzy Plantamura
- Teri Wilson
- Tina Smith
- Tracy Ware
- Vera Yates
- Veronica Zalis
- Vicky Papaioannou
- Yana Smakula
- Yoonsun Hur
- Zoey Scarpelli

Thank you so much for stopping by here today! Have a wonderful STAMPtember®!
Happy stamping!
Anna-Karin
Supplies:
* Please note: the links are affiliate links, for which I receive a small percentage of sales generated by the link, at no extra cost to you.
* Please note: the links are affiliate links, for which I receive a small percentage of sales generated by the link, at no extra cost to you.
Gorgeous tag Anna-Karin! I love this little kitty! I am going to have to get me this stamp set and the balloon embossing folder!! :-)
ReplyDeleteWonderful balloons tag.
ReplyDeleteMelissa
"Sunshine HoneyBee"
What a cute birthday tag - and I love the reverse embossing technique. I might have to try that some time :D
ReplyDeleteSuch a cute card! And it has never occurred to me to to use emboss resist to color on an embossing folder! What a great idea! Can't wait to try it!
ReplyDeleteSuper cute!
ReplyDeleteSo cute. The detail and texture of this tag is awesome. will be trying the embossing ink on my folders
ReplyDeleteThat was a beautiful tag and such delicate watercoloring!
ReplyDeleteAbsolutely adorable tag! Love how you colored the ribbon to match.
ReplyDeleteGreat idea to use embossing ink in the folder so you can emboss just the background. Nicely done!
ReplyDeleteWonderful
ReplyDeleteWhat a joyful card! I love the colors.
ReplyDeleteThank you for all the detail close up shots in your blog post. Very helpful!
ReplyDeleteWhat an adorable tag. Loved the colors and the cute little critter.
ReplyDeleteJust lovely. Thanks for sharing the steps!
ReplyDeleteOh my, how cute and adorably fun! Love the use of texture. Embossing powder is my go to as well. Love what you did with the embossing folder and die cut balloons.
ReplyDeletewhat a wonderful cards so many lovely details and the texture !
ReplyDeleteWhat an adorable tag! I love the sparkly balloons!
ReplyDeleteAdorable cat and tag. Like how you used the vellum.
ReplyDeleteYour card made me smile. Thank you for sharing your card with us.
ReplyDeleteGreat tags, coloring and cards. [Bunny]</a
ReplyDeleteThanks for an idea for our cat loving friends!
ReplyDeleteSuch a cute card. I love your watercoloring.
ReplyDeleteLove this! The character is adorable (I have some chunky cats of my own LOL) and as a Clemson fan, the color scheme is perfect. Great work and congrats on being part of the hop.
ReplyDeleteLori S in PA
I love the cat and the pops of sparkle!
ReplyDeleteThe kitty is adorable. The card is very pretty!
ReplyDeleteAbsolutely Adorable!!!!
ReplyDeleteLOVE this tag and the fact that you shared all your steps! Glitter cardstock? Hello! Where have I been that it's not in my stash of goodies???? Off to shop!
ReplyDelete