Hi crafters! December is starting tomorrow and I am happy to have finished my Advent calendar countdown tags just in time.
Please note: this post has affiliate links, for which I receive a small percentage of sales generated by the link, at no extra cost to you.
The base for the calendar was made in 2015. I make new tags every year and reuse the base. You can make a similar base or perhaps hang the tags in your tree or on the wall. The tags later go into my December Daily, as dates for the journaling pages. In earlier years, I have made larger tags, which I have written the journaling on, but this year I made a different kind of December Daily journal, which you can see to the left.
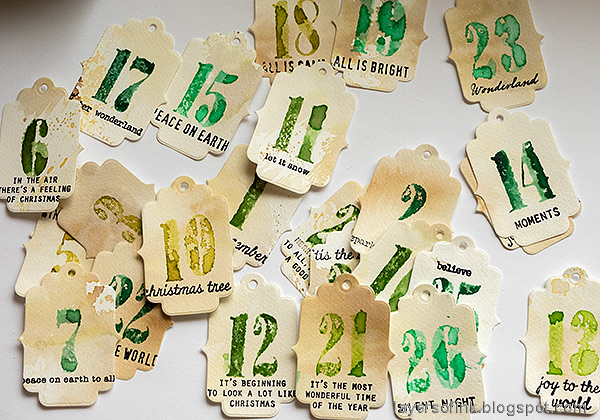
Here are all the finished tags. I made 26 since Christmas is celebrated until Boxing Day here and I like to include that whole weekend in my journal.
Start by smearing Distress Ink on a non-stick craft sheet, mist with water and press watercolor paper into the ink. When dry, die cut 26 tags using Simon Says Stamp Label Tags.
I used Tim Holtz Worn Text for the numbers. They were all stamped with shades of green Distress Ink. Mist with water before stamping.
Next, I stamped a small sentiment on each tag. The sentiments come from Simon Says Stamp Season's Greetings and from various Tim Holtz sets.
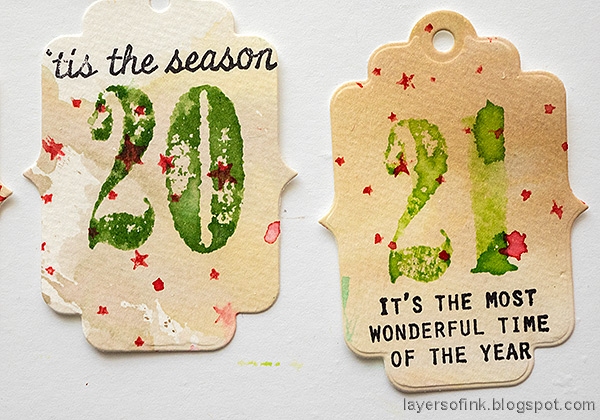
I used traditional Christmas colors, since my December Journal was made with traditional colors. Mist each stamp with water before stamping, for a watercolor look. The stamps are from different Tim Holtz Christmas sets.
I think I might have used 'Hello December' on a countdown tag before, usually on the very first tag of the month.
Its a lot of fun stamping in this way and I love being surrounded by a whole pile of stamps.
Some of the sentiments fit perfectly, as if they were made for this label tag die. The star stamp is from Jolly Holiday.
The Simon Says Stamp Label Tags come in a set of three sizes. This is the mid-sized tag. I really like the shape of them. You can find another example, where I used both the smaller and the larger tag here.
I really like how the Lucky Clover ink the the left almost shines.
This is how I plan to use them as dates in my December Journal. You can find the journal and its tutorial here.
I hope you enjoyed this tutorial! The tags can also be made as gift tags. Just skip the number and write the person's name there instead.
You can find the previous years' countdown tags here: 2015, 2016, 2018, 2019, 2020, 2021 and 2022.


No comments:
Post a Comment
Thank you so much for leaving a comment! Happy Crafting!