
Hello crafters! For today's project I created a fairy tale forest, with mushrooms and gnomes. You will find a fun technique using Stickles glitter glue and another with shrink plastic.

I wanted to create a little forest using mainly mushrooms from Tim Holtz Field Notes and Field Notes Snippets ephemera packs. It had to be inhabited and the Simon Says Stamp Spring Gnomes were perfect, but way too big, so I used shrink plastic to shrink them down to the perfect size.

Start by applying Matte Texture Paste through the SSS Large Dots stencil on a tag die cut from watercolor paper.

When dry, paint the tag with watered down Distress Paints and mist with more water to make them blend. I often coat the background with gesso first, but here I didn't do that, to capture more of the texture from the paper.

When the paste is dry, place the stencil back over the tag and apply Stickles Moon Dust with a palette knife. This was the first tag I made with this technique and I love the look of the raised glittery dots. I used the same technique for my tag for Monday's Simon Says Stamp Monday Challenge Post, but I made this tag first. Clean the stencil immediately.

Here you get a closer look at the sparkly dots. I particularly like that the dots aren't all the same color.

Stamp two Spring Gnomes on shrink plastic.

Shrink the plastic according to the instructions on the packaging. Here you can see the result with the small gnomes placed next to the stamps.

Color the gnomes on the back with Distress Paint.

When dry, paint them white at the back. This step makes them stand out better against the background. If you are using a light colored background, you can skip it.

I love the look of Glossy Accents on shrink plastic and it's a technique I hadn't used in a while. Set them aside to dry, it takes some time.
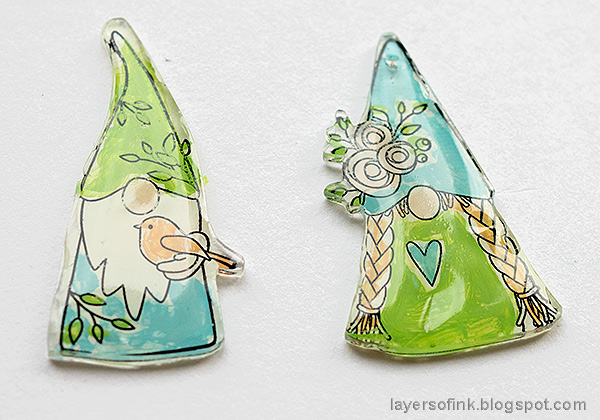
The Glossy Accent give them a wonderful glossy and finished look.

Sand the edges of some mushrooms from Field Notes and Field Notes Snippets.

Color a strip of Mummy Cloth with Distress Ink. Mist the cloth with water and press onto ink pads.

Adhere some of the mushrooms with foam tape for dimension. The gnomes were also adhered with foam tape.

Here you can see how glossy the gnomes are. I painted them brighter than the mushrooms so that they would stand out. You can also give them a more distressed look.

Fray the edges of the cloth and layer it three times. I love the textured look of the glittery dots here at the bottom of the tag.

I also added some gold stars with the Nebula Stickles jar.

The sentiments were found in the Clippings Sticker book and I also added two ephemera butterflies.

Here you can see the dimension created with the foam dots and Mummy Cloth.

I hope you enjoyed this tutorial. You can also create a fairy tale forest on a tag or as a part of a 3-D project. The Stickles and Texture Paste technique work on many types of project and with different stencils.

Thank you so much for taking the time to visit my blog today!
Happy crafting!
Anna-Karin
Supplies:
* Please note: the links are affiliate links, for which I receive a small percentage of sales generated by the link, at no extra cost to you.
* Please note: the links are affiliate links, for which I receive a small percentage of sales generated by the link, at no extra cost to you.
that is awesome! it's the tiny details that make it pretty.
ReplyDeleteCompletely in love with this magical fungi forest - it's entirely enchanting. Glorious shimmering starry sky too... what a fabulous tag.
ReplyDeleteAlison x
OK Love this!!! Just love the shrink plastic gnomes and all the elements to this magical tag. Simply beautiful....
ReplyDeleteLove your gnomes and this beautiful background with them! Thanks for sharing the details.
ReplyDelete