Hi everyone! It is time for one of my favourite posts of the year, my December Daily journal. I really like
Ali Edwards concept of a December Daily and this will be my sixth year of documenting our month of December in a journal. I do a kind of a mini version, where I focus on the words, and only add a couple of photos here and there.
The Narnia winter scene below, as well as the techniques, work for many other types of projects. It would for instance look great on a canvas, or you can make a smaller version on a card.
I wanted to do something different on this year's December journal and when I started thinking about a winter forest, I got the idea of making a Narnia-themed journal. I love the
Narnia Chronicles by C.S. Lewis, and did a
scenic stamping piece on the lamp-post scene (when Lucy first goes through the wardrobe into Narnia) some years ago. I wanted to create the image of a deep snowy forest and used lots of layers of die cuts on the cover, and a bunch of fun techniques to create snow.
I was planning to have posted this earlier och I was planning to have done a video, but time just ran out, so it's a step by step tutorial instead, with lots of photos. This is a
Sizzix tutorial, using
dies by Tim Holtz. Let's start, this is a pretty long post.
All my December journals, except the first one, are done in different Tim Holtz worn binders, and look pretty nice together side by side on the bookshelf. This is the
Tattered Worn Binder. This time, I wanted to paint the cover, and started by coating it with layers of gesso. The cover really soaks up the gesso and you'll need at least three layers, letting it dry in between. I think I did four layers.
Paint the cover with white, Tumbled Glass, Faded Jeans and Blueprint Sketch, starting with the lightest shade. Add white to blend the colors. As you can see, I used more blue on the back cover, because I knew I was going to cover that same area up on the front cover.
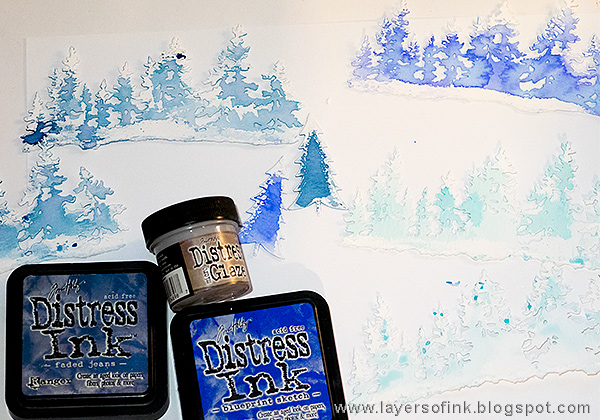
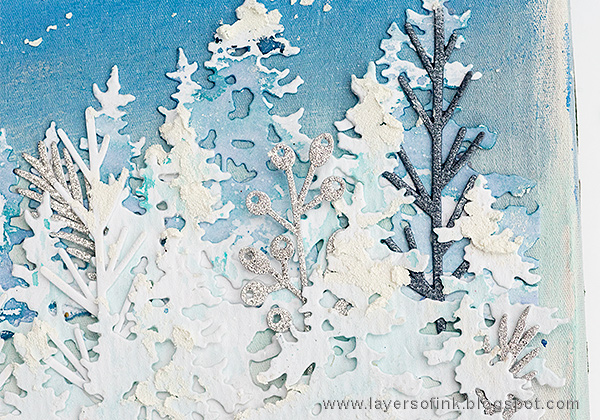
Die cut the
Tree Line at least six times from
watercolor paper. Also die cut a couple of small trees from the
Home for the Holidays set. From that same set, use the rolling hills die and die cut two hills from watercolor paper, varying the direction of the die. Finally tear the edge of a third piece.
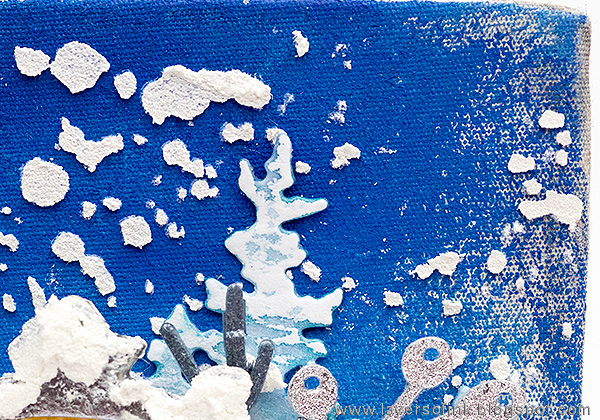
Distress Micro Glaze works great to create a resist effect that looks like snow, and it is fun and quick too. Apply the glaze with your finger along the branches of the trees and at the bottom of the tree line. Press Distress Ink on a craft sheet and mist with water. Use just one ink per tree line die cut. I also used Tumbled Glass. The different shades creates a sense of depth in the finished forest.
Repeat on the three snowy hill pieces. I planned where my lamp post was going to do and applied a larger oval of glaze there.
Use a yellow Distress Crayon to add yellow, for the warm light of the lamp post.
When all the pieces are dry, I smeared a thin layer of Rock Candy Distress Stickles over everything. This gives the look of snow glistening in the light, as you would see on a very cold day. If you can't get hold of Rock Candy Stickles, use another 'white' Stickles, such as
Frosted Lace.
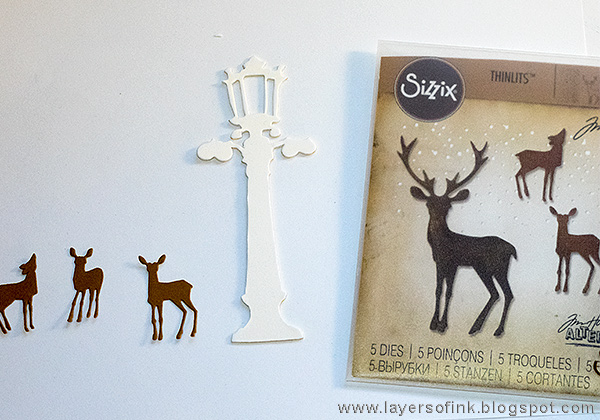
Die cut the
lamp post from
mat board or chipboard, and the deer from brown
Sizzix Paper Leather. The deer are from the
Winter Wonderland set.
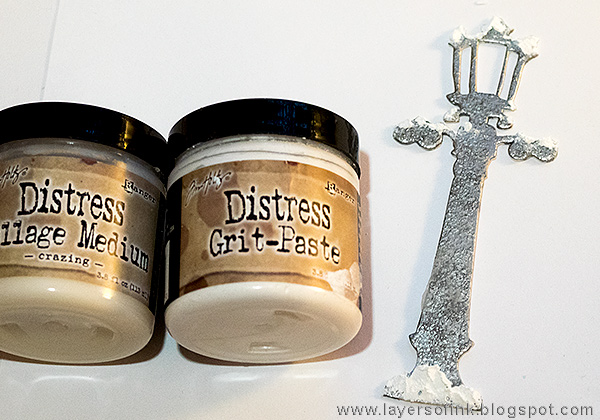
Paint the lamp post by dabbing it with a
Silver Paint Dabber. Repeat when dry. The dabbing motion gives a bubbly look to the paint.
When dry, add a little
Crazing Medium to the lamp post, as well as
Grit-Paste as snow.
Smear a Black Soot Distress Crayon on the lamp post, avoiding the snow (or add the snow later - I wanted to speed things up by letting the Grit-Paste and the Crazing dry at the same time). Wipe most of the crayon off with a slightly moist cloth.
To finish the lamp post I cut a piece of acetate to place behind the opening and colored it with alcohol ink. I also applied a tiny bit of Glossy Accents along the edges and sprinkled with dry Rock Candy glitter. Cut a piece of white cardstock and make markings with a Distress Crayon, looking like a bulb.
Here you can see the finished look of the lamp post, and you can spot the glitter, which is supposed to look like ice.
Die cut a bunch of other shapes to add details to the scene. I actually die cut a lot more shapes than what you see here, but forgot to take a new photo. I die cut some from white paper too, and some from glimmery blue paper, using the
Festive Greens and
Home for the Holidays sets. Adhere the silver
Deco Sheet to paper before die cutting.
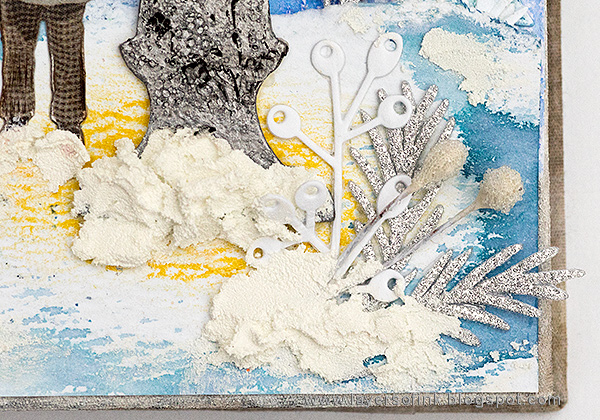
Plan the scene and start gluing the tree lines, from the top. When the tree lines and three layers of snowy hills were glued down, I started adding smaller die cuts here and there, such as the branch tree that you see here.
My Lucy comes from
Tim Holtz Christmas Paper Dolls and I think she fitted pretty well. She was colored lightly with Distress Markers.
Here's a closer look on the Grit-Paste snow. I also smeared a little Grit-Paste here and there on the trees and the ground, after gluing everything down.
As foreground, I added more trees and branches, as well as snow. The sentiment was printed, and I also printed a bunch of quotes which I will use on the inside.
Here's a better look at the texture of the glaze resist snow.
The deer were inked slightly with Ground Espresso and placed in the forest.
Here are the other two deer, and I added some snow to them too, from snow falling from branches.
The lamp post has an interesting old metal look and is also uneven to the touch.
There are also three
Beaded Berries.
There is lots of dimension on this cover, but it will still fit into my bookshelf since none of the pieces stick out too much.
The back cover is decorated too, although less elaborately.
I added a fun quote from the book on the back cover.
This forest also consists of a bunch of different types of surfaces and die cuts.
I will finish the journaling tags that will go on the inside tonight, and will try to post them tomorrow. My December journal is ready to be filled with memories.
If you want more inspiration, check out my previous December Daily journals:
Thank you so much for taking the time to look at this long post!
Happy Christmas crafting!
Anna-Karin
Supplies:
|
Sizzix Thinlits Die - Tree Line
|
Sizzix Bigz Die - Lamp Post
|
Sizzix Thinlits Festive Greens
|
Sizzix Thinlits Die Set 12PK - Home for the Holidays
|
Sizzix Winter Wonderland
|
Sizzix Bigz XL Alphabet Die - Storybook
|
Sizzix Little Sizzles Mat Board
|
Tim Holtz Distress Stickles Dry Glitter ROCK CANDY
|
Tim Holtz Idea-ology TATTERED Worn Binder
|
Tim Holtz Layering Stencil SPECKLES
|
Tim Holtz 8.5 X 11 DISTRESS WATERCOLOR CARDSTOCK
|
Tim Holtz Idea-ology DECO SHEETS
|
Neenah Classic Crest 80 LB SMOOTH SOLAR WHITE Paper Pack 40 Sheets NH80LB40
|
Tim Holtz Idea-ology 8 x 8 Paper Stash METALLIC KRAFT STOCK
|
Sizzix Paper Leather Sheets - 8 1/2
|
Simon Says Stamp Cardstock GLIMMERY DEEP SEA BLUE
|
Tim Holtz Idea-ology CHRISTMAS PAPER DOLLS
|
Tim Holtz Idea-ology BEADED BERRIES
|
Tim Holtz DISTRESS MICRO GLAZE
|
Tim Holtz DISTRESS GRIT PASTE
|
Tim Holtz Distress Collage Medium CRAZING
|
Dina Wakley Ranger WHITE
|
Ranger Paint Dabber SILVER METALLIC
|
Tim Holtz Flip Top Distress Paint BLUEPRINT SKETCH
|
Tim Holtz Flip Top Distress Paint FADED JEANS
|
Tim Holtz Flip Top Distress Paint TUMBLED GLASS
|
Ranger Tim Holtz Distress Crayon BLACK SOOT
|
Ranger Tim Holtz Distress Crayon FOSSILIZED AMBER
|
Tim Holtz Alcohol Ink BUTTERSCOTCH
|
Tim Holtz Distress Ink Pad BLUEPRINT SKETCH
|
Tim Holtz Distress Ink Pad FADED JEANS
|
Tim Holtz Distress Ink Pad TUMBLED GLASS
|
Tim Holtz Distress Ink Pad GROUND ESPRESSO
|
Tim Holtz Idea-ology TAGS Page Pockets
|
Tim Holtz Distress Markers BROKEN CHINA
|
Tim Holtz Distress Markers TATTERED ROSE
|
Tim Holtz Distress Markers VINTAGE PHOTO
|
Dina Wakley Ranger WHITE GESSO
|
Tim Holtz Distress Collage Medium MATTE
|
Sizzix Big Shot Machine Only (White & Gray)
|
Sizzix Accessory - Multipurpose Platform, Standard
|
Sizzix Accessory - Precision Base Plate for Intricate Thinlits Dies
|
Sizzix Accessory - Cutting Pads, Standard, 1 Pair (Purple w/Silver Glitter)
|
Tim Holtz Distress 3/4 INCH COLLAGE BRUSH
|
Ranger MINI ROUND INK BLENDING TOOLS
|
Dina Wakley Ranger PALETTE KNIFE
|
Tim Holtz Idea-ology SANDING GRIP
|
Tim Holtz Idea-ology SANDING GRIP REFILL
|
Ranger Inkssentials Non Stick CRAFT SHEET 15 X 18
|
Tim Holtz DISTRESS SPRAYER
|
| |
* Please note: the links are affiliate links, for which I receive a small percentage of sales generated by the link, at no extra cost to you.