Showing posts with label Decor. Show all posts

Tuesday, October 29, 2024

The Apothecary Tutorial

Hello crafters! I have one more Halloween project to share, the front door of a spooky apothecary practice. 

Please note: this post has affiliate links, for which I receive a small percentage of sales generated by the link, at no extra cost to you.

Layers of ink - The Apothecary Halloween Tutorial by Anna-Karin Evaldsson.

I really like Tim Holtz Baseboard pieces and they are fun to layer. Here I layered an arch and a door, with the addition of a sign post and a sentiment strip. Lots of fun little details which can belong to a spooky apothecary: bottles, jars, glass balls, sweets and of course skulls of some of his victims.

Sand the edges of the idea-ology Halloween baseboards pieces.

Here you can see the individual pieces. The shelf was made by gluing to wood planks from the Baseboard set together. Sand all the edges.

Add a Halloween transparency.

Glue a Halloween Transparency to the arch. I used one of the spider web transparencies.

Stain the skulls and bones with black paint.

Glue the door on top and glue the shelf under the door. Splatter black paint on the background. The skulls and bones were also distressed with black paint.

Die cut bottles with Tim Holtz Vault Wicked set.

Using the Sizzix Vault Wicked set, the bottles were die cut from leftover papers, Simon Says Stamp Color-Blend cardstock (which is glossy), Black Glitter Cardstock and gold metallic cardstock.

Add Halloween sticker book sentiments to the signpost.

Glue sentiments from the Halloween Sticker Book to the sign post. I really enjoying picking clipping sentiments, creating a story.

Glue Simon Says Stamp Pawsitively Dazzling Gems here and there.

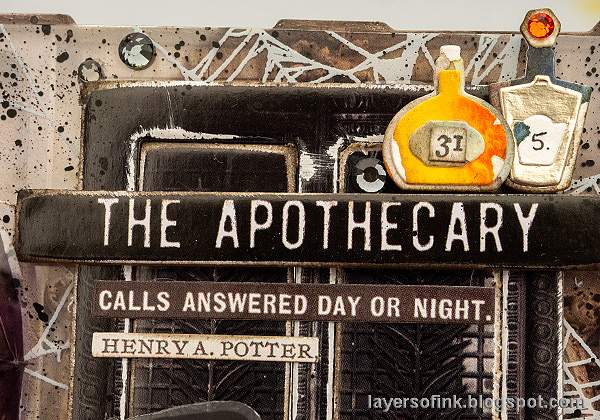
Two bottles were placed on the title and adhered with Simon Says Stamp Pawsitively Perfect Foam Tape. 

Add a transparent moth.

I glued a transparent bat to the door too. Fold up the wings.

Make a shelf with baseboard pieces and place bottles, glass balls, bones and skulls on it.

Glue mummy cloth to the shelf, as a table cloth. Add Bubbles, skulls, Simon Says Stamp Pawsitively Dazzling Gems, bones and bottles to the shelf. I used two layers of foam tape for the bottles.

Tiny bottles.

I added clippings number stickers to some of the bottles and wrote numbers on the rest.


Here you can see the shelf from above with all the little details. 


Shelves are easy to build and give space for many different types of dimensional items.


Stack three skulls on top of each other, with a bone under one of them. I also added idea-ology candy corn.

Layers of ink - The Apothecary Halloween Tutorial by Anna-Karin Evaldsson.

The project has quite a lot of dimension.

Layers of ink - The Apothecary Halloween Tutorial by Anna-Karin Evaldsson.

I hope you enjoyed this tutorial! See you soon again!


Thank you so much for stopping by here today! Have a good weekend!

Happy crafting!

Anna-Karin

Supplies:

* Please note: the links are affiliate links, for which I receive a small percentage of sales generated by the link, at no extra cost to you.


Wednesday, October 23, 2024

Vellum ghosts tutorial

Hi crafters! Today I have a fun Halloween project to share, with vellum ghosts and fun details.

Please note: this post has affiliate links, for which I receive a small percentage of sales generated by the link, at no extra cost to you.

Layers of ink - Vellum ghosts tutorial by Anna-Karin Evaldsson.

I wanted to make vellum ghosts using Tim Holtz Spooky Spirits stamp set. They live in a house with broken windows and various spooky elements. Do you see the eyes peeking out through one of the windows? A few weeks ago, I made mixed media ghosts with the same stamp set for the Simon Says Stamp store blog. Here comes another technique on how to make ghosts. 

Layers of ink - Vellum ghosts tutorial by Anna-Karin Evaldsson. Stamp with Simon Says Stamp Spooky Spirits.

Stamp three ghosts on Simon Says Stamp vellum using Tim's Spooky Spirits set. I cut them out with scissors, but there are also coordinating dies by Simon Says Stamp.

Layers of ink - Vellum ghosts tutorial by Anna-Karin Evaldsson. Emboss the vellum ghosts.

One of them got a hat from the Halloween sticker book. Turn the ghosts around, working on a Simon Says Stamp Pawsitively Perfect Craft Pad. Use a ball tool to emboss lines along all the stamped lines and in the shadow areas of the ghosts. Embossing vellum, turns it white.

Layers of ink - Vellum ghosts tutorial by Anna-Karin Evaldsson. Color with alcohol inks.

Color an idea-ology Halloween Transparency with alcohol inks to make it more distressed.

Layers of ink - Vellum ghosts tutorial by Anna-Karin Evaldsson.


Layers of ink - Vellum ghosts tutorial by Anna-Karin Evaldsson. Add distress glitter.

The back piece is made from Sizzix Little Sizzles Mat Board. I adhered a Tim Holtz Halloween Backdrops paper on top. Glue the transparent piece to the back of the window and adhere with Pawsitively Perfect Foam Tape. Add Simon Tacky Glue along some of the edges of the window and sprinkle Clear Rock Candy glitter on top. 

Layers of ink - Vellum ghosts tutorial by Anna-Karin Evaldsson.

The bats were die cut with Tim's Vault Wicked set, from black kraft-stock cardstock. Sand slightly. 

Layers of ink - Vellum ghosts tutorial by Anna-Karin Evaldsson.

I am very fond of vellum and its translucent qualities, perfect for ghosts. 

Layers of ink - Vellum ghosts tutorial by Anna-Karin Evaldsson.

The crow also comes from the Vault Wicked die set.  I sanded the edges of a sign post from Halloween Baseboards and added Clippings Stickers to it. 

Layers of ink - Vellum ghosts tutorial by Anna-Karin Evaldsson. Hiding ghosts.

I stamped a fourth vellum ghost and tucked it behind one of the windows, so that only the eyes show. The jewels are Simon Says Stamp Pawsitively Dazzling Gunmetal Gems. 

Layers of ink - Vellum ghosts tutorial by Anna-Karin Evaldsson. Add frosting to the window.

The glitter in the corners adds a frosted look, or it might be something slimy.

Layers of ink - Vellum ghosts tutorial by Anna-Karin Evaldsson.

The adhesive is hidden under the hat.

Layers of ink - Vellum ghosts tutorial by Anna-Karin Evaldsson.

I also added a Halloween Mini Skull and a bunch of additional gems.

Layers of ink - Vellum ghosts tutorial by Anna-Karin Evaldsson.

I hope you enjoyed this project! You can also make it with the mixed-media ghosts I made for the Boo Ghost Panel Tutorial on the Simon Says Stamp store blog.


Thank you so much for stopping by here today! Have a good weekend!

Happy crafting!

Anna-Karin

Supplies:

* Please note: the links are affiliate links, for which I receive a small percentage of sales generated by the link, at no extra cost to you.


Monday, July 29, 2024

Furry Friend Canvas

Hi friends! I hope you are well and had a good weekend with some crafty time. 

Please note: this post has affiliate links, for which I receive a small percentage of sales generated by the link, at no extra cost to you.


This week our theme at the Simon Says Stamp Monday Challenge Blog is 4-Legged Friends. I hope you will join us and don't miss the last project by our July guest designer Laura Cassina

Layers of ink - Furry Friend Mixed Media Tutorial by Anna-Karin Evaldsson.

I made a mixed media canvas board this week, featuring my parents' sweet dog. It will be a gift for my Mom (who hopefully does not read this). I made the background green, with a bit of yellow, to match the colors of the photo. 

Layers of ink - Furry Friend

Apply gesso to the board and let dry. The apply Texture Paste with a palette knife through the Simon Says Stamp Mix and Match Squares stencil. Let dry and repeat to cover the board.

Layers of ink - Furry Friend Mixed Media Tutorial by Anna-Karin Evaldsson. Paint with Distress Paint.

Paint the canvas with Distress Paint and mist with water to blend.

Layers of ink - Furry Friend Mixed Media Tutorial by Anna-Karin Evaldsson. Add details with white pen.

When the paint was dry, I added a white outline to some of the squares with a white paint pen.

Layers of ink - Furry Friend Mixed Media Tutorial by Anna-Karin Evaldsson. Mist with Distress Mist.

I misted the canvas board with Twisted Citron Distress Spritz.


When the mist was dry, I stamped the background here and there with Simon Says Stamp Old Letter.

Layers of ink - Furry Friend Mixed Media Tutorial by Anna-Karin Evaldsson. Die cut Simon Says Stamp You.

The title was die cut with the new You die from the Cheering For You release. I didn't use the particular die cuts on the photo, but ended up cutting the title from blue inky paper and black cardstock instead. 

Layers of ink - Furry Friend Mixed Media Tutorial by Anna-Karin Evaldsson. Add sentiments.

The word 'love' comes from the Simon Says Stamp You stamp set. I also wanted to stamp a small 'you' to complete this sentiment. Rub Antique Linen paint into the Tim Holtz Typed Tags.

Layers of ink - Furry Friend Mixed Media Tutorial by Anna-Karin Evaldsson. Die cut Circle Loops.

I die cut Simon Says Stamp Circle Loops from left-over inky paper, matching the sky in the photo.

Layers of ink - Furry Friend Mixed Media Tutorial by Anna-Karin Evaldsson.

'Are the best' also comes from the Simon Says Stamp You stamp set, which is a great stamp set with so many useful sentiments.

Layers of ink - Furry Friend Mixed Media Tutorial by Anna-Karin Evaldsson.

Here you can see the shimmer of the Distress Spritz a little better.

Join us this week in our 4-legged friends challenge! You have a chance to win a $25 gift voucher to do some fun shopping at Simon Says Stamp. You have until Monday 8am Ohio time. 1pm UK time, 2 pm CET to join in.


Do you use Instagram? If so please add #sssmchallenge so we can see your entries there too.


Thank you so much for stopping by here today! 

Happy crafting!

Anna-Karin

Supplies:

* Please note: the links are affiliate links, for which I receive a small percentage of sales generated by the link, at no extra cost to you.


Saturday, April 27, 2024

Bird Tin Tutorial

Hello crafters! Today I have an altered tin to share. I made it for a friend who likes birds, but you can of course use a different theme instead.

 Please note: this post has affiliate links, for which I receive a small percentage of sales generated by the link, at no extra cost to you.

Layers of ink - Bird Tin Tutorial by Anna-Karin Evaldsson.

I recycled an old mint tin for this project and altered it with lots of ink, stamping and blue tit birds. The birds were die cut and then watercolored with Distress Ink. Tins are fun because you get four different surfaces to decorate, the front, the inside (which is great for fragile dimensional items), and the back.

Layers of ink - Bird Tin Tutorial by Anna-Karin Evaldsson.

The inside looks like this, with a quote to the left and two smaller birds to the right. 

Layers of ink - Bird Tin Tutorial by Anna-Karin Evaldsson. Die cut and color the birds.

Start by die cutting Simon Says Stamp Layered Bird Bunch from Ranger's heavystock paper. Smear Distress Inks on a non-stick craft sheet and press some of the pieces into the ink. Let dry and repeat. Paint the heads with a paint brush.

Layers of ink - Bird Tin Tutorial by Anna-Karin Evaldsson. Die cut Simon Says Stamp Layered Birdie.

I did the same with the Simon Says Stamp Layered Birdie, only here I used the paintbrush a little more. The legs and beak were later colored with a darker shade of Black Soot.

Layers of ink - Bird Tin Tutorial by Anna-Karin Evaldsson. Assemble the flowers.

Shape the wings a little and piece together the birds. Add white highlights with a gel pen and color the eyes with a black pen.

Layers of ink - Bird Tin Tutorial by Anna-Karin Evaldsson. Color paper with Distress Ink.

For the backgrounds I colored heavystock cardstock with several layers of first Distress Ink and then at the end, also Distress Oxide Ink. Let the paper dry in between.

Layers of ink - Bird Tin Tutorial by Anna-Karin Evaldsson. Cut into cards.

Cut them into cards and round the edges with a We R Memory Keepers Corner Chomper. Later I also cut a fourth card for the back of the tin.

Layers of ink - Bird Tin Tutorial by Anna-Karin Evaldsson. Stamp with Simon Says Stamp Old Letter.

Stamp two of the cards with Simon Says Stamp Old Letter.

Layers of ink - Bird Tin Tutorial by Anna-Karin Evaldsson. Stamp with Simon Says Stamp All Seasons Tree.

Stamp the third card with a sentiment. Stamp the small tree from Simon Says Stamp All Seasons Tree with Pawsitively Saturated Royal ink. Stamp twice without reinking.

Layers of ink - Bird Tin Tutorial by Anna-Karin Evaldsson. Stamp with Simon Says Stamp Crackle Background.

Stamp in a few places with Simon Says Stamp Crackle Background and white emboss.

Layers of ink - Bird Tin Tutorial by Anna-Karin Evaldsson.

Adhere the papers to the inside of the tin. Add small twigs, dyed mummy cloth/cheese cloth and some sequins. The birds were adhered with three layers of Simon Says Stamp Pawsitively Perfect Foam Tape.

Layers of ink - Bird Tin Tutorial by Anna-Karin Evaldsson. paper and ink bird.

Make sure that it is possible to close the tin before gluing everything in place. I have made a few tins that don't close too, but I wanted this one to close.

Layers of ink - Bird Tin Tutorial by Anna-Karin Evaldsson. Inked bird.

The small birds and twigs are protected inside the tin. They are meant to be baby blue tit birds.

Layers of ink - Bird Tin Tutorial by Anna-Karin Evaldsson.

If there is space, you can tuck in another sentiment.

Layers of ink - Bird Tin Tutorial by Anna-Karin Evaldsson.

The lid of the tin had been coated with two layers of gesso and painted with Antique Linen Distress Paint. Glue a twig to the front of the tin and add some dyed mummy cloth / cheese cloth. Adhere the bird with two layers of foam tape

Layers of ink - Bird Tin Tutorial by Anna-Karin Evaldsson.

I adhered Tim Holtz Tissue Tape around the tin, adding a little glue too, to make sure it was stuck down well.

Layers of ink - Bird Tin Tutorial by Anna-Karin Evaldsson.

The sentiments were stamped on inky paper and cut into strips. They come from Simon Says Stamp Forest Scenery.

Layers of ink - Bird Tin Tutorial by Anna-Karin Evaldsson. White embossing.

The ink background has a lot of texture and in some places it looks like the ink shines.

Layers of ink - Bird Tin Tutorial by Anna-Karin Evaldsson. Blue tit.

I turned the birds into blue tits, which is one of my favorite birds, but you can also turn them into other birds.

Layers of ink - Bird Tin Tutorial by Anna-Karin Evaldsson.

By stamping twice without reinking in between, you create a sense of dimensions, since the fainter trees appear to be further away.

Layers of ink - Bird Tin Tutorial by Anna-Karin Evaldsson.

Don't worry about stray embossing powder, it only adds texture.

Layers of ink - Bird Tin Tutorial by Anna-Karin Evaldsson.

I decided to add paper to the back too. It was stamped with two sizes of trees from All Seasons Tree and and a sentiment from Simon Says Stamp Season's Greetings.

Layers of ink - Bird Tin Tutorial by Anna-Karin Evaldsson.

Add white anemone flowers with a white gel pen. 


Thank you so much for stopping by here today! 


Anna-Karin

Supplies:

* Please note: the links are affiliate links, for which I receive a small percentage of sales generated by the link, at no extra cost to you.