Saturday, November 30, 2013

CSI case file #100 - Happiness

Hello! This week we have come to case file #100 at CSI:Color, Stories, Inspiration. It is pretty cool to think of all the layouts that have been created for the challenge during these 100 case files. Here's this week's case file:


And my layout:
 
CSI case file 100 - Layers of ink
I always enjoy this colour combo and it works great with black and white photos. From the evidence items I used: stripes, Glossy Accents, numbers, stars, bricks, lightbulb, and borders. And from the testimony, I was inspired both by the Journal Sparks (I got journal about someone who makes you happy) and I also stamped a border on my journaling block.

I used watercolour paper for my base and painted stripes with watercolours, similar to the carpet on the inspiration photo. To make the yellow stripes, I adhered masking tape to the background, with even space in between, painted the yellow stripes and removed the masking tape. The grey stripes were done with the two different shades of grey in the case file and simply using a ruler. I wasn't aiming for perfection. Just remember to wipe the edge of the ruler off in between.

The background was stamped with different stamps using Archival Jet Black and Watering Can inks. I used mainly stamps by Tim Holtz and Darkroom Door. The stars were die cut from mat board, inked with Distress Ink, stamped with alphabet and number background and coated with Glossy Accents.

More stamping and a strip of tissue tape.

I love this Film frame stamp by Darkroom Door and it was the perfect size for the Tim Holtz sentiment stamp I wanted to use. The frame was stamped with Jet Black ink and the sentiment with Watering Can.

I used a mix of photography related stamps. The photo block needed a bit of yellow too, so I die cut a heart from the paper I had used to try out different shades of yellow paint.

Journaling: This is one of my favourite photos of the two of us, taken at a restaurant, during a very cosy winter holiday at the sea. You were almost one year old and crawled around everywhere having fun with your cousin. I love you.

Thank you for looking! I hope you can join us in our hundredth challenge!

Anna-Karin

Supplies:
Surfaces: Daler & Rowney watercolour paper; Tim Holtz Idea-ology French Industrial Paper Stash; Sizzix Little Sizzles White Mat Board 6 x 13
Dies: Sizzix: Stacked Stars, Mini Hearts
Stamps: Darkroom Door: Film Frame Stamp, Photography Set; Stampers Anonymous Tim Holtz: Psychedelic Grunge, At the Movies, Ultimate Grunge, School Desk, Words for Thought; Graphic 45 Typewriter Letters
Ink: Ranger Archival Ink: Jet Black, Watering Can; Distress Ink: Iced Spruce, Black Soot
Paint: Daler & Rowney Watercolours
Embellishments: Tim Holtz Idea-ology: Laboratorie Tissue Tape; Prima: Small Typo Bulbs

Friday, November 29, 2013

12 tags of 2013 November

Hi everyone! Almost the end of the month, November seems to have just disappeared. Here's my version of Tim Holtz November 12 tags of 2013.
 
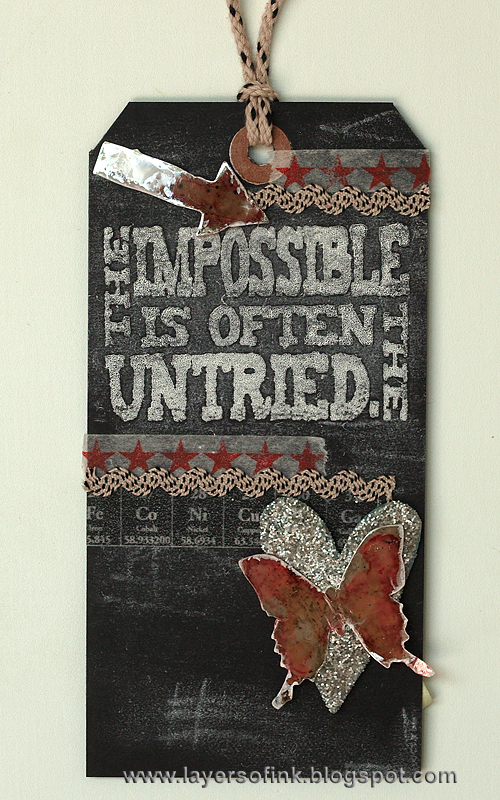
12 Tags of 2013 November - Layers of ink
I liked the look of the chalkboard effect together with this bold sentiment stamp. I did the technique in just the same way as Tim showed for his tag. I wanted to keep the chalkboard feel of the tag and didn't add many embellishments, just some tissue tape, ribbon and die cuts.

It is pretty cool how the chalk sticks to the embossing powder, and I like the extra lines here and there. It reminded me of writing on the school black board as a child.

The Pumice Stone Distress Glitter covered grungeboard heart was a left over from another project. I also had a piece of mica on my desk and die cut a butterfly and arrow from the mica. They were coloured at the back with Red Pepper alcohol ink, and when it was dry, I painted them at the back with Picket Fence Distress Paint.

Thank you for looking and have a lovely weekend!!

Anna-Karin

Supplies:
Surfaces: Ranger Black Tags; Tim Holtz Idea-ology Grungeboard
Dies: Sizzix: Mini Butterflies, Mini Hearts, Mini Old Jalopy & Arrow
Stamps: Stampers Anonymous Tim Holtz: Words for Thought
Embossing Powder: Ranger Frosted Crystal
Glitter: Distress Glitter Pumice Stone
Alcohol ink: Adirondack Red Pepper
Paint: Distress Paint Picket Fence
Embellishments: Tim Holtz Idea-ology: Black & Cream Trimmings, Laboratorie Tissue Tape, Merriment Tissue Tape; US ArtQuest Mica

Thursday, November 28, 2013

Altered Arts Christmas

Hi everyone! I have a project published in the Altered Arts Christmastime Projects Bonus Issue 2013. This special issue is free for everyone to download and it is full of gorgeous Christmas projects.

My project is one of my all time favourites, and also my very first tutorial, a Christmas Altered Book. You can find the original tutorial here. Lots of Sizzix dies, Hero Arts stamps and some really fun techniques. It takes a bit of time to glue the pages together and cut the windows, but is totally worth it.
 
To download the free special Christmas issue of Altered Arts, head over here.
 
Happy Christmas Crafting!
 
Anna-Karin


Tuesday, November 26, 2013

Advent Calendar Tutorial

Hello! Today I have a fun step-by-step Sizzix tutorial to share, for an interactive Advent calendar. Last year, I made a chest of drawers, which I use as embellishment storage. When I made it, I thought it would be fun to make a larger version as an Advent calendar, but didn't get to it in time.
 
If you don't want to make a calendar, you can turn this project into a great storage unit, by just using different patterned papers.
 
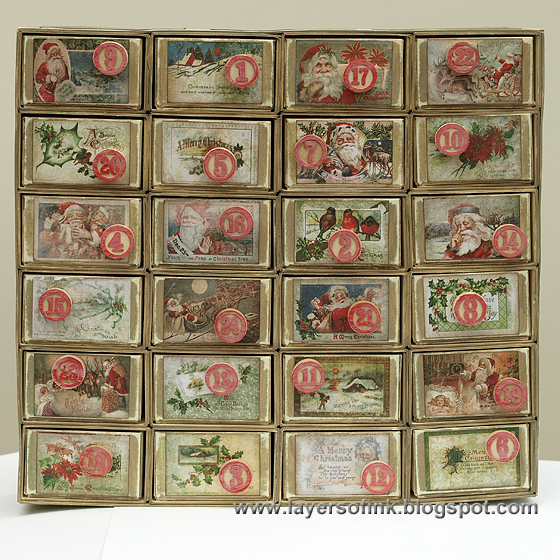
Advent Calendar - Layers of ink
When we were small, my Mom made Advent calendars for me and my sister. Mine was a large Santa-train wall-hanging, hers was a freestanding fabric tree. Mom bought and wrapped small gifts and sweets and we got to open one each day, with the biggest one being on Christmas Eve, which is the main day when we celebrate Christmas. I have very fond memories of that calendar, and wanted my son to have something similar. This calendar has 24 drawers (10 x 11 in.), but you can easily make 25 drawers, by simply adding one more column, so that you have 5 x 5 drawers instead of 4 x 6.
 
This is all constructed using one die, Eileen Hull's Candy Drawer, which I love. Here are more projects I made with the Candy Drawer: Chest of Drawers, Shadow Box, Memory Game, and Gift Box.
 
I used cream mat board, you can use chipboard too, but I really like mat board. Die cut 24 (or 25) drawers, which consist of three parts. The Scoreboards dies both cuts and scores the material, which makes assembly easy. It is an XL die, so you need the extended cutting pads.
 
Apply strong adhesive where shown. I used Wonder Tape, but later realised I didn't have enough at home. Instead of using tape to attach the drawer to the base, I used glue and place a heavy book on top until the glue was dry. The two side pieces, on the drawer itself and on its box (the piece at the bottom) are easier to adhere with strong tape. Repeat until you have 24 (or 25) drawers and boxes.
 
Measure and cut a length of mat board, make it a bit longer than what you need, but try to get the width right. It should be 6.2 cm (2.5 in).
 
For this I used wet glue, to give myself a bit of time to rearrange pieces if necessary. When the Wonder Tape is stuck, there is nothing you can do.
 
Start by gluing the boxes at the base of the calendar. If you are making a calendar for 25 days, you need to glue five boxes. If you are making one for 24 days, glue 4 boxes. I glued two at a time and used clamps and a heavy book to weigh them down.
 
Continue, one row at a time, until you have completed the calendar. Remember to place adhesive in between the boxes too. Don't worry if it is a little bit uneven (check my lower right piece).
 
Measure carefully and cut side pieces for the remaining three sides. You could just use patterned paper, which I did on my chest of drawers, but since the Advent Calendar is so large, I wanted the extra stability. Glue one side at a time and use clamps to keep it together.
 
 Paint the edges with Frayed Burlap Distress Paint.
 
 When dry, sand the edges to give the calendar a worn look.
 
Paint the front edges too. If you want to you can paint the boxes on the inside too, but I didn't think it was necessary.
 
To prevent the drawers from falling through to the other side, I cut two pieces of mat board to make a wall for the back.

 Paint the front of each drawer. I used a paint brush for all the painting.

 Sand the edges.

The vintage Christmas card images in Tim Holtz Seasonal Collage Mini Paper Stash were perfect for this project. Cut out and ink the edges.

Glue them to the front of each box.

So far, the project had been planned for a while, but I wasn't sure what to use for numbers and for handles. On my Chest of Drawers, I used beads as handles. When I got a box of Tim Holtz Game Pieces, I knew I had the answer. A combined handle and number! I toned down the red with a little bit of Antique Linen paint.

The numbers were glued to the drawers with hot glue, placing them where they covered the least important part of the images.

Advent Calendar - Layers of ink
You can place the drawers in order, or scrambled, as I did. I like the process of having to search for the one you can open.

On the sides, I used the larger images in Tim Holtz Seasonal Paper Stash, picking my favourite ones.

The other side of the box. If your calendar isn't too heavy (once filled), you can hang it on the wall. Mine will stand on a shelf. 
 
On the top, there are another three images. Remember that you don't have to make this into an Advent Calendar, it would be a really great storage unit for small embellishments.
 
Someone is very keen to find surprises in the boxes. He loves his calendar. Thank you so much for looking!! I hope you enjoyed the tutorial!

Happy Christmas Crafting!!

Anna-Karin

Supplies:
Surfaces: Sizzix Little Sizzles Cream Mat Board 6 x 13; Tim Holtz Idea-ology: Seasonal Collage Mini Paper Stash, Seasonal Paper Stash
Dies: Sizzix: Candy Drawer
Ink: Distress Ink: Gathered Twigs
Paint: Distress Paint: Frayed Burlap, Antique Linen
Embellishments: Tim Holtz Idea-ology: Bingo Game Pieces
Tools: Sizzix Big Shot

Monday, November 25, 2013

Christmas Daily Worn Journal

Hi everyone! We are counting down to Christmas this week at Simon Says Stamp Monday Challenge, with this holiday countdown challenge that Ashli suggested. I made a December Daily mini-book.

December Daily 2013 - Layers of ink
I like Ali Edward's idea of a December Daily, but I don't print photos at home so it isn't practical for me to do a page with photos every day. Last year, I made a simple December daily mini book, wanting something where I can quickly write down what we have done every day, without doing a specific layout for each day. This year, I wanted to do something similar, but in a different format. For my base I used Tim Holtz Composition Worn Cover, which is perfect for this kind of project, not too small, not too big and it is easy to add more pages. I used tags for my inside pages and embellished the cover with a mix of die cuts, rub-ons, stamps and Idea-ology pieces.

For another example using Tim Holtz worn covers, check out my Book of Random Things.

I glued Tim Holtz Eclectic Elements fabric to grungeboard, let it dry, and die cut with the Victorian Carolers die. This die has such intricate details. The edges were inked with Gathered Twigs.
 
The new white Christmas Remnant Rubs look great on the cover. Make sure you rub them real well so that they stick. If an edge is lifting, use a bit of matte multi-medium to stick it down again. White paint was rubbed into the word band and I layered it on a label stamped with Vermillion ink on a leftover tag.

The reindeer was painted with Evergreen Bough Distress Paint, most of which was rubbed off, to create a patina effect.

I used this calendar stamp on my December Daily last year too, here I stamped it with Watering Can ink on a leftover inky tag. Together with a muse token and label stickers it forms the title of the book.
 
I like the tag format and tags also fit perfectly into the cover. The tags were coloured by applying small spots of Distress Stain on my craft sheet, misting a tag with water (both sides) and pressing one side at a time into the ink. I really like the addition of a little bit of Brushed Pewter, which gives a nice metallic look to parts of the tags.

When the tags were dry, I made a template and punched holes in all the tags. I often leave this step to last, but keep placing important stamped images where the holes will be, ending up with holes in Santa's face etc. This time I remember to make the holes first. Numbers were stamped with Vermillion ink and Hero Arts Copper Plate numbers set.

 Instead of using my normal Gathered Twigs, I inked the edges with Iced Spruce.

My favourite ledger stamp, from Tim Holtz School Desk set, was stamped with Iced Spruce, holding it in my hand instead of mounting on a block.

I pulled out my Tim Holtz Christmas stamps and stamped them on the tags with Watering Can ink, which is a great grey ink. I had fun making each tag different. All the stamp sets are listed and linked in the supply list.

I stamped a little star/snowflake with Evergreen Bough on most pages.

The smaller stamps on the Mini Holidays (1-5) sets work great for this type of project.
 
We celebrate Christmas mainly on Christmas Eve, which is why Santa is coming with his gifts on that tag.
 
I went all the way to 26 December, since we celebrate Christmas until then. On the back of the tags, I stamped portions of the large Fabulous Flourish with Evergreen Bough ink, first stamping it off once on a scrap paper.

The inside covers of the journal I used were light grey, which worked well for me, otherwise you can paint them, as I did in my Book of Random Things. They were stamped with a whole bunch of Christmas stamps, using Watering Can ink. The stars/snowflakes were stamped with Evergreen Bough paint.

I used a large ring binder and attached it with hitch fasteners. Somewhere I saw someone who did this and thought it was a cool idea, sorry, I can't remember where I saw it. I can easily add extra tags if I have more to say, or to add extra photos.

I also placed some of the new page pockets at the back, for bits and pieces, mementos, photos, and whatever I might think of. 

You need to add a little bit of glossy accents to the tissue tape to make it stick down firmly. I added more rub-ons to the spine and here you can also see the hitch fasteners.

I hope you will join us this week and as always one random participant wins a $50 voucher from Simon Says Stamp.

http://www.simonsaysstamp.com/servlet/StoreFront
 
Thank you so much for looking!!

Happy Christmas Crafting!!

Anna-Karin

Supplies:
Surfaces: Tim Holtz Idea-ology: Composition Cover, Grungeboard; Ranger manila tags
Dies: Sizzix: Victorian Carolers
Ink: Ranger Archival Ink: Watering Can, Vermillion; Distress Ink: Evergreen Bough, Pumice Stone, Iced Spruce, Gathered Twigs
Paint: Distress Paint: Evergreen Bough, Picket Fence