Showing posts with label Memory Box. Show all posts

Monday, February 21, 2022

Daffodils Art Journal

Hi friends! Storm Franklin is bringing us a whole lot of wet snow at the moment, but to cheer that weather up, I have a spring-time art journal page to share.

Please note: this post has affiliate links, for which I receive a small percentage of sales generated by the link, at no extra cost to you.


Our theme this week at the Simon Says Stamp Monday Challenge Blog is Art Journaling. If you have never art journaled before, I hope you will try it. It is very fun, creative and freeing. You don't have to have an art journal, but you can use lose pages instead and bind them later and glue them into a notebook.

Don't miss the beautiful art journal page by our February guest designer Susan Babcock aka Susanbcards.

Layers of ink - Daffodils Art Journal Page Tutorial by Anna-Karin Evaldsson.

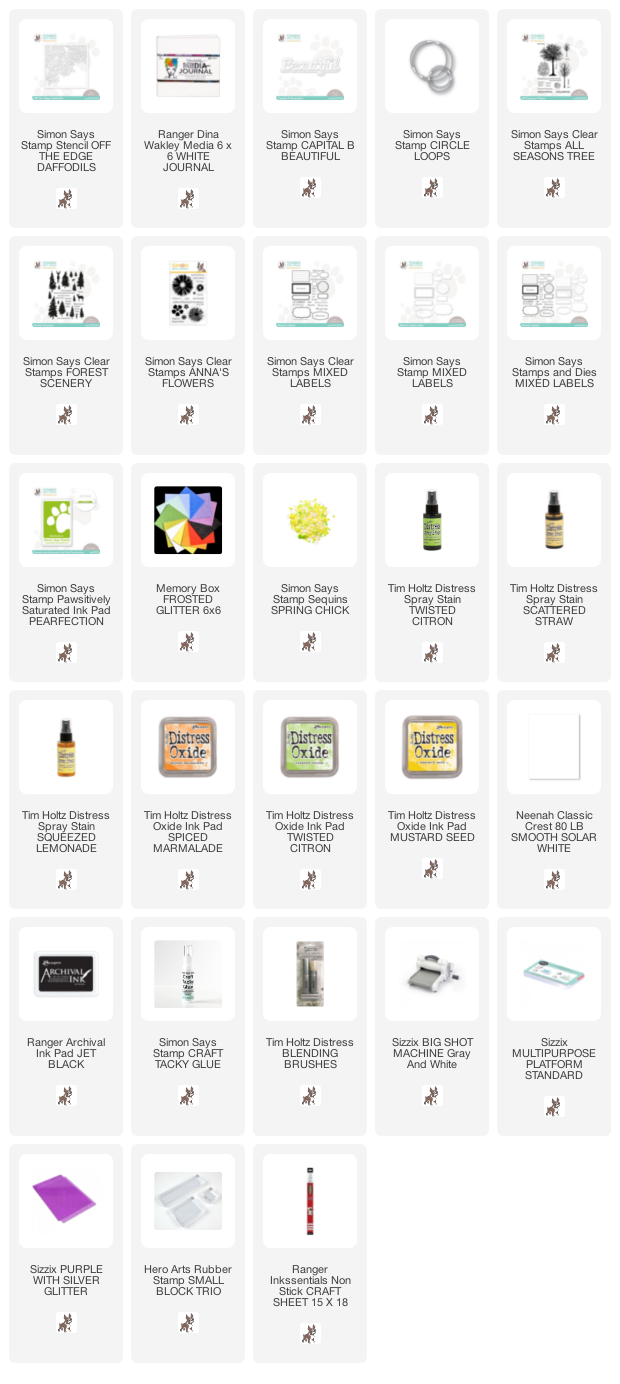
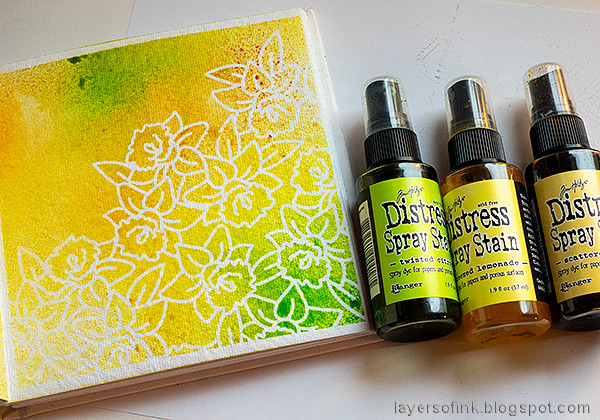
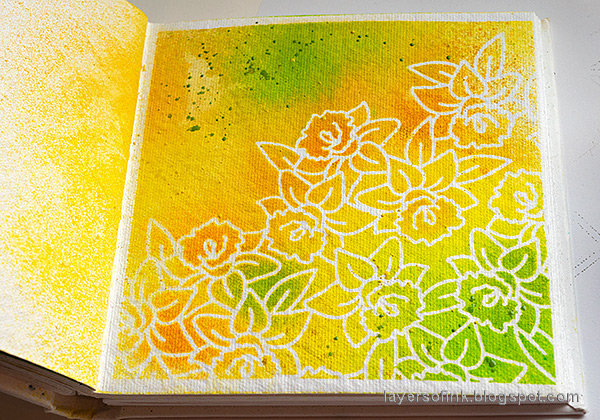
We spotted some snowdrops last week, which was the first sign of spring this year, although they are now buried under lots of snow. I love daffodils and made an art journal page featuring the beautiful Off The Edge Daffodils stencil from Simon Says Stamp's new Good Luck Charm release.

Layers of ink - Daffodils Art Journal Page Tutorial by Anna-Karin Evaldsson.

Place the stencil on a page in Dina Wakley's 6x6 in White Journal. Mist with Squeezed Lemonade, Scattered Straw and a little Twisted Citron.

Layers of ink - Daffodils Art Journal Page Tutorial by Anna-Karin Evaldsson.

When dry, place the stencil back again and add a little bit of Distress Oxide ink with ink blending brushes, just to darken some of the areas.

Layers of ink - Daffodils Art Journal Page Tutorial by Anna-Karin Evaldsson.

Splatter a little Twisted Citron spray on the page.

Layers of ink - Daffodils Art Journal Page Tutorial by Anna-Karin Evaldsson.

I die cut the Simon Says Stamp Circle Loops from yellow glitter paper. The sentiments were stamped on white paper and cut into strips. These are from Anna's Flowers and Mixed Labels.

Layers of ink - Daffodils Art Journal Page Tutorial by Anna-Karin Evaldsson.

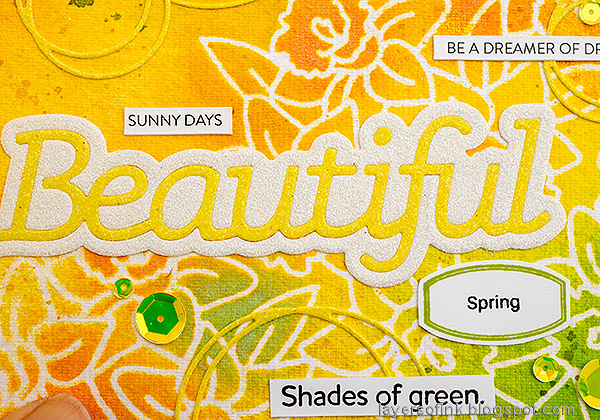
The Simon Says Stamp Capital B Beautiful die was die cut from white and yellow Memory Box Frosted Glitter paper and pieced together. The stamped label comes from Simon Says Stamp Mixed Labels.

Layers of ink - Daffodils Art Journal Page Tutorial by Anna-Karin Evaldsson. Stamp sentiments.

This type of detailed outline stencil works very well together with mists and gives a really quick background.

Layers of ink - Daffodils Art Journal Page Tutorial by Anna-Karin Evaldsson. Simon Says Stamp Forest Scenery.

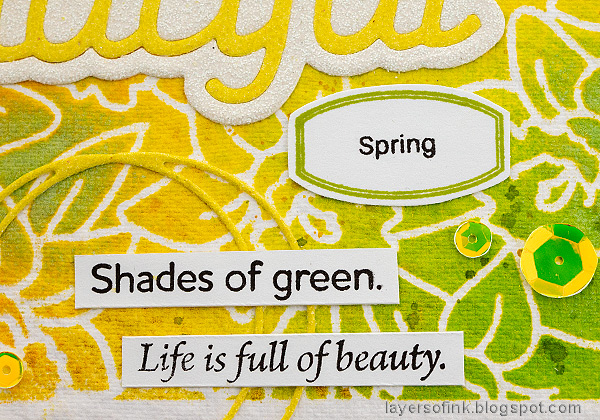
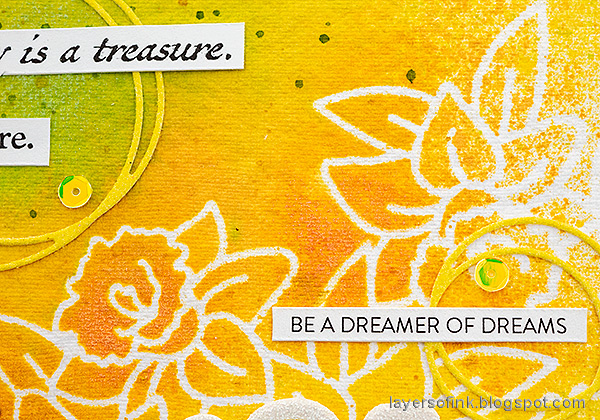
Some additional sentiments and sequins to finish the page. 

For more inspiration using the Simon Says Stamp Good Luck Charm release, check out my Black Glossy Background Card and Radiating Squares Art Journal page.

I hope you will join us this week in our Art Journal theme. You have a chance to win a $25 gift voucher to do some fun shopping at Simon Says Stamp. You have until Monday 8am Ohio time. 1pm UK time, 2 pm CET to join in.


Do you use Instagram? If so please add #sssmchallenge so we can see your entries there too.


Thank you so much for visiting my blog today! 

Happy crafting!

Anna-Karin

Supplies:

* Please note: the links are affiliate links, for which I receive a small percentage of sales generated by the link, at no extra cost to you.

Sunday, February 28, 2021

Stitched Circle Card

Hello friends! I have a card with stitching to share with you today. There was a time when I used a lot of embroidery floss on my cards, but I haven't done it as much lately. 

Layers of ink - Stitched Circle Card Tutorial by Anna-Karin Evaldsson.

I used to do embroidered designs on my cards often when I started cardmaking, partly since I had a lot of DMC embroidery floss at home. When I saw the Memory Box Stitched Circle die, I thought it would be fun to do a stitched design again. You can do lots of different designs and patterns with the help of this die. 

Layers of ink - Stitched Circle Card Tutorial by Anna-Karin Evaldsson.

Start by inking a heavystock paper with Distress Ink, mist with water and also add some water drops.

Layers of ink - Stitched Circle Card Tutorial by Anna-Karin Evaldsson.

When dry, die cut the Stitched Circle and try to center it on the paper. If it isn't in the center, you can also cut down the paper a bit.

Layers of ink - Stitched Circle Card Tutorial by Anna-Karin Evaldsson. Stamp with Simon Says Stamp Old Letter Background.

Stamp the background with the Simon Says Stamp Old Letter Background stamp and Dark Chocolate ink. If you want more subtle text, use Khaki ink instead.

Layers of ink - Stitched Circle Card Tutorial by Anna-Karin Evaldsson.

Start with the beige DMC floss. I used a whole strand and every second hole in the design. You will get a different look depending on how much you angle the threads. 

Layers of ink - Stitched Circle Card Tutorial by Anna-Karin Evaldsson.

Continue the same way, but the other way around. 

Layers of ink - Stitched Circle Card Tutorial by Anna-Karin Evaldsson.

Next, take the blue floss and repeat the process, but in the die cut holes that are still empty.

Layers of ink - Stitched Circle Card Tutorial by Anna-Karin Evaldsson.

Finally, repeat the blue thread again, but the other way around. 

Layers of ink - Stitched Circle Card Tutorial by Anna-Karin Evaldsson.

I cut away a circle in the center with a Simon Says Stamp Stitched Circles die.

Layers of ink - Stitched Circle Card Tutorial by Anna-Karin Evaldsson.

As a back drop, I used a piece of watercolor paper which had been inked with Tumbled Glass and Broken China. Apply the inks to a non-stick craft sheet, mist with water and press the paper into the ink. This was a second paper pressed into the ink after another paper had already soaked up most of the ink. That's how I got that light, mottled look.

Layers of ink - Stitched Circle Card Tutorial by Anna-Karin Evaldsson.

Mark the middle of the card with a pencil dot. Stamp the sun from Simon Says Stamp Mix and Match Circles with Mermaid Lagoon ink.

Layers of ink - Stitched Circle Card Tutorial by Anna-Karin Evaldsson.

White emboss a heart from Mix and Match Circles.

Layers of ink - Stitched Circle Card Tutorial by Anna-Karin Evaldsson.

Distress the edges of the panels and stitch to the background with a sewing machine.

Layers of ink - Stitched Circle Card Tutorial by Anna-Karin Evaldsson.

The sentiment comes from Simon Says Stamp Beautiful Butterflies and was stamped with Dark Chocolate ink.

Layers of ink - Stitched Circle Card Tutorial by Anna-Karin Evaldsson.

Experiment to see what designs you can create, by using different colors, thinner threads, and different patterns.


Thank you so much for taking the time to stop by here today! 

Happy crafting!

Anna-Karin

Supplies:

* Please note: the links are affiliate links, for which I receive a small percentage of sales generated by the link, at no extra cost to you.

Friday, February 26, 2021

Shimmering Butterfly Tag

Hello friends! Today I have a tutorial for you with a wax paper resist technique as well as some other fun details. 

Layers of ink - Shimmering Butterfly Tag Tutorial by Anna-Karin Evaldsson.

I was in the mood for a warm yellow-brown project, but you can of course do the techniques with any color. I used the Simon Says Stamp Boho Circle die together with wax paper to get the resist effect in the background. It is pretty subtle and if you want more contrast, work on a lighter background instead. I also used gold foil and Modeling Film on the tag.

Layers of ink - Shimmering Butterfly Tag Tutorial by Anna-Karin Evaldsson.

Ink a tag with Distress Ink.

Layers of ink - Shimmering Butterfly Tag Tutorial by Anna-Karin Evaldsson. Die cut the Simon Says Stamp Boho Circle.

Die cut the Boho Circle. This is an intricate die and it is easier to die cut if you place a piece of wax paper in between the die and the paper. I actually started out planning to use the heavystock die cut to the right, but then decided to use the wax paper instead.

Layers of ink - Shimmering Butterfly Tag Tutorial by Anna-Karin Evaldsson.

Move the wax paper around on the tag until you are happy with the look. Place baking paper above and underneath the tag and then iron on top, without steam. The wax will melt on the paper - but you don't really see it until the next step.

Layers of ink - Shimmering Butterfly Tag Tutorial by Anna-Karin Evaldsson.

Ink the tag with darker shades of Distress Ink. As you can see, the ink is darker on the areas where there were no wax paper, giving you a reversed image of the Boho Circle. 

Layers of ink - Shimmering Butterfly Tag Tutorial by Anna-Karin Evaldsson.

I added texture by dropping a few drops of water on the tag.

Layers of ink - Shimmering Butterfly Tag Tutorial by Anna-Karin Evaldsson. Stamp with Simon Says Stamp Crackle Background.

Stamp here and there with the Simon Says Stamp Crackle Background stamp and Vintage Photo ink. 

Layers of ink - Shimmering Butterfly Tag Tutorial by Anna-Karin Evaldsson.

Apply glue around the edges and wait a short while, so that it starts to dry, but is still tacky. Rub gold foil over the glue, with the shiny side up.

Layers of ink - Shimmering Butterfly Tag Tutorial by Anna-Karin Evaldsson.

Stamp butterflies from Simon Says Stamp Beautiful Butterflies on Wendy Vecchi Clearly For Art Modeling Film.

Layers of ink - Shimmering Butterfly Tag Tutorial by Anna-Karin Evaldsson.

Cut them out and turn them around. Apply Valencia and Gold Mixative alcohol ink to the back.

Layers of ink - Shimmering Butterfly Tag Tutorial by Anna-Karin Evaldsson.

Use a heat tool and carefully heat the butterfly, one side at a time. Shape the wings. You can reheat if you are not happy with the look. Modeling Film will hold its shape perfectly when cool. Staple to the background.

Layers of ink - Shimmering Butterfly Tag Tutorial by Anna-Karin Evaldsson.

I stamped words from Simon Says Stamp Forest Scenery and All Seasons Tree on the background with Dark Chocolate ink.

Layers of ink - Shimmering Butterfly Tag Tutorial by Anna-Karin Evaldsson.

Here you can see the resist effect better. I also stitched a little on the background.

Layers of ink - Shimmering Butterfly Tag Tutorial by Anna-Karin Evaldsson.

The Detailed Leaf Cluster was die cut from Memory Box Frosted Glitter paper and I also added some copper sequins.

Layers of ink - Shimmering Butterfly Tag Tutorial by Anna-Karin Evaldsson.

The main sentiment comes from Forest Scenery and was stamped with Dark Chocolate ink.

Layers of ink - Shimmering Butterfly Tag Tutorial by Anna-Karin Evaldsson.

The combination of the very shiny gold foil, glitter paper, metallic alcohol ink under the butterfly and the warm shades makes for an interesting looking tag.


Thank you so much for taking the time to stop by here today! 

Happy crafting!

Anna-Karin

Supplies:

* Please note: the links are affiliate links, for which I receive a small percentage of sales generated by the link, at no extra cost to you.

Monday, January 11, 2021

Forest Shaker Card Tutorial

Hi friends! I hope you are well and that you had a good weekend. We got quite a bit of snow and the boys are happy. Today I have a shaker card to share with you.


We have a Shake It Up theme at the Simon Says Stamp Monday Challenge Blog this week. I am looking forward to seeing all the projects. Don't miss the fun shaker project by January guest designer Anita Rao


Layers of ink - Forest Shaker Card Tutorial by Anna-Karin Evaldsson.

One of the first cards that I made was a shaker card and I still love making them. This  week, I made a forest themed shaker. By changing the colors you can easily change it into a winter scene instead, but I felt like using shades of green today. Shaker cards are such fun and will always bring a smile to the recipient. 

Layers of ink - Forest Shaker Card Tutorial by Anna-Karin Evaldsson. Die cut the pine tree collage.


Layers of ink - Forest Shaker Card Tutorial by Anna-Karin Evaldsson.

Ink the paper with Distress Inks using an ink-blending tool.

Layers of ink - Forest Shaker Card Tutorial by Anna-Karin Evaldsson.

Die cut six pine trees with the Poppy Stamp Evergreen Trio set and ink with Rustic Wilderness and Pine Needles.

Layers of ink - Forest Shaker Card Tutorial by Anna-Karin Evaldsson. Stamp with Simon Says Stamp Old Letter Background.

Stamp the background with the SSS Old Letter Background stamp and Green Leaf ink. This gives a nice texture to the background.

Layers of ink - Forest Shaker Card Tutorial by Anna-Karin Evaldsson. Fill the shaker.

Create a shaker with two layers of Clearly For Art Modeling film and foam tape and fill it with sequins and some mica flakes

Layers of ink - Forest Shaker Card Tutorial by Anna-Karin Evaldsson.

The main sentiment is a Theories Quote Chip which was inked with Rustic Wilderness and coated with a layer of Glossy Accents.

Layers of ink - Forest Shaker Card Tutorial by Anna-Karin Evaldsson.

The second sentiment was stamped with one of the stamps from Anna's Flowers and the Green Leaf ink.

Layers of ink - Forest Shaker Card Tutorial by Anna-Karin Evaldsson.

I also used two butterflies from Tim Holtz Field Notes Snippets.

Layers of ink - Forest Shaker Card Tutorial by Anna-Karin Evaldsson. Tim Holtz Field Notes ephemera.

The shaker was backed with a paper from Tim's Field Notes Ephemera pack, which had wood themed illustrations.

Layers of ink - Forest Shaker Card Tutorial by Anna-Karin Evaldsson.

I like the combination of Rustic Wilderness and Pine Tree Distress Ink. Mount two of the trees with foam tape.

Layers of ink - Forest Shaker Card Tutorial by Anna-Karin Evaldsson.

Shaker cards are a little hard to photograph because of all the moving and shiny parts. There are a couple of snowflake sequins in the mix, but they might also be flowers.

Layers of ink - Forest Shaker Card Tutorial by Anna-Karin Evaldsson.

I like adding mica flakes to shakers and since they are usually smaller than sequins, they mix well together.

Layers of ink - Forest Shaker Card Tutorial by Anna-Karin Evaldsson.


I hope you will join us this week in our Shake It Up challenge. You have a chance to win a $25 gift voucher to do some fun shopping at Simon Says Stamp. You have until Monday 8am Ohio time. 1pm UK time, 2 pm CET to join in.

Don't forget to follow Simon Says Stamp on Instagram, they post great stuff daily. 


Do you use Instagram? If so please add #sssmchallenge so we can see your entries there too.


Thank you so much for taking the time to stop by here today! 

Happy crafting!

Anna-Karin

Supplies:

* Please note: the links are affiliate links, for which I receive a small percentage of sales generated by the link, at no extra cost to you.